Ali ibn Muhammad: Difference between revisions
imported>Darman36 |
imported>Gener4l Cl4ank4 No edit summary |
||
| Line 15: | Line 15: | ||
==Biography== | ==Biography== | ||
===Early life=== | ===Early life=== | ||
Originally a high-ranking dignitary in the Abbasid court,<ref name="Ali DB">''[[Assassin's Creed: Mirage]]'' – [[Database: Ali ibn Muhammad]]</ref> Ali eventually became disillusioned with the Caliphate and believed that it was his destiny to liberate its enslaved population.<ref name="Rebels DB">''Assassin's Creed: Mirage'' – [[Database: Rebels]]</ref> His rebellion initially involved only the {{Wiki|Zanj}}, a {{Wiki|Bantu peoples|Bantu}} population from [[Africa|Southeast Africa]] who were brought into the Caliphate as slaves, but soon grew to include various [[Arabia|Arab]] tribes and slaves.<ref name="Wiki">{{WP|Zanj Rebellion}}</ref> | Originally a high-ranking dignitary in the Abbasid court,<ref name="Ali DB">''[[Assassin's Creed: Mirage]]'' – [[Database: Ali ibn Muhammad]]</ref> Ali eventually became disillusioned with the Caliphate and believed that it was his destiny to liberate its enslaved population.<ref name="Rebels DB">''[[Assassin's Creed: Mirage]]'' – [[Database: Rebels]]</ref> His rebellion initially involved only the {{Wiki|Zanj}}, a {{Wiki|Bantu peoples|Bantu}} population from [[Africa|Southeast Africa]] who were brought into the Caliphate as slaves, but soon grew to include various [[Arabia|Arab]] tribes and slaves.<ref name="Wiki">{{WP|Zanj Rebellion}}</ref> | ||
At some point prior to 861, Ali came into contact with the [[Assassins|Hidden Ones]] of [[Alamut]], who sought to remove the influence of their enemies, the [[Order of the Ancients]], over the Caliphate. As their goals were aligned, Ali and the Hidden Ones formed an alliance, albeit an uneasy one, as the former's methods often went against the brotherhood's [[The Creed|creed]].<ref name="Ali DB" /> | At some point prior to 861, Ali came into contact with the [[Assassins|Hidden Ones]] of [[Alamut]], who sought to remove the influence of their enemies, the [[Order of the Ancients]], over the Caliphate. As their goals were aligned, Ali and the Hidden Ones formed an alliance, albeit an uneasy one, as the former's methods often went against the brotherhood's [[The Creed|creed]].<ref name="Ali DB" /> | ||
| Line 21: | Line 21: | ||
===Working with the Hidden Ones=== | ===Working with the Hidden Ones=== | ||
{{Quote|Keep secrets if you must, but I need assurance that there is nothing amiss that might interfere with the rebel cause. {{Wiki|Allah}} has brought me as a light unto your path of shadows. Remember that.|Ali, in a letter to Rayhan, 862.|Assassin's Creed: Mirage|A New Beginning}} | {{Quote|Keep secrets if you must, but I need assurance that there is nothing amiss that might interfere with the rebel cause. {{Wiki|Allah}} has brought me as a light unto your path of shadows. Remember that.|Ali, in a letter to Rayhan, 862.|Assassin's Creed: Mirage|A New Beginning}} | ||
In late 861, Ali's men learned about a chest containing an [[Memory Seals|artifact]] sought by the Hidden Ones, which was to be delivered to the Caliph [[Al-Mutawakkil]]. The rebel leader relayed this information to [[Rayhan]], but after not hearing back from him, he sent the [[Mentor]] a letter asking for assurance that the artifact would pose no threat to the rebellion.<ref name="Letter">''Assassin's Creed: Mirage'' – [[Notes from Basim's travels]]: "Letter from Ali"</ref> | In late 861, Ali's men learned about a chest containing an [[Memory Seals|artifact]] sought by the Hidden Ones, which was to be delivered to the Caliph [[Al-Mutawakkil]]. The rebel leader relayed this information to [[Rayhan]], but after not hearing back from him, he sent the [[Mentor]] a letter asking for assurance that the artifact would pose no threat to the rebellion.<ref name="Letter">''[[Assassin's Creed: Mirage]]'' – [[Notes from Basim's travels]]: "Letter from Ali"</ref> | ||
In 862, after the Hidden Ones intercepted a group of [[Mercenary|mercenaries]] trying to find Alamut, they sent one of their agents, [[Nur]], to [[Baghdad]] to seek assistance from Ali and his rebels.<ref name="New Beginning">''Assassin's Creed: Mirage'' – [[A New Beginning]]</ref> Together, Ali and Nur investigated the perpetrators behind the would-be attack on Alamut, until the Order of the Ancients took notice of their activities and ordered their capture. While Nur barely managed to escape, Ali was captured along with his rebels at the [[Upper Harbor]].<ref name="Taking Flight">''Assassin's Creed: Mirage'' – [[Taking Flight]]</ref> | In 862, after the Hidden Ones intercepted a group of [[Mercenary|mercenaries]] trying to find Alamut, they sent one of their agents, [[Nur]], to [[Baghdad]] to seek assistance from Ali and his rebels.<ref name="New Beginning">''[[Assassin's Creed: Mirage]]'' – [[A New Beginning]]</ref> Together, Ali and Nur investigated the perpetrators behind the would-be attack on Alamut, until the Order of the Ancients took notice of their activities and ordered their capture. While Nur barely managed to escape, Ali was captured along with his rebels at the [[Upper Harbor]].<ref name="Taking Flight">''[[Assassin's Creed: Mirage]]'' – [[Taking Flight]]</ref> | ||
====Meeting Basim Ibn Ishaq==== | ====Meeting Basim Ibn Ishaq==== | ||
{{Dialogue2|Ali|I know your kind like to frolic in the dark but even the world's greatest thief would steer clear of this prison.|Basim|Ali, one day I will tell you all about my past. Then you will understand.|Such a tease.|Ali and Basim upon the former's rescue, 860s.|Assassin's Creed: Mirage|Jailbreak}} | {{Dialogue2|Ali|I know your kind like to frolic in the dark but even the world's greatest thief would steer clear of this prison.|Basim|Ali, one day I will tell you all about my past. Then you will understand.|Such a tease.|Ali and Basim upon the former's rescue, 860s.|Assassin's Creed: Mirage|Jailbreak}} | ||
[[File:ACMir Jailbreak 12.png|left|thumb|250px|Ali being freed by Basim]] | [[File:ACMir Jailbreak 12.png|left|thumb|250px|Ali being freed by Basim]] | ||
Following his capture, Ali was held for some time at the [[Khurasan Gate Guardhouse]]<ref name="Follow Nur's Lead">''Assassin's Creed: Mirage'' – [[Follow Nur's Lead]]</ref> before being moved to the [[Damascus Gate Prison]], the most secure prison in Baghdad.<ref name="Zeroing In">''Assassin's Creed: Mirage'' – [[Zeroing In]]</ref> It was here that he was eventually found and rescued by the Hidden One [[Basim Ibn Ishaq]], who infiltrated the prison and killed the jailer torturing Ali. Basim introduced himself as a friend of Nur and declined to tell Ali about his past, insisting that they save the details for another time as they needed to find a way out of the prison.<ref name="Jailbreak">''Assassin's Creed: Mirage'' – [[Jailbreak]]</ref> | Following his capture, Ali was held for some time at the [[Khurasan Gate Guardhouse]]<ref name="Follow Nur's Lead">''[[Assassin's Creed: Mirage]]'' – [[Follow Nur's Lead]]</ref> before being moved to the [[Damascus Gate Prison]], the most secure prison in Baghdad.<ref name="Zeroing In">''[[Assassin's Creed: Mirage]]'' – [[Zeroing In]]</ref> It was here that he was eventually found and rescued by the Hidden One [[Basim Ibn Ishaq]], who infiltrated the prison and killed the jailer torturing Ali. Basim introduced himself as a friend of Nur and declined to tell Ali about his past, insisting that they save the details for another time as they needed to find a way out of the prison.<ref name="Jailbreak">''[[Assassin's Creed: Mirage]]'' – [[Jailbreak]]</ref> | ||
Suspecting that Basim was searching for [[Mas'ood Al-Ya'qoob|Al-Ghul]], the Ancient who had ordered his capture, Ali revealed that the prison's guards were serving Al-Ghul, supplying him with workers for his dig sites in the desert. He and Basim then headed to the guard quarters to search for a book containing information on the Ancient's activities, but were [[Social stealth|spotted]] by the soldiers. While Basim held back the guards, Ali found the book and escaped with it after being instructed by the Hidden One to head to a [[Water Mill|watermill]] north of Baghdad, where his mentor [[Roshan]] and Ali's rebels were waiting.<ref name="Jailbreak" /> | Suspecting that Basim was searching for [[Mas'ood Al-Ya'qoob|Al-Ghul]], the Ancient who had ordered his capture, Ali revealed that the prison's guards were serving Al-Ghul, supplying him with workers for his dig sites in the desert. He and Basim then headed to the guard quarters to search for a book containing information on the Ancient's activities, but were [[Social stealth|spotted]] by the soldiers. While Basim held back the guards, Ali found the book and escaped with it after being instructed by the Hidden One to head to a [[Water Mill|watermill]] north of Baghdad, where his mentor [[Roshan]] and Ali's rebels were waiting.<ref name="Jailbreak" /> | ||
[[File:ACMir A Delicate Alliance 3.png|thumb|250px|Roshan, Basim and Ali discussing their leads on Al-Ghul's identity]] | [[File:ACMir A Delicate Alliance 3.png|thumb|250px|Roshan, Basim and Ali discussing their leads on Al-Ghul's identity]] | ||
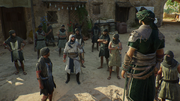
At the watermill, Ali addressed his men with a speech before seeing Basim arrive and recognizing his great aid to the rebel cause. Ali and Basim then went to meet with Roshan and discuss their leads on Al-Ghul's identity. Using information from the book recovered by Ali, they deduced the Ancient to be [[Mas'ood Al-Ya'qoob]], a [[Soap Boiler's District|soap mill]] owner who purchased migrant laborers for his dig sites.<ref name="Delicate Alliance">''Assassin's Creed: Mirage'' – [[A Delicate Alliance]]</ref> | At the watermill, Ali addressed his men with a speech before seeing Basim arrive and recognizing his great aid to the rebel cause. Ali and Basim then went to meet with Roshan and discuss their leads on Al-Ghul's identity. Using information from the book recovered by Ali, they deduced the Ancient to be [[Mas'ood Al-Ya'qoob]], a [[Soap Boiler's District|soap mill]] owner who purchased migrant laborers for his dig sites.<ref name="Delicate Alliance">''[[Assassin's Creed: Mirage]]'' – [[A Delicate Alliance]]</ref> | ||
Moments later, Ali's second-in-command | Moments later, Ali's second-in-command [[Beshi]] arrived injured, and Basim explained that he had been posing as a prisoner to spy on Mas'ood. Despite being caught, Beshi had managed to learn what Mas'ood looked like and that he was operating out of a [[Caravanserai, Baghdad|nearby caravanserai]]. Basim and Roshan subsequently left for the caravanserai in order to kill Mas'ood. Ali offered to come with them but Roshan declined his help, believing the rebel leader would turn the mission into a large spectacle.<ref name="Delicate Alliance" /> | ||
====Investigation in Jarjaraya==== | ====Investigation in Jarjaraya==== | ||
{{Dialogue|Basim|Ali, what is this? This is not what we agreed to.|Ali|I do what must be done. I do not need your approval.|Basim and Ali discussing the latter's methods, 860s.|Assassin's Creed: Mirage|The Hunter}} | {{Dialogue|Basim|Ali, what is this? This is not what we agreed to.|Ali|I do what must be done. I do not need your approval.|Basim and Ali discussing the latter's methods, 860s.|Assassin's Creed: Mirage|The Hunter}} | ||
[[File:ACV Blood and Shadows 2.png|left|thumb|250px|Ali talking to Basim and Fuladh]] | [[File:ACV Blood and Shadows 2.png|left|thumb|250px|Ali talking to Basim and Fuladh]] | ||
Following Mas'ood's death, the Order ramped up their efforts to crush Ali's rebellion and used the Caliphate's [[Turkic Army|Turkic mercenaries]] to capture and execute many of his men. A furious Ali traveled with Beshi to the Hidden One [[Assassin bureau|bureau]] in [[Sharqiyah]] to request aid from [[Fuladh Al Haami]], but the latter suspected that the Order were trying to lure out Ali and instructed him to lay low for the time being. When Basim arrived at the bureau, Fuladh told Ali that he could help solve the problem and the rebel leader agreed on the condition that he receive the credit.<ref name="Blood and Shadows">''Assassin's Creed: Mirage'' – [[Blood and Shadows]]</ref> | Following Mas'ood's death, the Order ramped up their efforts to crush Ali's rebellion and used the Caliphate's [[Turkic Army|Turkic mercenaries]] to capture and execute many of his men. A furious Ali traveled with Beshi to the Hidden One [[Assassin bureau|bureau]] in [[Sharqiyah]] to request aid from [[Fuladh Al Haami]], but the latter suspected that the Order were trying to lure out Ali and instructed him to lay low for the time being. When Basim arrived at the bureau, Fuladh told Ali that he could help solve the problem and the rebel leader agreed on the condition that he receive the credit.<ref name="Blood and Shadows">''[[Assassin's Creed: Mirage]]'' – [[Blood and Shadows]]</ref> | ||
Meeting with Basim at the [[Sharqiyah Gate]], the two rode for [[Jarjaraya]], a town south of Baghdad where many | Meeting with Basim at the [[Sharqiyah Gate]], the two rode for [[Jarjaraya]], a town south of Baghdad where many Zanj rebels had gone missing. On the way there, they discussed the Hidden Ones and their personal views on freedom, with Ali asking Basim if he was bothered by having to obey his masters' every order. However, Basim disagreed with the notion that he was not free and believed that the Hidden Ones had helped him find his purpose after being nothing more than a street [[thief]] for most of his life.<ref name="The Hunter">''[[Assassin's Creed: Mirage]]'' – [[The Hunter]]</ref> | ||
[[File:ACMir The Hunter 12.png|thumb|250px|Ali interrogating the captive guard]] | [[File:ACMir The Hunter 12.png|thumb|250px|Ali interrogating the captive guard]] | ||
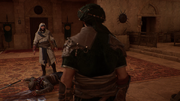
Upon reaching Jarjaraya, Ali and Basim split up to look for information on who was abducting the former's men. Ali captured a guard and took him to the local rebel hideout for [[interrogation]], despite Beshi's disapproval of his methods. After completing his own investigation, Basim arrived at the hideout and he too voiced his disagreement with the torture of the captive guard, but Ali defended his actions as necessary and claimed that he did not need anyone's approval.<ref name="The Hunter" /> | Upon reaching Jarjaraya, Ali and Basim split up to look for information on who was abducting the former's men. Ali captured a guard and took him to the local rebel hideout for [[interrogation]], despite Beshi's disapproval of his methods. After completing his own investigation, Basim arrived at the hideout and he too voiced his disagreement with the torture of the captive guard, but Ali defended his actions as necessary and claimed that he did not need anyone's approval.<ref name="The Hunter" /> | ||
After Basim left to investigate a contact that the captive guard was set to meet, Ali continued his interrogation, eventually killing the guard once he revealed everything he knew. When Basim returned to the hideout, he angrily confronted Ali over his actions and claimed that Beshi, who had since left to rendezvous with other rebels, would disagree with this unnecessary murder. However, Ali | After Basim left to investigate a contact that the captive guard was set to meet, Ali continued his interrogation, eventually killing the guard once he revealed everything he knew. When Basim returned to the hideout, he angrily confronted Ali over his actions and claimed that Beshi, who had since left to rendezvous with other rebels, would disagree with this unnecessary murder. However, Ali insisted that this was the "price of war" and reminded Basim that Beshi was not the leader of the rebellion.<ref name="The Hunter" /> | ||
[[File:ACMir The Hunter 25.png|left|thumb|250px|Ali, Basim and the rebels attacking Dogan's villa]] | [[File:ACMir The Hunter 25.png|left|thumb|250px|Ali, Basim and the rebels attacking Dogan's villa]] | ||
Changing the subject, Ali asked Basim to rescue some of his captive men who were being held at a nearby farmhouse. Once the Hidden One had done so, Ali rallied the rebels with a speech before they attacked the villa of [[Dogan bin Arslan]], the Turkic captain responsible for the capture and execution of the rebels. Following Dogan's death, Basim returned to Baghdad to investigate an Order meeting that the captain was expected to attend, leaving Ali in Jarjaraya to await Beshi's return.<ref name="The Hunter" /> | Changing the subject, Ali asked Basim to rescue some of his captive men who were being held at a nearby [[Dogan's Farm|farmhouse]]. Once the Hidden One had done so, Ali rallied the rebels with a speech before they attacked the villa of [[Dogan bin Arslan]], the Turkic captain responsible for the capture and execution of the rebels. Following Dogan's death, Basim returned to Baghdad to investigate an Order meeting that the captain was expected to attend, leaving Ali in Jarjaraya to await Beshi's return.<ref name="The Hunter" /> | ||
====Attack on the Great Garrison==== | ====Attack on the Great Garrison==== | ||
{{Quote|I would wish peace upon you both, but... we know that is not in your future. Nor mine.|Ali, prior to parting | {{Quote|I would wish peace upon you both, but... we know that is not in your future. Nor mine.|Ali, prior to parting ways with the Hidden Ones, 860s.|Assassin's Creed: Mirage|The Return (Mirage)}} | ||
After Beshi failed to show up, Ali concluded that he had been captured and returned to the [[Sharqiyah bureau]]. He was soon joined by Basim, who had [[Eavesdropping|eavesdropped]] on the meeting between the Order members and learned the alias of the Order leader in Sharqiyah: [[Wasif al-Turki|Al-Mardikhwar]]. After discussing his findings with Ali and Fuladh, Basim left to assassinate Al-Mardikhwar's subordinates, [[Nadir ibn Havid]] and [[Jasoor ibn Basil]], while Ali decided to search for Beshi.<ref name="The Hunt">''Assassin's Creed: Mirage'' – [[The Hunt]]</ref> | After Beshi failed to show up, Ali concluded that he had been captured and returned to the [[Sharqiyah bureau]]. He was soon joined by Basim, who had [[Eavesdropping|eavesdropped]] on the meeting between the Order members and learned the alias of the Order leader in Sharqiyah: [[Wasif al-Turki|Al-Mardikhwar]]. After discussing his findings with Ali and Fuladh, Basim left to assassinate Al-Mardikhwar's subordinates, [[Nadir ibn Havid]] and [[Jasoor ibn Basil]], while Ali decided to search for Beshi.<ref name="The Hunt">''[[Assassin's Creed: Mirage]]'' – [[The Hunt]]</ref> | ||
[[File:ACMir The Chase 1.png|thumb|250px|Basim, Ali and Fuladh discussing Wasif al-Turki]] | [[File:ACMir The Chase 1.png|thumb|250px|Basim, Ali and Fuladh discussing Wasif al-Turki]] | ||
Through his investigation, Ali discovered that Beshi and other rebels were being held prisoner in the [[The Great Garrison|Great Garrison]]. Returning to the Sharqiyah bureau, he again spoke to Basim and Fuladh, the former of whom had learned that Al-Mardikhwar was based at the garrison. After Fuladh deduced the Ancient's identity to be the Turkic warlord [[Wasif al-Turki]], Ali and Basim left for the garrison, | Through his investigation, Ali discovered that Beshi and other rebels were being held prisoner in the [[The Great Garrison|Great Garrison]]. Returning to the Sharqiyah bureau, he again spoke to Basim and Fuladh, the former of whom had learned that Al-Mardikhwar was based at the garrison. After Fuladh deduced the Ancient's identity to be the Turkic warlord [[Wasif al-Turki]], Ali and Basim left for the garrison, seeking to eliminate the warlord and to rescue the captive rebels.<ref name="The Chase">''[[Assassin's Creed: Mirage]]'' – [[The Chase (Mirage)|The Chase]]</ref> | ||
Near the garrison, the two observed a conversation between Wasif and Baghdad's governor [[Muhammad ibn Tahir]], who advised the warlord to control himself, only to be threatened by him in response. Ali then left to find Beshi and the other rebels, leaving Basim to find a way into the garrison and eliminate Wasif. Although Ali eventually managed to locate Beshi, he arrived too late, as his second-in-command had been executed by Wasif.<ref name="Den of the Beast">''Assassin's Creed: Mirage'' – [[Den of the Beast]]</ref> | Near the garrison, the two observed a conversation between Wasif and Baghdad's governor [[Muhammad ibn Tahir]], who advised the warlord to control himself, only to be threatened by him in response. Ali then left to find Beshi and the other rebels, leaving Basim to find a way into the garrison and eliminate Wasif. Although Ali eventually managed to locate Beshi, he arrived too late, as his second-in-command had been executed by Wasif.<ref name="Den of the Beast">''[[Assassin's Creed: Mirage]]'' – [[Den of the Beast]]</ref> | ||
[[File:ACMir Den of the Beast 26.png|left|thumb|250px|Ali rallying his men to fight Wasif's guards]] | [[File:ACMir Den of the Beast 26.png|left|thumb|250px|Ali rallying his men to fight Wasif's guards]] | ||
After defeating the warlord's guards with Basim's help, Ali instructed the Hidden One to free his captive men. Once Basim had done so, Ali informed him of a signal brazier which, once lit, would lure out Wasif's remaining guards, creating the perfect distraction for the Hidden One to assassinate the warlord. Basim did as he was told and, while Ali and his rebels battled the guards, he infiltrated Wasif's office and killed him.<ref name="Den of the Beast" /> | After defeating the warlord's guards with Basim's help, Ali instructed the Hidden One to free his captive men. Once Basim had done so, Ali informed him of a signal brazier which, once lit, would lure out Wasif's remaining guards, creating the perfect distraction for the Hidden One to assassinate the warlord. Basim did as he was told and, while Ali and his rebels battled the guards, he infiltrated Wasif's office and killed him.<ref name="Den of the Beast" /> | ||
As Ali walked into the room moments later, he saw Basim standing next to Wasif's corpse and impaled the body with his sword, to make it appear like he had killed the warlord and keep the Hidden Ones' involvement secret.<ref name="Den of the Beast" /> He and his rebels, accompanied by Basim, then fought their way out of the garrison until losing their pursuers in an alley. There, Ali told Basim | As Ali walked into the room moments later, he saw Basim standing next to Wasif's corpse and impaled the body with his sword, to make it appear like he had killed the warlord and keep the Hidden Ones' involvement secret.<ref name="Den of the Beast" /> He and his rebels, accompanied by Basim, then fought their way out of the garrison until losing their pursuers in an alley. There, Ali told Basim to meet him back at the Sharqiyah bureau and the two parted ways.<ref name="The Return">''[[Assassin's Creed: Mirage]]'' – [[The Return (Mirage)|The Return]]</ref> | ||
[[File:ACMir The Return 6.png|thumb|250px|Ali parting ways with the Hidden Ones]] | [[File:ACMir The Return 6.png|thumb|250px|Ali parting ways with the Hidden Ones]] | ||
| Line 70: | Line 70: | ||
===Later activities=== | ===Later activities=== | ||
Sometime following these events, Ali decided to organize an attack on the [[Palace of the Green Dome|Caliphal Palace]], believing it to be the perfect moment to strike due to the people of the Caliphate being divided over the [[Al-Musta'in|current caliph]]'s claim to the throne. Basim was made aware of this during a meeting with Roshan,<ref name="Head of the Snake">''Assassin's Creed: Mirage'' – [[The Head of the Snake]]</ref> and later took advantage of the assault to infiltrate the palace and find the royal concubine [[Qabiha]], who was the [[Ra's Al-Af'a]] of the Order of the Ancients in Baghdad.<ref name="Serpent's Nest">''Assassin's Creed: Mirage'' – [[The Serpent's Nest]]</ref> | Sometime following these events, Ali decided to organize an attack on the [[Palace of the Green Dome|Caliphal Palace]], believing it to be the perfect moment to strike due to the people of the Caliphate being divided over the [[Al-Musta'in|current caliph]]'s claim to the throne. Basim was made aware of this during a meeting with Roshan,<ref name="Head of the Snake">''[[Assassin's Creed: Mirage]]'' – [[The Head of the Snake]]</ref> and later took advantage of the assault to infiltrate the palace and find the royal concubine [[Qabiha]], who was the [[Ra's Al-Af'a]] of the Order of the Ancients in Baghdad.<ref name="Serpent's Nest">''[[Assassin's Creed: Mirage]]'' – [[The Serpent's Nest]]</ref> | ||
During this time, Ali maintained his alliance with the Hidden Ones, albeit in a less direct manner. Rather than working directly with the brotherhood, he assigned them several [[Assassination contract|assassination contracts]] on individuals who posed a threat to the Zanj rebellion, including a corrupt state official,<ref name="State Official">''Assassin's Creed: Mirage'' – [[The State Official]]</ref> a slave [[merchant]],<ref name="Slave Merchant">''Assassin's Creed: Mirage'' – [[The Slave Merchant]]</ref> and a slave trapper.<ref name="Slave Trapper">''Assassin's Creed: Mirage'' – [[The Slave Trapper]]</ref> He also tasked them to rescue an informant captured by the Caliphate guards.<ref name="Informant">''Assassin's Creed: Mirage'' – [[The Informant (Mirage)|The Informant]]</ref> All of these contracts would eventually be completed by Basim.<ref name="ACMir">''Assassin's Creed: Mirage''</ref> | During this time, Ali maintained his alliance with the Hidden Ones, albeit in a less direct manner. Rather than working directly with the brotherhood, he assigned them several [[Assassination contract|assassination contracts]] on individuals who posed a threat to the Zanj rebellion, including a corrupt state official,<ref name="State Official">''[[Assassin's Creed: Mirage]]'' – [[The State Official]]</ref> a slave [[merchant]],<ref name="Slave Merchant">''[[Assassin's Creed: Mirage]]'' – [[The Slave Merchant]]</ref> and a slave trapper.<ref name="Slave Trapper">''[[Assassin's Creed: Mirage]]'' – [[The Slave Trapper]]</ref> He also tasked them to rescue an informant captured by the Caliphate guards.<ref name="Informant">''[[Assassin's Creed: Mirage]]'' – [[The Informant (Mirage)|The Informant]]</ref> All of these contracts would eventually be completed by Basim.<ref name="ACMir">''[[Assassin's Creed: Mirage]]''</ref> | ||
==Personality and traits== | ==Personality and traits== | ||
{{Dialogue2|Ali|I do not follow your creed, nor do I answer to the Hidden Ones. This is the price of war.|Basim|Beshi would disagree...|Beshi does not lead this rebellion! He does his part, and I do mine.|Ali arguing with Basim over his methods, 860s.|Assassin's Creed: Mirage|The Hunter}} | {{Dialogue2|Ali|I do not follow your creed, nor do I answer to the Hidden Ones. This is the price of war.|Basim|Beshi would disagree...|Beshi does not lead this rebellion! He does his part, and I do mine.|Ali arguing with Basim over his methods, 860s.|Assassin's Creed: Mirage|The Hunter}} | ||
[[File:ACMir The Hunter 13.png|left|thumb|250px|Ali defending his actions to Basim and Beshi]] | [[File:ACMir The Hunter 13.png|left|thumb|250px|Ali defending his actions to Basim and Beshi]] | ||
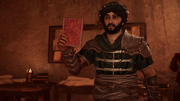
Ali was an arrogant man who believed himself a hero of prophecy, sent by Allah himself to liberate the Caliphate's enslaved population.<ref name="Ali DB" /> He did not care how he achieved this goal and, as a result his methods were often very brutal, such as torturing a captive guard for information and killing him afterwards.<ref name="The Hunter" /> He also tended to make very public displays out of his victories, hoping to rally more people to his cause.<ref name="Delicate Alliance" /> | Ali was an arrogant man who believed himself a hero of prophecy, sent by Allah himself to liberate the Caliphate's enslaved population.<ref name="Ali DB" /> He did not care how he achieved this goal and, as a result, his methods were often very brutal, such as torturing a captive guard for information and killing him afterwards.<ref name="The Hunter" /> He also tended to make very public displays out of his victories, hoping to rally more people to his cause.<ref name="Delicate Alliance" /> Consequently, he often came into conflict with his second-in-command Beshi and his Hidden One allies, who disagreed with his methods.<ref name="The Hunter" /> | ||
Ali paid little mind to any criticism directed at his actions, which he justified as being the "price of war". Adding to this, he believed that the freedom he was fighting for required people to answer to no one but themselves, unlike the Hidden Ones, who considered the existence of certain societal rules necessary to prevent humanity from descending into chaos.<ref name="The Hunter" /> | Ali paid little mind to any criticism directed at his actions, which he justified as being the "price of war". Adding to this, he believed that the freedom he was fighting for required people to answer to no one but themselves, unlike the Hidden Ones, who considered the existence of certain societal rules necessary to prevent humanity from descending into chaos.<ref name="The Hunter" /> As a result, many Hidden Ones felt uneasy about working with Ali, most notably Roshan, who described him as a "dangerous and delusional fool."<ref name="New Beginning" /> | ||
That being said, Ali was not without his qualities, as he proved multiple times to be a charismatic leader who commanded complete loyalty from his men. Before or after each battle, he would typically rally them with a speech to re-assure them about the cause they were fighting for, which caused many rebels to look up to him.<ref name="Delicate Alliance" /><ref name="The Hunter" /><ref name="The Return" /> Despite their methods being at odds, he also maintained his alliance with the Hidden Ones and was willing to compromise with them to achieve their mutual goals.<ref name="Delicate Alliance" /> | That being said, Ali was not without his qualities, as he proved multiple times to be a charismatic leader who commanded complete loyalty from his men. Before or after each battle, he would typically rally them with a speech to re-assure them about the cause they were fighting for, which caused many rebels to look up to him.<ref name="Delicate Alliance" /><ref name="The Hunter" /><ref name="The Return" /> Despite their methods being at odds, he also maintained his alliance with the Hidden Ones and was willing to compromise with them to achieve their mutual goals.<ref name="Delicate Alliance" /> | ||
| Line 89: | Line 89: | ||
<gallery widths="180" position="center" captionalign="center"> | <gallery widths="180" position="center" captionalign="center"> | ||
ACMirage Ali ibn Muhammad Promotional Image 2.jpg|Promotional image of Ali | ACMirage Ali ibn Muhammad Promotional Image 2.jpg|Promotional image of Ali | ||
ACMirage DB Ali ibn Muhammad.png|Database image of Ali | |||
ACMir Jailbreak 16.png|Ali obtaining the book with information on Al-Ghul | ACMir Jailbreak 16.png|Ali obtaining the book with information on Al-Ghul | ||
ACMir A Delicate Alliance 1.png|Ali praising Basim in front of his rebels | ACMir A Delicate Alliance 1.png|Ali praising Basim in front of his rebels | ||
ACMir A Delicate Alliance 5.png|Roshan declining Ali's help to eliminate Mas'ood | ACMir A Delicate Alliance 5.png|Roshan declining Ali's help to eliminate Mas'ood | ||
ACMir The Hunter 23.png|Ali talking to Basim prior to the attack on Dogan's villa | ACMir The Hunter 23.png|Ali talking to Basim prior to the attack on Dogan's villa | ||
ACMir Den of the Beast 1.png|Ali and Basim spying on Wasif and Governor Muhammad | ACMir Den of the Beast 1.png|Ali and Basim spying on Wasif and Governor Muhammad | ||
| Line 105: | Line 105: | ||
==References== | ==References== | ||
{{Reflist}} | {{Scroll box|content={{Reflist}}}} | ||
{{Assassins nav}} | {{Assassins nav}} | ||
{{ACMir}} | {{ACMir}} | ||
Revision as of 19:02, 17 January 2025
Ali ibn Muhammad (Persian: علی بن محمد; died 883) also known as Sahib al-Zanj (Persian: صاحب الزنج; English: Leader of the Zanj), was a former Abbasid official and the leader of the Zanj Rebellion during the late 9th century. Though an ally to the Hidden Ones, he did not respect their creed, believing that true freedom had no constraints.[2]
Biography
Early life
Originally a high-ranking dignitary in the Abbasid court,[3] Ali eventually became disillusioned with the Caliphate and believed that it was his destiny to liberate its enslaved population.[4] His rebellion initially involved only the Zanj, a Bantu population from Southeast Africa who were brought into the Caliphate as slaves, but soon grew to include various Arab tribes and slaves.[5]
At some point prior to 861, Ali came into contact with the Hidden Ones of Alamut, who sought to remove the influence of their enemies, the Order of the Ancients, over the Caliphate. As their goals were aligned, Ali and the Hidden Ones formed an alliance, albeit an uneasy one, as the former's methods often went against the brotherhood's creed.[3]
Working with the Hidden Ones
In late 861, Ali's men learned about a chest containing an artifact sought by the Hidden Ones, which was to be delivered to the Caliph Al-Mutawakkil. The rebel leader relayed this information to Rayhan, but after not hearing back from him, he sent the Mentor a letter asking for assurance that the artifact would pose no threat to the rebellion.[6]
In 862, after the Hidden Ones intercepted a group of mercenaries trying to find Alamut, they sent one of their agents, Nur, to Baghdad to seek assistance from Ali and his rebels.[7] Together, Ali and Nur investigated the perpetrators behind the would-be attack on Alamut, until the Order of the Ancients took notice of their activities and ordered their capture. While Nur barely managed to escape, Ali was captured along with his rebels at the Upper Harbor.[8]
Meeting Basim Ibn Ishaq

Following his capture, Ali was held for some time at the Khurasan Gate Guardhouse[9] before being moved to the Damascus Gate Prison, the most secure prison in Baghdad.[10] It was here that he was eventually found and rescued by the Hidden One Basim Ibn Ishaq, who infiltrated the prison and killed the jailer torturing Ali. Basim introduced himself as a friend of Nur and declined to tell Ali about his past, insisting that they save the details for another time as they needed to find a way out of the prison.[11]
Suspecting that Basim was searching for Al-Ghul, the Ancient who had ordered his capture, Ali revealed that the prison's guards were serving Al-Ghul, supplying him with workers for his dig sites in the desert. He and Basim then headed to the guard quarters to search for a book containing information on the Ancient's activities, but were spotted by the soldiers. While Basim held back the guards, Ali found the book and escaped with it after being instructed by the Hidden One to head to a watermill north of Baghdad, where his mentor Roshan and Ali's rebels were waiting.[11]

At the watermill, Ali addressed his men with a speech before seeing Basim arrive and recognizing his great aid to the rebel cause. Ali and Basim then went to meet with Roshan and discuss their leads on Al-Ghul's identity. Using information from the book recovered by Ali, they deduced the Ancient to be Mas'ood Al-Ya'qoob, a soap mill owner who purchased migrant laborers for his dig sites.[12]
Moments later, Ali's second-in-command Beshi arrived injured, and Basim explained that he had been posing as a prisoner to spy on Mas'ood. Despite being caught, Beshi had managed to learn what Mas'ood looked like and that he was operating out of a nearby caravanserai. Basim and Roshan subsequently left for the caravanserai in order to kill Mas'ood. Ali offered to come with them but Roshan declined his help, believing the rebel leader would turn the mission into a large spectacle.[12]
Investigation in Jarjaraya

Following Mas'ood's death, the Order ramped up their efforts to crush Ali's rebellion and used the Caliphate's Turkic mercenaries to capture and execute many of his men. A furious Ali traveled with Beshi to the Hidden One bureau in Sharqiyah to request aid from Fuladh Al Haami, but the latter suspected that the Order were trying to lure out Ali and instructed him to lay low for the time being. When Basim arrived at the bureau, Fuladh told Ali that he could help solve the problem and the rebel leader agreed on the condition that he receive the credit.[13]
Meeting with Basim at the Sharqiyah Gate, the two rode for Jarjaraya, a town south of Baghdad where many Zanj rebels had gone missing. On the way there, they discussed the Hidden Ones and their personal views on freedom, with Ali asking Basim if he was bothered by having to obey his masters' every order. However, Basim disagreed with the notion that he was not free and believed that the Hidden Ones had helped him find his purpose after being nothing more than a street thief for most of his life.[14]

Upon reaching Jarjaraya, Ali and Basim split up to look for information on who was abducting the former's men. Ali captured a guard and took him to the local rebel hideout for interrogation, despite Beshi's disapproval of his methods. After completing his own investigation, Basim arrived at the hideout and he too voiced his disagreement with the torture of the captive guard, but Ali defended his actions as necessary and claimed that he did not need anyone's approval.[14]
After Basim left to investigate a contact that the captive guard was set to meet, Ali continued his interrogation, eventually killing the guard once he revealed everything he knew. When Basim returned to the hideout, he angrily confronted Ali over his actions and claimed that Beshi, who had since left to rendezvous with other rebels, would disagree with this unnecessary murder. However, Ali insisted that this was the "price of war" and reminded Basim that Beshi was not the leader of the rebellion.[14]

Changing the subject, Ali asked Basim to rescue some of his captive men who were being held at a nearby farmhouse. Once the Hidden One had done so, Ali rallied the rebels with a speech before they attacked the villa of Dogan bin Arslan, the Turkic captain responsible for the capture and execution of the rebels. Following Dogan's death, Basim returned to Baghdad to investigate an Order meeting that the captain was expected to attend, leaving Ali in Jarjaraya to await Beshi's return.[14]
Attack on the Great Garrison
After Beshi failed to show up, Ali concluded that he had been captured and returned to the Sharqiyah bureau. He was soon joined by Basim, who had eavesdropped on the meeting between the Order members and learned the alias of the Order leader in Sharqiyah: Al-Mardikhwar. After discussing his findings with Ali and Fuladh, Basim left to assassinate Al-Mardikhwar's subordinates, Nadir ibn Havid and Jasoor ibn Basil, while Ali decided to search for Beshi.[15]

Through his investigation, Ali discovered that Beshi and other rebels were being held prisoner in the Great Garrison. Returning to the Sharqiyah bureau, he again spoke to Basim and Fuladh, the former of whom had learned that Al-Mardikhwar was based at the garrison. After Fuladh deduced the Ancient's identity to be the Turkic warlord Wasif al-Turki, Ali and Basim left for the garrison, seeking to eliminate the warlord and to rescue the captive rebels.[16]
Near the garrison, the two observed a conversation between Wasif and Baghdad's governor Muhammad ibn Tahir, who advised the warlord to control himself, only to be threatened by him in response. Ali then left to find Beshi and the other rebels, leaving Basim to find a way into the garrison and eliminate Wasif. Although Ali eventually managed to locate Beshi, he arrived too late, as his second-in-command had been executed by Wasif.[17]

After defeating the warlord's guards with Basim's help, Ali instructed the Hidden One to free his captive men. Once Basim had done so, Ali informed him of a signal brazier which, once lit, would lure out Wasif's remaining guards, creating the perfect distraction for the Hidden One to assassinate the warlord. Basim did as he was told and, while Ali and his rebels battled the guards, he infiltrated Wasif's office and killed him.[17]
As Ali walked into the room moments later, he saw Basim standing next to Wasif's corpse and impaled the body with his sword, to make it appear like he had killed the warlord and keep the Hidden Ones' involvement secret.[17] He and his rebels, accompanied by Basim, then fought their way out of the garrison until losing their pursuers in an alley. There, Ali told Basim to meet him back at the Sharqiyah bureau and the two parted ways.[18]

At the bureau, Ali thanked the Hidden Ones for their assistance before Basim expressed remorse over their failure to save Beshi. The rebel leader claimed that Beshi's story was already being told throughout Baghdad, making him more free in death than he had been in life, and that freedom had a price, which Beshi had been more than willing to pay. He then wished the Hidden Ones good luck in their endeavors and left to continue leading his rebellion.[18]
Later activities
Sometime following these events, Ali decided to organize an attack on the Caliphal Palace, believing it to be the perfect moment to strike due to the people of the Caliphate being divided over the current caliph's claim to the throne. Basim was made aware of this during a meeting with Roshan,[19] and later took advantage of the assault to infiltrate the palace and find the royal concubine Qabiha, who was the Ra's Al-Af'a of the Order of the Ancients in Baghdad.[20]
During this time, Ali maintained his alliance with the Hidden Ones, albeit in a less direct manner. Rather than working directly with the brotherhood, he assigned them several assassination contracts on individuals who posed a threat to the Zanj rebellion, including a corrupt state official,[21] a slave merchant,[22] and a slave trapper.[23] He also tasked them to rescue an informant captured by the Caliphate guards.[24] All of these contracts would eventually be completed by Basim.[25]
Personality and traits

Ali was an arrogant man who believed himself a hero of prophecy, sent by Allah himself to liberate the Caliphate's enslaved population.[3] He did not care how he achieved this goal and, as a result, his methods were often very brutal, such as torturing a captive guard for information and killing him afterwards.[14] He also tended to make very public displays out of his victories, hoping to rally more people to his cause.[12] Consequently, he often came into conflict with his second-in-command Beshi and his Hidden One allies, who disagreed with his methods.[14]
Ali paid little mind to any criticism directed at his actions, which he justified as being the "price of war". Adding to this, he believed that the freedom he was fighting for required people to answer to no one but themselves, unlike the Hidden Ones, who considered the existence of certain societal rules necessary to prevent humanity from descending into chaos.[14] As a result, many Hidden Ones felt uneasy about working with Ali, most notably Roshan, who described him as a "dangerous and delusional fool."[7]
That being said, Ali was not without his qualities, as he proved multiple times to be a charismatic leader who commanded complete loyalty from his men. Before or after each battle, he would typically rally them with a speech to re-assure them about the cause they were fighting for, which caused many rebels to look up to him.[12][14][18] Despite their methods being at odds, he also maintained his alliance with the Hidden Ones and was willing to compromise with them to achieve their mutual goals.[12]
Behind the scenes
Ali ibn Muhammad is a historical character introduced in the 2023 video game Assassin's Creed: Mirage, where he is voiced by the Egyptian actor Aladeen Tawfeek. His inclusion in Mirage was first revealed in an Arabhardware interview with Lead Producer Fabian Salomon,[26] and was later officially confirmed by Narrative Director Sarah Beaulieu.[27]
Gallery
-
 Promotional image of Ali
 -
 Database image of Ali
 -
 Ali obtaining the book with information on Al-Ghul
 -
 Ali praising Basim in front of his rebels
 -
 Roshan declining Ali's help to eliminate Mas'ood
 -
 Ali talking to Basim prior to the attack on Dogan's villa
 -
 Ali and Basim spying on Wasif and Governor Muhammad
 -
 Ali discovering the aftermath of Basim's assassination of Wasif
 -
 Ali telling Basim to meet him at the Sharqiyah bureau


Appearances
- Assassin's Creed: Mirage (first appearance)
- Echoes of History (mentioned only)
- Assassin's Creed Roleplaying Game
References

| |||||||||||||||||||||||||||||||||||||