Battle of Bunker Hill: Difference between revisions
imported>IlMualim Quotes |
imported>IlMualim No edit summary |
||
| Line 1: | Line 1: | ||
{{Era|AC3}} | {{Era|AC3}} | ||
{{WP-REAL}} | {{WP-REAL}} | ||
{{Quote|So maintain vigilance. Conserve your ammo. Ensure a proper line of sight. And above all else, men, do not fire until you see the whites of their eyes.|Israel Putnam, | {{Quote|So maintain vigilance. Conserve your ammo. Ensure a proper line of sight. And above all else, men, do not fire until you see the whites of their eyes.|Israel Putnam, addressing his soldiers.|Assassin's Creed III}} | ||
{{Battle | {{Battle | ||
|name = Battle of Bunker Hill | |name = Battle of Bunker Hill | ||
| Line 18: | Line 18: | ||
|commanders1 = *[[Israel Putnam]] | |commanders1 = *[[Israel Putnam]] | ||
*William Prescott | *William Prescott | ||
*Joseph | *Joseph Warren † | ||
*John Stark | *John Stark | ||
|commanders2 = [[British Army]]: | |commanders2 = [[British Army]]: | ||
| Line 24: | Line 24: | ||
*Sir Robert Pigot | *Sir Robert Pigot | ||
*James Abercombie | *James Abercombie | ||
*[[John Pitcairn]]† | *[[John Pitcairn]] † | ||
*Henry Clinton | *Henry Clinton | ||
Royal Navy: | Royal Navy: | ||
| Line 42: | Line 42: | ||
==Prelude== | ==Prelude== | ||
{{Quote|I don't care much for your excuses, gentlemen. We should be building on Bunker Hill. Breed's is closer to the city, but it is also closer to their artillery!|Putnam, explaining his reasoning to the other commanders.|Assassin's Creed III}} | {{Quote|I don't care much for your excuses, gentlemen. We should be building on Bunker Hill. Breed's is closer to the city, but it is also closer to their artillery!|Putnam, explaining his reasoning to the other commanders.|Assassin's Creed III}} | ||
During their march towards Boston, the [[Continental Army]] encamped on the hills near Charlestown, occupying Bunker Hill and Breed's Hill. Despite being ordered to fortify Bunker Hill, Prescott chose to fortify the latter. [[Israel Putnam]] opposed the decision, as Breed's Hill was closer to the British ships in the harbour, and easier to climb. | |||
As Putnam argued his case, British artillery began bombarding the position, and killed several Patriot soldiers. | As Putnam argued his case, British artillery began bombarding the position, and killed several Patriot soldiers. During the bombardment, the [[Assassin]] Connor arrived at Breed's Hill, advised by [[Samuel Adams]] to meet Putnam, in his quest to seek out John Pitcairn, who was leading the British troops. Despite Putnam's cynicism, Connor survived a dash through Charlestown under bombardment, swam out into the bay and sank two British ships to stop the barrage. | ||
Meanwhile, the British commander, William Howe, landed on Moulton's Hill, but chose to wait for reinforcements rather than attack, giving the Patriots time to prepare, and further fortify the hill. | Meanwhile, the British commander, William Howe, landed on Moulton's Hill, but chose to wait for reinforcements rather than attack, giving the Patriots time to prepare, and further fortify the hill. | ||
| Line 50: | Line 50: | ||
==Battle== | ==Battle== | ||
{{Quote|It seems we are well and truly at war... A pity, that. For it's a war we did not ask for. A war we did not wish... And why would we? We're killing our brothers down there - and for what? Duty? Honor? Liberty and justice as the Yanks claim? No.|John Pitcairn talking to his soldiers|Assassin's Creed III}} | {{Quote|It seems we are well and truly at war... A pity, that. For it's a war we did not ask for. A war we did not wish... And why would we? We're killing our brothers down there - and for what? Duty? Honor? Liberty and justice as the Yanks claim? No.|John Pitcairn talking to his soldiers|Assassin's Creed III}} | ||
After Howe launched the attack, he divided his forces, expecting a quick victory against the disorganised American forces. Connor returned to Breed's Hill as Putnam was delivering his famous "Do not fire until you see the whites of their eyes" speech to his troops, and soon sighted Pitcairn behind British lines, encamped on Moulton's Hill. Putnam suggested that Connor wait for the British lines to be thinned down, or to circle around the battlefield, but Connor chose to charge through the battlefield. | |||
By this time, the British had already attacked and retreated twice. | The British Army had the upper hand with better organization and discipline, keeping the [[Continental Army|Continental]] troops pinned down with volley fire. Small pockets of Patriot fighters hid behind cover and returned intermittent fire. The fighting forced Connor to cross the battlefield and infiltrate the British camp via a side path and cliff. From there, he assassinated Pitcairn, and returned to Putnam. | ||
By this time, the British had already attacked the American lines and retreated twice. However, more British reinforcements were arriving, and the Americans were quickly running out of ammunition. By the time Connor returned, the Patriots had lost a lot of men, and Putnam ordered a full retreat. | |||
==Aftermath== | ==Aftermath== | ||
Revision as of 01:23, 17 March 2013
- "So maintain vigilance. Conserve your ammo. Ensure a proper line of sight. And above all else, men, do not fire until you see the whites of their eyes."
- ―Israel Putnam, addressing his soldiers.[src]
The Battle of Bunker Hill, occasionally referred to as the Battle of Breed's Hill, was an event that took place on June 17, 1775, during the early stages of the American Revolutionary War. The battle is named after the adjacent Bunker Hill, which was peripherally involved in the battle and was the original objective of both colonial and British troops. It was during this battle that British major John Pitcairn was assassinated by Connor.
Prelude
- "I don't care much for your excuses, gentlemen. We should be building on Bunker Hill. Breed's is closer to the city, but it is also closer to their artillery!"
- ―Putnam, explaining his reasoning to the other commanders.[src]
During their march towards Boston, the Continental Army encamped on the hills near Charlestown, occupying Bunker Hill and Breed's Hill. Despite being ordered to fortify Bunker Hill, Prescott chose to fortify the latter. Israel Putnam opposed the decision, as Breed's Hill was closer to the British ships in the harbour, and easier to climb.
As Putnam argued his case, British artillery began bombarding the position, and killed several Patriot soldiers. During the bombardment, the Assassin Connor arrived at Breed's Hill, advised by Samuel Adams to meet Putnam, in his quest to seek out John Pitcairn, who was leading the British troops. Despite Putnam's cynicism, Connor survived a dash through Charlestown under bombardment, swam out into the bay and sank two British ships to stop the barrage.
Meanwhile, the British commander, William Howe, landed on Moulton's Hill, but chose to wait for reinforcements rather than attack, giving the Patriots time to prepare, and further fortify the hill.
Battle
- "It seems we are well and truly at war... A pity, that. For it's a war we did not ask for. A war we did not wish... And why would we? We're killing our brothers down there - and for what? Duty? Honor? Liberty and justice as the Yanks claim? No."
- ―John Pitcairn talking to his soldiers[src]
After Howe launched the attack, he divided his forces, expecting a quick victory against the disorganised American forces. Connor returned to Breed's Hill as Putnam was delivering his famous "Do not fire until you see the whites of their eyes" speech to his troops, and soon sighted Pitcairn behind British lines, encamped on Moulton's Hill. Putnam suggested that Connor wait for the British lines to be thinned down, or to circle around the battlefield, but Connor chose to charge through the battlefield.
The British Army had the upper hand with better organization and discipline, keeping the Continental troops pinned down with volley fire. Small pockets of Patriot fighters hid behind cover and returned intermittent fire. The fighting forced Connor to cross the battlefield and infiltrate the British camp via a side path and cliff. From there, he assassinated Pitcairn, and returned to Putnam.
By this time, the British had already attacked the American lines and retreated twice. However, more British reinforcements were arriving, and the Americans were quickly running out of ammunition. By the time Connor returned, the Patriots had lost a lot of men, and Putnam ordered a full retreat.
Aftermath
- " I'm ordering a full retreat. We have lost too many in exchange for too little."
- ―Putnam to Connor[src]
The battle resulted in heavy casualties for both sides. The Patriots withdrew from the battlefield to focus their efforts around Boston. Connor warned Putnam that there was a bigger threat, revealing a letter he retrieved from Pitcairn: a plot to assassinate George Washington.
The battle was a pyrrhic victory for the British. They suffered more than twice the casualties the Patriots did, and the battle served as a morale booster to the Patriots, proving that they could hold their own against the British.
Gallery
-
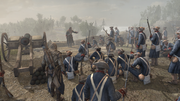
 Patriots shelled by British artillery.
 -
 Connor and Israel Putnam at Bunker Hill.
 -
 Putnam delivering his speech.
 -
 Connor observing Pitcairn's camp on Moulton Hill.
 -
 Connor moving across the battlefield.


Reference