Frederick Abberline: Difference between revisions
imported>VilkaTheWolf No edit summary |
imported>Darman36 |
||
| Line 43: | Line 43: | ||
With the aid of Jacob, Abberline remained the public face of the investigation whilst the Assassins followed their own path in stopping the Ripper. Soon, however, Jacob disappeared, and Abberline was forced to enlist the aid of Evie Frye, whom Jacob had already summoned from [[India]], in both stopping Jack, and potentially locating Jacob.<ref name="Autumn"/> | With the aid of Jacob, Abberline remained the public face of the investigation whilst the Assassins followed their own path in stopping the Ripper. Soon, however, Jacob disappeared, and Abberline was forced to enlist the aid of Evie Frye, whom Jacob had already summoned from [[India]], in both stopping Jack, and potentially locating Jacob.<ref name="Autumn"/> | ||
Upon her arrival, Abberline informed her of Jacob's disappearance, and that he had lodgings in Whitechapel near a [[brothel]], sending her there to find clues.<ref name="Autumn"/> Unfortunately, when Evie returned after having located and assassinated [[Olwyn Owers]], an associate of Jack, Abberline confronted her, showing a newspaper article of a massacre at [[Owers Manor|Owers' Manor]], implied to be Jack's handiwork, though evidence pointed to Evie. Stating that he was doing all he could to keep his men from outright arresting Evie, he told her she could find [[Arthur Weaversbrook]], the publisher of the newspaper article, near [[St. Paul's Cathedral|St. Paul's]].<ref>''Assassin's Creed: Syndicate'' – '' | Upon her arrival, Abberline informed her of Jacob's disappearance, and that he had lodgings in Whitechapel near a [[brothel]], sending her there to find clues.<ref name="Autumn"/> Unfortunately, when Evie returned after having located and assassinated [[Olwyn Owers]], an associate of Jack, Abberline confronted her, showing a newspaper article of a massacre at [[Owers Manor|Owers' Manor]], implied to be Jack's handiwork, though evidence pointed to Evie. Stating that he was doing all he could to keep his men from outright arresting Evie, he told her she could find [[Arthur Weaversbrook]], the publisher of the newspaper article, near [[St. Paul's Cathedral|St. Paul's]].<ref>''Assassin's Creed: Syndicate'' – ''Jack the Ripper'' – [[Letters of Intent]]</ref> | ||
Tensions between Abberline and Evie hit their breaking point, however, when [[Mary Kelly]]'s body turned up. Abberline had to forcibly prevent his men from arresting Evie, but then confronted her. He stated that he could no longer keep the Order's existence in London secret, and that either Evie bring him the Ripper's head, or she risked being accused of his crimes. Evie swore to bring him the Ripper, or die trying.<ref>''Assassin's Creed: Syndicate'' – '' | Tensions between Abberline and Evie hit their breaking point, however, when [[Mary Kelly]]'s body turned up. Abberline had to forcibly prevent his men from arresting Evie, but then confronted her. He stated that he could no longer keep the Order's existence in London secret, and that either Evie bring him the Ripper's head, or she risked being accused of his crimes. Evie swore to bring him the Ripper, or die trying.<ref>''Assassin's Creed: Syndicate'' – ''Jack the Ripper'' – [[The Mother of All Crimes]]</ref> | ||
Much later, Abberline entered [[Lambeth Asylum]], just after Evie managed to locate and kill Jack, where he found her and her brother in the undercroft. Evie begged Abberline to keep the secret of Jack's Assassin ties, and even his death, from the public. Abberline conceded to her request, however uneasy he felt.<ref>''Assassin's Creed: Syndicate'' – '' | Much later, Abberline entered [[Lambeth Asylum]], just after Evie managed to locate and kill Jack, where he found her and her brother in the undercroft. Evie begged Abberline to keep the secret of Jack's Assassin ties, and even his death, from the public. Abberline conceded to her request, however uneasy he felt.<ref>''Assassin's Creed: Syndicate'' – ''Jack the Ripper'' – [[Live by the Creed, Die by the Creed]]</ref> | ||
==Behind the scenes== | ==Behind the scenes== | ||
Revision as of 02:06, 25 December 2020
Frederick George Abberline (1843 – 1929) was the Chief Inspector for the London Metropolitan Police Service.
Biography
Early life in the Metropolitan Police
Formerly a clockmaker from Dorset, Frederick Abberline joined the Metropolitan Police in 1862.[1] Starting as a Police Constable, Abberline was called when a body was found in the construction of the first underground railway. Finding that the death was caused by a clean stab wound, he sent the body to Belle Isle for further inspection.[2]
Passing through the slums, he tried to avoid the curious street children who were trying to peek in the body. Eventually reaching the mortuary yard, he discovered that the corpse had been replaced by a body of a dead pony.[2]
With his embarrassing failure, his fellow officers started to call him nicknames and puns. Eventually, Abberline decided to return to Belle Isle and bribe the children to discover the thief's identity: a robed man wearing a cowl, undoubtedly an Assassin.[2]
After stroving for hard work, his efforts paid off with a promotion to Sergeant by 1865.[1]
Working with the Assassins

Trying to make a name for himself, Abberline enlisted the help of the Assassins Jacob and Evie Frye to help him arrest criminals who were part of the Templar-affiliated Blighters by 1868, paying the twins money to kidnap or kill the targets. However, Abberline preferred that the targets were brought back alive rather than dead.[3]
Sometime later, Abberline disguised himself as a banker named Dredge to gain information in the inner sanctum of the Templar Grand Master Crawford Starrick's financial sector. Abberline uncovered a plot to rob the Bank of England while undercover. However, he was accidentally kidnapped by Jacob who was investigating as well. Abberline revealed his disguise, informing Jacob of his discovery. The Assassin talked him into revealing confidential information of the supplier - Cockham Merchants.[4]
Abberline later aided Jacob further in their investigation, Jacob uncovering Plutus' identity as the banker and Templar Philip Twopenny as he provided information regarding the bank's possible access points. However, Jacob's assassination of Twopenny caused major turmoil in London's citizens and Abberline had to calm the rioters down.[5] He met with Evie who, once again, came to fix her brother's problems. She had to recover the currency printing plates, after Abberline informed her that Jacob was accused of stealing it. Abberline also requested to destroy counterfeit notes if Evie had the opportunity.[6]

After Maxwell Roth's assassination, Jacob asked Abberline about smuggling weapons inside Buckingham Palace, as the Frye twins needed to prevent Starrick from assassinating the leaders of London's church and state at the Queen's Ball. As only royal guards could carry weapons on site, the sergeant told him to acquire a royal guard's uniform and return a carriage Jacob evidently stole. Jacob gave the uniform to Abberline for his disguise, and they would meet on the roof of the palace for Jacob to acquire his and Evie's equipment.[7]
Later, at the ball, Abberline informed Jacob that Starrick's men had replaced the rooftop guards and had taken up sniping positions. Though Abberline was uncertain who the impostors were, Jacob assured him that he had the means of identifying them.[8]
The next morning, after Jacob, Evie, and Henry Green had assassinated Starrick, Abberline brought them to meet Queen Victoria, who knighted the trio into the Order of the Sacred Garter.[8]
Solving the Whitechapel murders
By 1873, Abberline had attained the rank of Inspector, and was transferred to Whitechapel.[1] Around this time, he became acquainted with American author Mark Twain and Pinkerton agent Tommy Greyling, who were in London pursuing an American Templar Alice who had stolen several Voynich manuscripts from the London Museum. Along with Evie and Henry, Abberline assisted the two with recovering the manuscripts from Alice but ultimately failed when the Templar was able to escape England and return to United States.[9]
In 1888, a British Assassin who would soon become known as "Jack the Ripper" usurped control of Jacob Frye's Rooks and committed a series of gruesome murders. These murders, coupled with the publishing of a number of letters, supposedly authored by Jack, in the local newspaper helped foster an atmosphere of fear within the city.[10]
With the aid of Jacob, Abberline remained the public face of the investigation whilst the Assassins followed their own path in stopping the Ripper. Soon, however, Jacob disappeared, and Abberline was forced to enlist the aid of Evie Frye, whom Jacob had already summoned from India, in both stopping Jack, and potentially locating Jacob.[10]
Upon her arrival, Abberline informed her of Jacob's disappearance, and that he had lodgings in Whitechapel near a brothel, sending her there to find clues.[10] Unfortunately, when Evie returned after having located and assassinated Olwyn Owers, an associate of Jack, Abberline confronted her, showing a newspaper article of a massacre at Owers' Manor, implied to be Jack's handiwork, though evidence pointed to Evie. Stating that he was doing all he could to keep his men from outright arresting Evie, he told her she could find Arthur Weaversbrook, the publisher of the newspaper article, near St. Paul's.[11]
Tensions between Abberline and Evie hit their breaking point, however, when Mary Kelly's body turned up. Abberline had to forcibly prevent his men from arresting Evie, but then confronted her. He stated that he could no longer keep the Order's existence in London secret, and that either Evie bring him the Ripper's head, or she risked being accused of his crimes. Evie swore to bring him the Ripper, or die trying.[12]
Much later, Abberline entered Lambeth Asylum, just after Evie managed to locate and kill Jack, where he found her and her brother in the undercroft. Evie begged Abberline to keep the secret of Jack's Assassin ties, and even his death, from the public. Abberline conceded to her request, however uneasy he felt.[13]
Behind the scenes
Frederick Abberline is a historical figure and a character introduced in Assassin's Creed: Syndicate where he is voiced by Samuel Crane.
Gallery
-
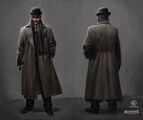
 Concept art of Abberline
 -
 Concept art of Abberline's appearance in the Jack the Ripper DLC
 -
 Promotional art of Abberline in the Jack the Ripper DLC
 -
 Abberline in 1888


Appearances
- Assassin's Creed: Syndicate (first appearance)
- Assassin's Creed: Underworld
- Assassin's Creed: Last Descendants – Locus
References
- ↑ 1.0 1.1 1.2 Assassin's Creed: Syndicate – Database: Frederick Abberline
- ↑ 2.0 2.1 2.2 Assassin's Creed: Underworld
- ↑ Assassin's Creed: Syndicate – Abberline, We Presume
- ↑ Assassin's Creed: Syndicate – A Case of Identity
- ↑ Assassin's Creed: Syndicate – A Bad Penny
- ↑ Assassin's Creed: Syndicate – Unbreaking the Bank
- ↑ Assassin's Creed: Syndicate – Dress to Impress
- ↑ 8.0 8.1 Assassin's Creed: Syndicate – A Night to Remember
- ↑ Assassin's Creed: Last Descendants – Locus
- ↑ 10.0 10.1 10.2 Assassin's Creed: Syndicate – Jack the Ripper – Autumn of Terror
- ↑ Assassin's Creed: Syndicate – Jack the Ripper – Letters of Intent
- ↑ Assassin's Creed: Syndicate – Jack the Ripper – The Mother of All Crimes
- ↑ Assassin's Creed: Syndicate – Jack the Ripper – Live by the Creed, Die by the Creed

| |||||||||||||||||||||||||
| |||||||||||||||||||||||||||||||||||||