Den Defense: Difference between revisions
imported>Odranoelluta No edit summary |
No edit summary |
||
| Line 1: | Line 1: | ||
{{Era|ACR}} | {{Era|ACR}} | ||
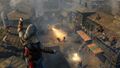
[[File:DenDefense2.jpg|thumb|300px|Ezio and several Assassins defend a den.]] | [[File:DenDefense2.jpg|thumb|300px|Ezio and several Assassins defend a den.]] | ||
Whenever the [[Byzantines|Byzantine]] [[Templars]] attacked an [[Assassin]] [[Assassin Dens|den]], the [[Italy|Italian]] [[Mentor]], [[Ezio Auditore da Firenze|Ezio Auditore]], would engage in a '''Den Defense''' to keep it under Assassin control. | |||
==The | ==The process== | ||
During a Den Defense, Ezio | During a Den Defense, Ezio had the ability to command and deploy Assassins units to defend the den from approaching Templar troops. Positioning themselves on rooftops and behind barricades, the Assassin forces would wait for the impending waves of Templars. | ||
Also, each Assassin had a combat speciality, ranging from [[Crossbowmen]] to bombers, and barricades could also be placed to halt Templar progression. In order to call in assistance, morale was used to deploy Assassins and build barricades, and was gained automatically over time and sometimes from looting Templar corpses. Occasionally, deployed Assassins could be killed and barricades destroyed, which would prompt Ezio to call in replacement troops and construct new blockades. | |||
He could also participate in the defense more directly, by firing his [[Hidden Gun|pistol]] at approaching soldiers, which would signal his troops to attack that squadron, or, periodically, command a cannon to be fired at a group of soldiers or a war machine. | |||
The Templars would attack in several waves, leaving little time between each for the Assassins to prepare. | The Templars would attack in several waves, leaving little time between each for the Assassins to prepare. From there, they would advance up the street, pausing only once encountering a barricade. On their death, Templar soldiers could be looted for Akce, bomb ingredients or morale points. However, once the soldiers reached the Assassin den, they would begin attacking it, and would not stop until they forced the Assassins out or were killed. | ||
===List of Assassin | ===List of Assassin units=== | ||
*Assassin Leader: Leaders wouldn't attack the Byzantine soldiers, but they were vital, as other Assassins weren't allowed onto the rooftops unless there was a leader there. Leaders would also increase Morale over time. | *Assassin Leader: Leaders wouldn't attack the Byzantine soldiers, but they were vital, as other Assassins weren't allowed onto the rooftops unless there was a leader there. Leaders would also increase Morale over time. | ||
*Barricade: Barricades would be placed in the streets to slow the Templars' progression to the Den. Assassins | *Barricade: Barricades would be placed in the streets to slow the Templars' progression to the Den. Assassins could be deployed to barricades to help defend them. Typically, one barricade would be placed in front of the Den, as a precaution at the start of the battle. | ||
**[[Greek Fire]] Barricade: A barricade mounting a flamethrower, with high damage and short range. | **[[Greek Fire]] Barricade: A barricade mounting a flamethrower, with high damage and short range. | ||
**[[Machine Gun]] Barricade: A barricade mounting a repeating gun with average range, low damage, and high rate of fire. | **[[Machine Gun]] Barricade: A barricade mounting a repeating gun with average range, low damage, and high rate of fire. | ||
**[[Cannon]] Barricade: A barricade mounting a small cannon with long range and high damage, but | **[[Cannon]] Barricade: A barricade mounting a small cannon with long range and high damage, but had a very low rate of fire. | ||
*Crossbowman: An Assassin wielding a [[Crossbow]]. | *Crossbowman: An Assassin wielding a [[Crossbow]]. Possessed a high rate of fire, but dealt relatively low damage. | ||
*Rifleman: An Assassin wielding a rifle. Dealt large amounts of damage, but had a | *Rifleman: An Assassin wielding a rifle. Dealt large amounts of damage, but had a lower rate of fire than Crossbowmen. | ||
*Air Assassin: An Assassin wielding a [[Hidden Blade]]. | *Air Assassin: An Assassin wielding a [[Hidden Blade]]. These would air assassinate Byzantine troops, though they couldn't attack again quickly, as they would have to climb back up to the rooftop. | ||
*Bruiser: An Assassin wielding a [[Swords and Maces|medium weapon]]. Highly adept at melee, but had no ranged capability. | *Bruiser: An Assassin wielding a [[Swords and Maces|medium weapon]]. Highly adept at melee, but had no ranged capability. | ||
*Caltrop Bomber: An Assassin wielding Caltrop Bombs. While not dealing much damage, they would slow down Templars caught in its effect. | *Caltrop Bomber: An Assassin wielding Caltrop Bombs. While not dealing much damage, they would slow down Templars caught in its effect. | ||
| Line 24: | Line 26: | ||
===List of Templar Units=== | ===List of Templar Units=== | ||
*Militia: Weak and poorly armored, their primary danger was in their numbers. | *Militia: Weak and poorly armored, their primary danger was in their numbers. | ||
*[[Almogavars]]: Well-armored brutes carrying [[heavy weapons]], they would move slowly, making them easy targets. | *[[Almogavars]]: Well-armored brutes carrying [[heavy weapons]], though they would move slowly, making them easy targets. | ||
*Riflemen: Equipped with a rifle, these Templars could return fire | *Riflemen: Equipped with a rifle, these Templars could return fire at rooftop Assassins, but had a low rate of fire and weak armor. | ||
*Bombmen: Slow and poorly armored, but were equipped with [[bombs]] that would make short work of barricades. | *Bombmen: Slow and poorly armored, but were equipped with [[bombs]] that would make short work of barricades. | ||
*Scouts: Poorly armored, but were fast and could climb over barricades. | *Scouts: Poorly armored, but were fast and could climb over barricades. | ||
*[[Stalkers]]: Highly dangerous in melee, they attacked Assassins on the rooftops instead of in the streets. | *[[Stalkers]]: Highly dangerous in melee, they attacked Assassins on the rooftops instead of in the streets. | ||
*[[War Machines (Den Defense)|War Machines]]: Heavily armored and slow, these were usually brought in at the very end of an assault. | *[[War Machines (Den Defense)|War Machines]]: Heavily armored and slow, these were usually brought in at the very end of an assault. | ||
**Ram: A heavily armored battering ram | **Ram: A heavily armored battering ram. It was limited to melee attacks, but dealt high amounts of damage. | ||
**[[Greek Fire]]: A heavily armored platform with a flamethrower mounted on it. | **[[Greek Fire]]: A heavily armored platform with a flamethrower mounted on it. It dealt large amounts of damage near-constantly, but was limited to close range. | ||
**[[Machine Gun]]: A heavily armored platform that fired projectiles over a long distance dealing average damage. | **[[Machine Gun]]: A heavily armored platform that fired projectiles over a long distance, dealing average damage. It was, however, ineffective against barricades. | ||
**[[Cannon]]: A heavily armored platform with a mounted cannon | **[[Cannon]]: A heavily armored platform with a mounted cannon. It had a very low rate of fire, but dealt extraordinary amounts of damage and had a long range. | ||
==Source== | ==Source== | ||
*''[[Assassin's Creed: Revelations]]'' | *''[[Assassin's Creed: Revelations]]'' | ||
Revision as of 04:47, 16 April 2012

Whenever the Byzantine Templars attacked an Assassin den, the Italian Mentor, Ezio Auditore, would engage in a Den Defense to keep it under Assassin control.
The process
During a Den Defense, Ezio had the ability to command and deploy Assassins units to defend the den from approaching Templar troops. Positioning themselves on rooftops and behind barricades, the Assassin forces would wait for the impending waves of Templars.
Also, each Assassin had a combat speciality, ranging from Crossbowmen to bombers, and barricades could also be placed to halt Templar progression. In order to call in assistance, morale was used to deploy Assassins and build barricades, and was gained automatically over time and sometimes from looting Templar corpses. Occasionally, deployed Assassins could be killed and barricades destroyed, which would prompt Ezio to call in replacement troops and construct new blockades.
He could also participate in the defense more directly, by firing his pistol at approaching soldiers, which would signal his troops to attack that squadron, or, periodically, command a cannon to be fired at a group of soldiers or a war machine.
The Templars would attack in several waves, leaving little time between each for the Assassins to prepare. From there, they would advance up the street, pausing only once encountering a barricade. On their death, Templar soldiers could be looted for Akce, bomb ingredients or morale points. However, once the soldiers reached the Assassin den, they would begin attacking it, and would not stop until they forced the Assassins out or were killed.
List of Assassin units
- Assassin Leader: Leaders wouldn't attack the Byzantine soldiers, but they were vital, as other Assassins weren't allowed onto the rooftops unless there was a leader there. Leaders would also increase Morale over time.
- Barricade: Barricades would be placed in the streets to slow the Templars' progression to the Den. Assassins could be deployed to barricades to help defend them. Typically, one barricade would be placed in front of the Den, as a precaution at the start of the battle.
- Greek Fire Barricade: A barricade mounting a flamethrower, with high damage and short range.
- Machine Gun Barricade: A barricade mounting a repeating gun with average range, low damage, and high rate of fire.
- Cannon Barricade: A barricade mounting a small cannon with long range and high damage, but had a very low rate of fire.
- Crossbowman: An Assassin wielding a Crossbow. Possessed a high rate of fire, but dealt relatively low damage.
- Rifleman: An Assassin wielding a rifle. Dealt large amounts of damage, but had a lower rate of fire than Crossbowmen.
- Air Assassin: An Assassin wielding a Hidden Blade. These would air assassinate Byzantine troops, though they couldn't attack again quickly, as they would have to climb back up to the rooftop.
- Bruiser: An Assassin wielding a medium weapon. Highly adept at melee, but had no ranged capability.
- Caltrop Bomber: An Assassin wielding Caltrop Bombs. While not dealing much damage, they would slow down Templars caught in its effect.
- Shrapnel Bomber: An Assassin wielding Shrapnel Bombs. They would deal damage in a large radius, but couldn't throw the bombs often.
List of Templar Units
- Militia: Weak and poorly armored, their primary danger was in their numbers.
- Almogavars: Well-armored brutes carrying heavy weapons, though they would move slowly, making them easy targets.
- Riflemen: Equipped with a rifle, these Templars could return fire at rooftop Assassins, but had a low rate of fire and weak armor.
- Bombmen: Slow and poorly armored, but were equipped with bombs that would make short work of barricades.
- Scouts: Poorly armored, but were fast and could climb over barricades.
- Stalkers: Highly dangerous in melee, they attacked Assassins on the rooftops instead of in the streets.
- War Machines: Heavily armored and slow, these were usually brought in at the very end of an assault.
- Ram: A heavily armored battering ram. It was limited to melee attacks, but dealt high amounts of damage.
- Greek Fire: A heavily armored platform with a flamethrower mounted on it. It dealt large amounts of damage near-constantly, but was limited to close range.
- Machine Gun: A heavily armored platform that fired projectiles over a long distance, dealing average damage. It was, however, ineffective against barricades.
- Cannon: A heavily armored platform with a mounted cannon. It had a very low rate of fire, but dealt extraordinary amounts of damage and had a long range.
Source
Gallery
-
Crossbowmen.
-
 Ezio and several Assassins, defending a Den.

| |||||||||||||||||||||||||||||||||||||