User:Sol Pacificus/Manual of style: Difference between revisions
imported>Sol Pacificus |
imported>Sol Pacificus m Sol Pacificus moved page User:Sol Pacificus/Sandbox2 to User:Sol Pacificus/Sandbox 2 |
(No difference)
| |
Revision as of 16:50, 14 July 2017
Grappling hook
A grappling hook is a tool that consists of multiple hooks attached to a rope.
[expand a little on details?]
During the Third Crusade, the Assassins favored the device's versatility for their operations. Consequently in 1190, Rafik, the Keeper of Dasmascus gave a grappling hook to Altaïr Ibn-La'Ahad, suggesting that it would be useful should the young Assassin choose to travel by rooftop again. <-- inadequate ending for the sentence?
[it indeed proved useful in the slums because the buildings collapse?]
[when pursuing Fajera and the bridge collapsed Altaïr found it esp. useful for crossing the river ~ significant enough to mention?]
[he would continue to use it throughout his quest for the Chalice to swing himself across gaps he cannot jump]
[employed it as a way of pulling guards towards him. compare with Hookblade & rope dart?]
Reference
Nazim
Nazim (unknown - 1190) was a Templar crossbowman that participated in the Third Crusade.
In 1190, he was stationed in Tyre as part of the defense force for the Templar hospital. Alongside two Hospitalier soldiers, he was guarding the interior of a restricted building when he encountered the Assassin Altaïr Ibn-La'Ahad, who had trespassed en route to the hospital. Though unaware of Altaïr's affiliation, the Crusaders nevertheless moved to apprehend the intruder, decrying him as a "shameless thief." Nazim had barely just received the order to arm his crossbow when Altaïr overpowered his group and killed them.
Trivia
Because the video game's levels are designed with improbable architecture, it is impossible to determine the function of the building where Nazim is encountered. The interior of this building consists of naught but a few platforms suspended above a bottomless abyss with disconnected beams for navigation. One side of the building's façade resembles that of a typical church, at least with regards to buttresses and arched windows, the other side lacks these features, which are replaced instead by a large platform that protrudes out over the street.
Reference
Templar Hospital
The Templar Hospital of Tyre was a medical facility that operated in the 12th century and came to double as a stronghold for the Knights Templar at the height of the Third Crusade.
History
Located near the harbor, the institution was shut down at some point prior to 1190. Around that year, the Crusaders reopened the complex under the command of the Templar doctor Roland Napule, in the process drastically bolstering the city's reinforcements.
Though ostensibly a hospital, the facility was in fact employed for much more nefarious purposes, particularly in light of the Templars' fervent pursuit for the keys to the Temple of the Sand. People suspect to knowledge of these keys were detained at the hospital and subjected to brutal interrogations. While these operations were by no means publicized, the local civilians nevertheless whispered rumors of the horrors committed within its walls.
These rumors eventually reached the ears of the Assassins, who sent an agent to investigate. The infiltrator failed to return, however, and the Assassins remained largely in the dark on the exact details of the Templars' operations.
A few months later, the Templars captured an elderly man that had visited the Temple of Sand. Certain that this man knew the whereabouts of a key to the Temple, Roland Napule began a fierce interrogation in the detention room. Erstwhile, he sent two Hospitalier soldiers to patrol the sewers, wary that it was a potential route for intruders.
Unbeknownst to the Templars, the young Assassin Altaïr Ibn-La'Ahad had arrived in Tyre, having been instructed by Fajera to seek the old man for aid in his quest for the Chalice. Guided by the the Assassin Rafiq Hamid, Altaïr infiltrated the hospital through the very sewers that Roland had sought to secure.
Despite the hospital's stringent level of security, the Assassin ultimately navigated his way to the detention room without injury. Interrupting the interrogation, he killed Roland Napule and rescued the prisoner, who gave his key to the desert temple in gratitude.
Layout
Exterior
The hospital was a prominent
Subterranean levels
Underneath the hospital was a complex series of dungeons, furnace rooms, and finery forges.
Trivia
- As Altaïr infiltrates the hospital through the underground passageways, the main levels of the hospital are never actually explored in Assassin's Creed: Altaïr's Chronicles.
Temple of Sand

The Temple of Sand, commonly referred to simply as the desert temple, was a legendary temple that lied in the desert east of the Dead Sea, rumored to harbor the Chalice, an ancient artifact similar to the Pieces of Eden thought to possess the power to unite all factions of the Third Crusade. By the time of that war, much of the site was submerged under the desert, though many of its ruins still protruded from the sands. Three keys were required to gain access to this temple.
History
In spite of the site's shrouded nature and the specific conditions for entry, explorers throughout generations had managed to penetrate its walls to dabble at its treasures, only to be killed by traps set for them below.
As the vault for the elusive relic known as the Chalice, the temple became a critical target in the war between the Assassins and Templars in 1190. That year, the two factions embarked on a massive hunt for the keys to the temple, and among the Assassins, this quest was principally assigned to the elite agent Altaïr Ibn-La'Ahad. Although the Mentor Rashid ad-Din Sinan had informed Altaïr that the Templars had already captured the Chalice, the Crusaders' desperate search for an entry into the temple implied otherwise.
An elderly man who had visited the temple prior to this conflict was waylaid by Templars and detained at the Templar Hospital in Tyre where its commander, the doctor Roland Napule subjected him to gruesome torture for the keys. One had already passed into the hands of the Romani dancer Fajera, and another into the possession of Basilisk himself, but this old man still held the remaining key. With the assassination of Roland, the man granted Altaïr his key, and the Assassin, who had already collected Fajera’s key, was one step further towards opening the temple.
Once Altaïr had stolen the last key and the map to the site from the Templars, he journeyed to the temple. Among its outdoor ruins, he narrowly avoided tumbling underground when, just before an exposed treasure chest, the earth gave way to the cavernous chambers below. After recovering this treasure, he used the collapsed ground to slide into the underground temple where he immediately ran into the first of many Crusaders he would face within the ancient complex.
Despite having lost all keys and the map to the Assassin, the Crusaders had found a way into the temple, occupying its premises before he had even arrived. As a result, Altaïr had to be cautious of the patrols throughout his exploration in addition to the temple's deadly traps. After traversing through the grotto and into the high reaches of the temple, he overcame the great champion of Basilisk that had been posted to guard the antechamber to the shrine.
Within the grand treasure room, Altaïr believed that his quest was at an end only to be proven wrong when he opened the shrine to find it empty. At this point, he was ambushed by Basilisk and his captains, who revealed that the Chalice was not an artifact, but a woman. As Basilisk promptly left afterwards, he failed to witness Altaïr defeat his knights with ease. Upon closer inspection of the vacant shrine, he found himself suddenly transported outside of the temple, in the wake of a rapidly advancing sandstorm.
While the Assassin ultimately escaped the sandstorm by fleeing to a nearby shelter, much of the ruins was ravaged in the disaster.
Layout
At the time of the Third Crusade, the majority of the complex lied underneath the desert, with only scattered remnants of ancient pillars jutting above ground. The temple was vast; its colossal structure extending enormous depths below the surface. When the Crusaders entered, they found the skeletons of past explorers strewn about throughout its perilous corridors, killed by the temple's myriad of booby traps. These traps consisted of great swinging axes, pits of spikes, and giant stakes that spontaneously struck out from the walls or ground, some triggered by specific floor panels—generally marked with the bas-relief of sphinxes—where the slightest misstep could spell certain doom. True to its region, the architecture was Mesopotamian, with the engravings of lions and sphinxes lining some walls. Even so, much of the pottery found within exhibited the black-figure painting common to the Greeks. Though a great part of the underground complex was intact in 1190, much of it was in decay; many columns and floors had collapsed, while others would crumble under the merest step by a traveler. Despite lying underneath a desert, it harbored an abundant water supply and a system of pipes that served either as sewage or irrigation. Due to its dilapidated state, streams of water trickled down through cracks in the walls and ceilings.
Grotto
At the very bottom of the temple was a cavernous grotto by which the site was rooted. This grotto was flooded by mystifying waterfalls that streamed down from the highest levels of the subterranean complex. One route to the temple's shrine, which Altaïr had taken, necessitated ascending towards its level from a long staircase originating from the grotto itself. The entrance of this stairway was barred by a gate composed of stalactites and stalagmites, opened only by the activation of two mechanisms some distance from each other: one that controlled the stalactites, and the other the stalagmites.
Treasure Room
The great treasure chamber was less a room than a fire pit of mammoth proportions. Its vast, vaulted chamber was hundreds of meters high and deep, such that it appeared to be an abyss from which a perpetual firestorm raged. Steady streams of fire flowed up along the great wall. Almost wholly empty, the chamber’s only structure was a central platform attached by bridges on four sides leading in from the four entrances corresponding to each cardinal direction. On this lone platform—ringed by four torches yet no railings—sat the shrine purported to hold the Chalice, a plain golden box topped by a pair of harpy-like figures facing one another. One of the entrances of this room was similarly wrought entirely in gold and could only be opened after a specific pattern of steps was taken on the floor of the antechamber.
Trivia
- Although the entire first act of the game stresses the necessity of the three keys to the temple in order to open it, Altaïr is not shown to rely on them when he finally enters the temple. Instead, as he arrives at the site, the ground spontaneously caves-in beneath him, allowing him entry. Curiously enough, the Crusaders were also shown to have been able to enter the temple despite having lost the keys to Altaïr.
- It appears that Altaïr was magically teleported outside the temple upon inspecting the shrine, but the game does not explain how exactly this occurred.
Gallery
-
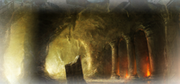 The temple caves

Reference
| ||||||||||||||||||||||||||||
Adha
Adha (unknown – 1190) was a woman from the Levant who lived in the time of the Third Crusade. As the Chalice, a legendary "artifact" thought to have been hidden in the Temple of Sand, she was rumored to possess the mystery power to unite the factions of the war.
In 1190, the Chalice was sought after by both the Knights Templar and Levantine Assassins, unaware that it was a person rather than an object. After a Crusader expedition to the Temple of Sand turned out fruitless, she was located in Jerusalem and captured by the Templars. To her fortune, her friend, the elite Assassin Altaïr Ibn-La'Ahad was not far behind and rescued her.
Despite this, Adha remained mistrustful of the Assassins, in part due to a Templar spy embedded within their highest ranks. Guided by his love for her, Altaïr agreed to assassinate the spy, Harash, then flee the Assassins and Templars to settle for a normal life with her. In the end, this dream proved futile when Altaïr failed to save her after she was recaptured by the Crusaders and subsequently murdered.
Biography
The Chalice
The Chalice was known to either be a holy artifact, or the descendant and heir of Jesus Christ. [citation needed] According to Rashid ad-Din Sinan, whoever had the Chalice could unite all factions under them, granting them victory over all, and allowing them to rule the Holy Land. Seeing the danger of such an artifact should it fall into the hands of the Crusaders or Saracens, the Mentor sent one of his Assassins, Altaïr Ibn-La'Ahad, on a mission to retrieve it in 1190.[1]
His search led him to the fabled Temple of Sand, where the Chalice was thought to have been hidden. It was there that, after discovering only an empty golden chest, he was ambushed by the Templars, whose leader Basilisk informed him that the Chalice was in fact a woman before leaving him to his doom.
Altaïr survived the attack and the subsequent sandstorm that engulfed the temple. After pursuing Basilisk to Tyre and besting him in combat, he extracted the location of the Chalice from his enemy in exchange for mercy. However, the Templar also alerted him to a Crusader plot to poison the entire population of Acre to end the siege, knowing full well that Altaïr's conscience would force him to detour to Acre to stop this massacre.[1]
First capture and rescue
Though Basilisk had hoped Altaïr's preoccupation with Acre would allow his forces to capture the Chalice first, Altaïr had torched his fleet of docked ships, hindering his head start.
Thus when Adha, the Chalice, was apprehended by three Templars at her hiding place in Don Carvaggio's villa, Jerusalem, her friend Altaïr was only moments behind. Her captors proceeded to escort her to the city gates, stalked by the Assassin on the roofs above. When Altaïr set off an explosion to aid in his navigation, the Templars began to suspect that trouble was following them. In response, Adha attempted to stall by slowing her pace and pleading for a rest, much to the fury of Sadad, one of her captors.[1]
As Adha was ushered into a sewage facility by the Templars, a great battle ensued as Altaïr burst into the Templar base. Even the elite Templars could not hold back the Assassin's advance, and soon enough all the soldiers holding Adha hostage were dead, save the sergeant Qasim who fled for his life.[1]
Separated from her savior by a channel, Adha was convinced by Altaïr to venture into the sewers where their paths might cross. She was wary of trusting an Assassin—even one she's had prior association with—but nevertheless relented when he promised not to abandon her.[1]
When they at last reunited at the exit of the sewers, Adha revealed why she feared to place her life in the hands of the Assassins. She had overheard from the Templars that they had bribed Harash, the Keeper of the Assassins, to serve as their spy. As long as their brotherhood remained compromised, it was dangerous for her to accompany Altaïr. Altaïr, though shocked by the news, placed his faith in Adha and agreed to assassinate the traitor. Knowing that he lacked hard proof of Harash's treachery, he predicted that such an act would also mean leaving the order altogether.[1]
It was then that the two, in love as they were, agreed to flee together to a faraway place, away from the conflict between the Templars and Assassins, so as to settle down and pursue lives of normalcy.[1][2] They planned to reunite in Tyre once Harash has been killed, where they will then make their escape via a ship in the harbor. Before parting ways, Adha gifted Altaïr a sword far superior to the ones he previously wielded.[1]
Second capture
While Altaïr returned to the Assassin citadel at Alep in secret, Adha hid herself on their ship in Tyre. Unbeknownst to her, she had already been discovered by the Templars before Altaïr had completed his mission. The Templars, suspecting that she was waiting for Altaïr, hoped that they could exploit this as a means to easily locate the enemy that had caused them so much trouble. As such, they initially left her alone, fearing that alerting her to their presence could result in her fleeing and a failure to catch Altaïr by surprise.[1]
After Altaïr assassinated Harash, the Templars abandoned this course and seized Adha. Altaïr, aware that Adha had been discovered thanks to a prior Templar report to Harash, rushed to the Tyre harbor to find himself face to face with the Templar's entire army under the direct command of Basilisk.[1]

As Templar knights forced Adha onto one of their ships, Altaïr furiously fought his way through masses of soldiers in a desperate attempt to reach her in time. Eventually, the Assassin leapt onto the ship just before the one that held Adha, but was impeded by the imposing figure of Basilisk himself. Unable to bypass the Templar leader, he was forced into a final duel with this mortal enemy, all while Adha and her captors watched from afar on the deck of their ship.[1]
Basilisk, as in his past fights with Altaïr, was defeated by his superior mobility, yet even as the Assassin dealt the killing blow, the Templars sent a fire boat crashing in between the two ships. In the resulting explosion, Altaïr was prevented from leaping to Adha; he made a last minute dive into the water to escape the inferno.[1]
When he returned to shore, he could only watch as the Templar ship holding Adha captive sailed off far off into the distance. He called out to Adha, promising to her that he would find her one day, as it disappeared over the horizon.[1]
Death
- "I had thought Adha would be the one to lead me to rest, that I might lay down my blade and live as a normal man. But now I know such dreams are best left to sleep..."
- ―Altaïr, in his Codex.[src]
In 1191, during Altaïr's preparations to assassinate Abu'l Nuqoud in Damascus, an Assassin informant asked him "Any news of Adha since she left?" When Altaïr remained silent, as always with informants, he continued with "No? How sad. I'm sure you'll find her someday."[3]
Though the circumstances of Adha's death are unclear, Altaïr wrote in his Codex that he chased Adha's captors across the sea, but only caught up to them in time to hold Adha's lifeless body in his arms and see the terror in her unblinking eyes. He went on to state that he had hunted down and exacted vengeance on those that had killed her, though this had brought him no comfort, nor joy.[2]
After Adha's death, Altaïr felt that he "would never again feel for a woman as [he] had for her". Fortunately, though, this was proven false when he eventually fell in love with Maria Thorpe.[2]
Trivia
- Though not explicitly mentioned, the fact that Altaïr and Adha knew each other by name upon first meeting in Assassin's Creed: Altaïr's Chronicles suggested that they had met at least once before.
- An e-mail on the conference room computer of Abstergo Industries' Roman facility mentioned the Chalice, and questioned whether or not it was a real Piece of Eden. It also noted that the search for it would be called off until more evidence of its existence could be found.
- Adha means "sacrifice" in Arabic.
Gallery
-
 Assassin's Creed: Memories art of Adha
 -
 Memories art of Adha
 -
 Adha in Templar custody


