Haytham Kenway: Difference between revisions
imported>Jasca Ducato |
imported>Sadelyrate m →Trivia |
||
| Line 358: | Line 358: | ||
==Trivia== | ==Trivia== | ||
*Haytham's name was connected with an eagle, continuing the eagle motif set by [[Aquilus]], [[Altaïr Ibn-La'Ahad]], [[Ezio Auditore da Firenze]], [[Aveline de Grandpré]] and [[Nikolai Orelov]]. | *Haytham's name was connected with an eagle, continuing the eagle motif set by [[Aquilus]], [[Altaïr Ibn-La'Ahad]], [[Ezio Auditore da Firenze]], [[Aveline de Grandpré]] and [[Nikolai Orelov]]. | ||
*"Haytham" is | *"Haytham" is a transliteration of the Arabic name هيثم meaning "young eagle." | ||
*"Kenway" comes from an Old English name, either Cynewig or Cenwig, composed of the words ''cyne'' ("royal") or ''cen'' ("keen, bold") and ''wig'' ("war"). | *"Kenway" comes from an Old English name, either Cynewig or Cenwig, composed of the words ''cyne'' ("royal") or ''cen'' ("keen, bold") and ''wig'' ("war"). | ||
*Like his son and father, Haytham did not possess the scar on his lip that some of Desmond's other ancestors displayed. | *Like his son and father, Haytham did not possess the scar on his lip that some of Desmond's other ancestors displayed. | ||
| Line 368: | Line 368: | ||
*Haytham was the fourth known Templar to perform a [[Leap of Faith]], others being [[Francesco de' Pazzi]], [[Vali cel Tradat]] and [[Daniel Cross]]. | *Haytham was the fourth known Templar to perform a [[Leap of Faith]], others being [[Francesco de' Pazzi]], [[Vali cel Tradat]] and [[Daniel Cross]]. | ||
*The interactions between Haytham and Connor showed similarities to William and Desmond Miles, specifically concerning personality and conversations. | *The interactions between Haytham and Connor showed similarities to William and Desmond Miles, specifically concerning personality and conversations. | ||
*Ironically, Haytham mentioned near to the start of ''Assassin's Creed III'' that he cut ties with Edward Braddock for his ruthlessness and slaughter of innocents, which | *Ironically, Haytham mentioned near to the start of ''Assassin's Creed III'' that he cut ties with Edward Braddock for his ruthlessness and slaughter of innocents, which Haytham himself showed signs of committing by the end of the game. | ||
*During his final confrontation with Connor, Haytham justified the Templars by stating that "''all mankind was built to serve''" | *During his final confrontation with Connor, Haytham justified the Templars by stating that "''all mankind was built to serve''." This cryptic statement was a reference to how humans were originally a slave race under the First Civilization. | ||
*Haytham was briefly mentioned in ''[[The Tyranny of King Washington]]'' as having died a long time before in the alternate timeline. His Hidden Blades were kept safe by Kaniehtí:io, who later gave them to Ratonhnhaké:ton. | *Haytham was briefly mentioned in ''[[The Tyranny of King Washington]]'' as having died a long time before in the alternate timeline. His Hidden Blades, their bracers different to his true timeline counterparts, were kept safe by Kaniehtí:io, who later gave them to Ratonhnhaké:ton. | ||
==Gallery== | ==Gallery== | ||
Revision as of 22:44, 12 August 2013
- "You act as though you have some right to judge. To declare me and mine wrong for the world. And yet everything I've shown you – all I've said and done – should clearly demonstrate otherwise. We did not harm your people."
- ―Haytham Kenway defending the Templars to his son, Ratonhnhaké:ton.[src]
Haytham E. Kenway (1725 – 1781) was the first Grand Master of the Templar Order's Colonial Rite, reigning from 1754 until his death.
Son of the pirate Assassin Edward Kenway, Haytham was converted to the Templar cause at a young age by Reginald Birch, following his father's death.
After being sent to the British colonies in America to locate a suspected First Civilization storehouse, Haytham remained and established a permanent organized Templar presence in the colonies.
Under his leadership, the Colonial Rite grew exponentially, almost completely destroying their Assassin counterparts, and manipulating the colonial governments at every level.
During this time, he unknowingly sired a son – Ratonhnhaké:ton – with Kaniehtí:io, a Kanien'kehá:ka woman whom he had met during his initial quest for the storehouse. He is an ancestor to Desmond Miles.
Biography
Early life
- "It is a requirement when you are raised in the manner that I was. Perception is fundamental to the Order. It guides the feet when running and climbing. Informs the hands when striking and fighting. But most important, it transforms the senses. And we begin to know the world in a different way."
- ―Haytham discussing his training to Charles Lee.[src]
Haytham was born in England in the year 1725, as the second child to the Assassin Edward Kenway and his second wife Tessa Kenway, with an older half-sister, Jenny Kenway. Unbeknownst to him, Haytham was trained to become an Assassin by his father from an early age.
During this time, Haytham was tutored on how to use a sword, despite barely being six years old. He was also encouraged to think for himself and dispute others' opinions.
On his eighth birthday, Haytham's family was walking home from a trip to White's Chocolate House on Chesterfield Street, when the group were attacked by a mugger trying to steal Tessa's necklace. Reginald Birch, who was also with them, threatened to kill the man.
However, he was dissuaded by Edward, who was infuriated at Reginald's harsh vigilantism. When Haytham returned home that day, Edward asked his son whether he thought that the thief should have been allowed to go free.
At first, Haytham replied that he initially held feelings to enact revenge but would have offered the man clemency, to which he was presented with a steel short sword; this sword he would go on to use in his life as a Templar.
On 3 December 1735, there was an attack on Haytham's London home in Queen Anne's Square when he was still young. His father, his sole friend Tom Barrett, and some of the house's servants were killed in the defense of the household.
Haytham himself made his first kill defending his home, ending the life of one of the infiltrators, though it cost him his standing with his mother. Accompanying this, Jenny was abducted, and a journal of his father's was taken. Soon after, the Grand Master of the Templar Order's British Rite, Reginald Birch, approached Haytham.
Birch had worked as Edward's senior property manager and happened to be courting Jenny, enabling him the trust of the family. Following this, Haytham was given leave by his mother to be trained in Europe by Birch, who tutored him in the Templars' ways.
As a member of the Templar Order, Haytham became an acquaintance of Edward Braddock, a fellow Templar and a soldier in the British Army. They both participated in the Siege of Bergen op Zoom, where Braddock's violent attitude became evident. After Braddock brutally murdered several innocents, the two had a falling out and Braddock left the Templar Order forever.
During a mission to kidnap a young rebel named Lucio in Corsica, Haytham encountered the Assassin Miko, who was assigned to protect the young man. On being ambushed by the Assassin, Haytham lost his treasured short sword, though the fight ended when Haytham pulled Miko into a crevasse, but was subsequently dragged in along with him.
Miko grabbed ahold of a rope and Haytham's arm to prevent himself from falling into a steep drop, though Haytham loosened Miko's Hidden Blade from his arm and bit his hand, causing Miko to fall. While this did not finish off his adversary, upon Haytham's suggestion, Miko fled to fight another day.
Afterwards, having the Assassin's Hidden Blade to compensate for his lost sword, Haytham then brought Lucio to Birch so that the Templar Grand Master could blackmail Lucio's mother into decoding the journal that Haytham had retrieved from Juan Vedomir, a target that Haytham had executed on a prior assignment.
Stealing the Precursor Key
- "Once. My father brought me here as a child, though I remember little of it. And I don't suppose tonight will afford me the luxury of a proper viewing either."
- ―Haytham reflecting on his first play he attended with his father.[src]

In the year 1754, Haytham attended the musical The Beggar's Opera by John Gay, in the Theatre Royal in London. Although lamenting the fact that he had never been able to see the play through to the end, Haytham's true purpose there was to obtain a "precursor" artifact from an attending patron and member of the Assassin Order, who happened to be Miko. After obtaining the artifact and assassinating its owner, Haytham fled the opera house and met once more with his co-conspirators.
From there, he met with Birch for a short while, confirming the Order's suspicion that the precursor artifacts were tied to the New World. He was chartered passage to Boston aboard the Providence as the Order's representative and instructed to locate a suspected First Civilization storehouse in the region. Haytham would then set about organizing an official presence for the Templars in the New World.
Aboard the Providence
- "But let me be clear, should you ever dare to insult or threaten me again, I'll not hesitate to cut off your head myself. Are we understood?"
- ―Haytham threatening Samuel Smythe aboard the Providence, en route to Boston.[src]

On the second day of his journey, Haytham partook in a fight with some of the ship's crew members, Hector Graves being the main assailant. After defeating him and a man known as Quill, he was taken to the captain's quarters to speak with Samuel Smythe, the captain of the ship.
There, he learned that some of the crew members were potentially planning a mutiny. Smythe reminded Haytham that such a revolt would rule out him ever reaching the Colonies, so he agreed to investigate.
On the twenty-eighth day of his journey, Haytham sped up his investigation by request of the increasingly worried captain. After asking the cook and doctor about information regarding peculiar actions, he was referred to a man named James Fairweather.
James told him that crew members had been gathering above deck and quietly conversing about things that he believed "boded ill". From there, after a splashing sound was heard, Haytham went below deck and discovered that painted barrels had been thrown overboard.
Five days later, Haytham spoke with Smythe about the marked barrels being thrown overboard on a daily basis, determining that they were a marker to leave a trail for another ship. Seconds later, a boat was sighted, which then began to attack the Providence. Following this, Smythe adamantly sent Haytham below deck, where he came into contact with Louis Mills.
Mills revealed that he had been the one throwing the marked barrels overboard and that he was in fact an associate of the Assassin Order; he had pursued Kenway once word of the murder in the Theatre Royal reached him. On agreeing to settle the matter with a sword duel, the two engaged in combat and Mills was struck down by Kenway.

Haytham returned above deck and forced Smythe to lead his ship into an approaching storm to lose the pursuing vessel. During the storm, Haytham helped to secure the ship's rigging before flying the foremast to quicken the Providence.
After lightning snapped the main mast and left James hanging from a rope, Haytham continued to quickly save the man just as the attacking ship had sunk, having also been struck by lightning.
On the seventy-second day, Haytham reached Boston, where he met his first assistant and recruit, Charles Lee, who gave him a short tour of the city. During the tour, Haytham met Benjamin Franklin and discovered that some of his Almanac pages were missing. He also met his first partner, William Johnson, at the Green Dragon Tavern.
Gathering the Colonial Templars
- "...Upon this paper are the names of five men sympathetic to our cause. Each is also uniquely suited to aid you in your endeavor. With them at your side, you will want nothing."
- ―Reginald Birch giving Haytham the names of the Templars in the colonies.[src]

Now, effectively Grand Master of the Templar Order in the Colonies, Haytham's first aim was to unite his new partners so that they could locate the storehouse. After meeting Johnson, he learned that some of his work had been stolen in a robbery. Leaving to find Johnson's man, Thomas Hickey, who was also on his list of loyal Templars, Haytham searched for those responsible.
After spotting Hickey and receiving an explanation, Haytham, with the help of Charles and Thomas, infiltrated a mercenary fort and located the papers. Thomas and Haytham then killed the attacking soldiers while Charles carried the chest that contained Johnson's information.
Learning that the research would not be of much use in the situation, Haytham went to find his other partners, beginning with Benjamin Church. After he visited Church's home, Haytham discovered that there had been a raid, which resulted in Church's kidnapping.
He then continued to conduct an investigation with Charles, in which he eavesdropped on the conversations of Benjamin's neighbors. The first pair informed Haytham that Church had been taken somewhere in north-eastern Boston. Following that, he went to the top of a church to view the rest of the city for other prospects.
The second eavesdrop gave him relatively nothing and was a conversation between two British Regulars. The third – also a conversation between two Regulars – notified Haytham that Church was in debt to someone and that a man named "Cutter" was included in this group, who planned to torture or kill Benjamin.
The final conversation, between two civilians, told Haytham that the group that had captured Church had taken him to the top of a hill, at a fort which had a doctor.
After obtaining this information, Haytham met with Charles once more to consolidate it together and locate Church. Piecing together that the Templar would be near to the water-front besides the fort, the pair slipped by undetected to a locked door at the edge.
Silently, Haytham stole a key from one of the nearby Regulars and opened the door to the building. Entering with Lee, Haytham found Church tied to a chair, surrounded by a few British Regulars and being interrogated by a man named Silas Thatcher, who was in charge of Southgate Fort.
After Silas left, Lee and Haytham silently killed the soldiers and Cutter before freeing Church and going back to the Green Dragon Tavern.

For the next name on his list, Haytham traveled to the Copp's Hill Battery to retrieve John Pitcairn from General Edward Braddock. After having sneaked in with the help of Lee, he located Pitcairn near the end of the battery, speaking with Braddock about mistakes. When Haytham attempted to take Pitcairn with him, Braddock refused and sent him and Charles away.
Uneager to submit to Braddock's orders, Haytham later tricked the General and his men into a dead-end and slaughtered most of them, humiliating Braddock before 'stealing' Pitcairn. Following this, Haytham took Pitcairn with him to the tavern and spoke with his partners.
After gathering his new co-conspirators, Haytham planned an infiltration on Southgate Fort, so that he could free the Native American slaves there in order to discover where the First Civilization storehouse was. Locating a convoy, he and his partners ambushed it, killing all of the Regulars and dressing in their garb.
Using the tactic of the Trojan horse, Haytham sneaked his men into the fort, freed the slaves within, killed the fort's general and wounded Silas so that he could be shot by Church.
Search for the precursor storehouse
- "I saved your people. Does this mean nothing to you? Look. I am not the enemy."
- ―Haytham trying to gain Kaniehtí:io's trust.[src]

Six months after the death of Silas, Haytham had successfully had his partners track down a woman that they had freed in the attack, a native who had appeared to have some sort of command. In the snow, he located her by following tracks she had left behind and chased her through the Frontier on the ground while she ran through the trees.
When he finally caught up to her, they spoke about the 'key' and if she knew where the storehouse was. Telling him to meet her at a nearby hill, she left, and he eventually followed.
When he met her at the hilltop, she told him about soldiers in the nearby tavern that wished to drive her people away and that they were led by Edward Braddock, the "Bulldog." He suggested that they stop the soldiers, coming up with a plan to kill Braddock.
After entering the tavern, Haytham began eavesdropping on some Regulars, which informed him of Braddock's plans to go on an 'expedition'. The second group of Regulars he listened to informed him that Braddock was already at the 'advanced' camp, preparing to fight French soldiers.
Just as he attempted to leave the tavern, he was brought into a bar-fight with some of the Regulars, making short work of them with a minor face injury; the native woman, Kaniehtí:io, quickly cleaned it for him. She then left, telling Haytham to meet her at the camp.

Haytham quickly followed, meeting the woman outside of the British campsite of Fort St-Mathieu while deep in the blizzard. Sneaking into a supply cart, he hid until entering the walls of the fort.
After getting into the camp, Haytham silently went through the area, breaking the stronghold's two cannons before beginning to eavesdrop on a conversation between the young George Washington and a Regular officer.
Listening, he learned that Braddock refused a truce to end the French and Indian War and was rallying troops before he would take a trip to Fort Duquesne, and also that a copy of the plans was located inside of the command tent.
With this in mind, Haytham quickly stole them and left the fort, taking them to Kaniehtí:io and discussing a plan to ambush the soldiers beside the Allegheny (or Monongahela) river.
Hunting Braddock
- "Your death opens a door. It's nothing personal. Well, maybe it is a LITTLE personal. You've been a pain in my arse, after all."
- ―Haytham speaking to Braddock after catching up to the latter.[src]

A few months later, Haytham rallied his co-conspirators to meet with Kaniehtí:io near the edge of the river. After speaking with her, they waited in the planned hiding point for Braddock and his men to pass by.
Creating a quick plan of deception, Haytham went and assassinated one of the Regulars, before taking the man's outfit and disguising himself, allowing him to sneak up to Braddock's side.
After witnessing Braddock kill one of his men for showing uncertainty, Haytham waited a moment before riding closer to the General. Following a failed attack from a French soldier, the Bulldog rode off and Haytham was forced to chase after him. When a tree fell before Braddock, the Bulldog fell back, allowing Haytham to catch up with him.
However despite this, just as he was about to shoot, Washington killed the horse beneath him. To save him, Kaniehtí:io tackled Washington from his own horse and pinned him to the ground, while Haytham got to his feet and pursued Braddock again on foot.

Chasing him until he was able to assassinate him, Haytham delivered Braddock his last rites and took the Templar ring from the Bulldog's finger, before he went with Kaniehtí:io to the storehouse.
Having reached it, Haytham attempted to open the door with his key, though he discovered that he was unable to do so because it was the incorrect Piece of Eden; this was followed by a romantic moment with Kaniehtí:io, the pair kissing in the storehouse's cavern.
Following this, Haytham met with his co-conspirators again, plotting the future of the Templar Order in the Colonies and inducting Lee as an official Templar. Over time, as his and Kaniehtí:io's relationship grew stronger, Haytham unknowingly conceived Ratonhnhaké:ton with her.
Searching for a lost sister
Despite his bad relationship with his sister while he was young, Haytham did intend to find her. Eventually, he managed to track Jenny to Damascus, where she had been employed as a servant.
Journeying to the city to retrieve her, Haytham and his friend Jim Holden snuck into the Qasr al-Azm and located Jenny, but not without Jim being captured after securing Haytham and Jenny's escape.
Jim was soon transported to the Abou Gerbe monastery on Mount Ghebel Eter, Egypt, where he forcefully underwent operations to become a eunuch. Greatly infuriated at the brutality of the procedure, Haytham rescued Jim from the priests and eunuchs, killing many in the process and departed for England when Holden's wound closed.
Avenging his father
Through Jenny, Haytham found out that it was Reginald who ordered the attack in his childhood that killed his father. Accompanied by Jenny and Jim, Haytham launched an attack against Reginald in his chateau, killing any that stood in his way.
While Reginald tried to defend himself, it was Jenny that struck the killing blow, by wedging Birch onto a sword that Haytham had implanted into a doorframe prior to their struggle.
Subsequently, Haytham freed Reginald's captives, but he was stabbed for his previous crimes. This injury kept Haytham in bed for half a year, during which he was taken care of by Jenny and Jim.
When he finally recovered however, Haytham witnessed that Jim had committed suicide, as he had little reason to continue living. Haytham mused upon Jim's kindness and decided that he should unite Assassins and Templars in honor of all the good in the world.
The Boston Massacre
- Connor: "Is that my father...?"
- Achilles: "Yes. Which means trouble is sure to follow. I need you to tail his accomplice. This crowd is a powder keg – we can't allow him to light the fuse."
- —Achilles Davenport speaking to Connor about Haytham's presence in Boston.[src]

Returning to the British colonies before 1770, Haytham was present in Boston with an agent in that year, where they watched as the civilians began to revolt against the British soldiers due to the various taxes the Crown had put into motion.
As tensions began to flare, Haytham sent his agent to the rooftops to fire a shot into the crowd and provoke the troops to open fire, unaware that his agent was being followed by his own son.
When the agent was killed by Connor, Charles Lee shot his pistol into the air as a back-up plan and prompted the soldiers to open fire on the civilians. Following this, Haytham pointed out Connor to be the one responsible. As Boston was put on high alert to apprehend Connor, Haytham and Charles quickly departed.
Assassination attempt on George Washington
- "There can be no further mistakes, Thomas. Am I understood?"
- ―Haytham reprimanding Thomas Hickey.[src]

After both William Johnson and John Pitcairn were assassinated by Connor, Haytham instructed Thomas Hickey to murder George Washington after Lee was turned down for Commander-in-Chief of the Continental Army.
However, Hickey's plan was almost foiled by Connor, who exposed him to the authorities for running a counterfeiting ring in New York; despite Connor's claims of innocence, both men were captured and thrown into Bridewell Prison.
In response, Haytham accompanied Lee to the prison, where Thomas was released from a cell next to his son, only to be moved to a different part of Bridewell due to investigations made by Benjamin Tallmadge against Hickey. Haytham reprimanded Hickey and told Charles to handle things from there as he left the prison.
During the time of Connor and Thomas' imprisonment, Haytham and Charles managed to convince the judge to execute Connor rather than put him on trial. However, Haytham had a last minute change of heart and decided to save Connor from his execution.
When Connor's Assassin apprentices attempted but failed to cut the rope holding up his noose with a fired arrow, Haytham threw a knife from amongst the crowds, severing the rope and saving Connor, but also causing the audience to panic.
Reunion with Connor
- "Look – much as I'd love to spar with you, Benjamin Church's mouth is as big as his ego. You clearly want the supplies he's stolen, I want him punished. Our interests are aligned."
- ―Haytham proposing a truce with Connor.[src]

In 1777, Haytham was in search of the former Templar Benjamin Church, who had deserted the Order before being sent to prison for treason against the Continental Army. Slightly outside of the Continental fort in Valley Forge, Pennsylvania, Haytham had tracked the traitor to a small church.
After an investigation, he determined that he had reached Benjamin too late, but stayed nonetheless to wait and see if someone would appear so that he could ambush them. To his surprise, this proved to be fruitful, though Haytham had taken a leap from the building's rafters onto his son, Connor, instead of one of Church's men.
After a slight brawl with the Assassin, Haytham revealed that he too was searching for Church and suggested a truce, given that while they were searching for Benjamin for different reasons, their shared goal was to find him. Connor silently agreed and the pair departed the building.
Not long later, Connor had begun to track the location of Church's mercenaries through the snow, while Haytham followed. When the two had found one of the men by a broken cart of Continental supplies and quickly captured him, there was a quick interrogation that ended with Haytham shooting the man, much to the dismay of his son.
Then, he ordered Connor to infiltrate the camp that they had discovered from the man while he secretly sneaked a different route, which ultimately led in his capture. Connor, who quickly came to the rescue, was left behind to kill the other soldiers, while Haytham went to make plans in New York.
A month later, when Connor had finally made his way to the city, Haytham led them atop the rooftops to where Church's location had been stated to be. In one exchange, he revealed he had spared Connor out of 'curiosity' and that he was not so different from those that his son aided. They also spoke of their ideas of freedom, which he saw as an 'invitation to chaos'.
After reaching the gate to Church's hideout in the abandoned Smith and Company Brewery, he allowed Connor to retrieve some sort of disguise, waiting at the rendezvous point until the Assassin's return.

When Connor did arrive, Haytham led him to the door, passing through with the permission of the guards after stating Connor to have been his son. Exploring the brewery, both Haytham and Connor engaged in a conversation about Kaniehtí:io, in which Haytham pretended to learn of her passing despite having become aware of it after Johnson's death.
Once Connor had given the blame to Charles Lee though, Haytham denied it, saying that he had ordered against it and it was not possible, hoping that this 'shock' would cause his son to doubt what he believed was the truth.
When they reached Church, Haytham set his accusations and sentenced the man to death, only to be surprised to discover a decoy, following which they were ambushed by the mercenaries.
Making short work of them, there was a quick interrogation for Church's location, which allowed them to discover that the rogue Templar was on his way to the island of Martinique. Once more, Haytham killed his interrogated target at the end, despite Connor promising mercy, eliciting another angry glare from the Assassin.
Following the murder, a second ambush began, where the militia began to shoot at gunpowder barrels within the warehouse and set the building on fire, with the two inside. As Haytham led the way, he and his son narrowly escaped the treacherous brewery by breaking through a locked door on the higher levels, crashing into the water below.
From there, Connor and Haytham climbed onto the docks, where they quickly formulated a plan to use Connor's ship – the Aquila – to catch up with Church, who was just over a day ahead of them.
Chasing Benjamin Church
- "So here we are, face to face at last, my friend. It's been quite an adventure – let me tell you – working my way through your nasty little tricks and traps. Clever. Some of them, anyway. I'll give you credit for that. And for the quietude with which you pulled it off. We had a dream, Benjamin! A dream you sought to destroy! And for that, my fallen friend, you will be made to pay."
- ―Haytham beating up Benjamin Church.[src]

Meeting Connor at a New York pier, in the far-eastern section of the city, Haytham boarded the Aquila for the journey to catch Church. By 1778, they had caught up somewhere in the Caribbean Sea, despite Haytham's remarks that they were probably days behind because of the route choice.
After a narrow crossing though the rocks, they approached the Welcome, Church's initial escape ship, which was already abandoned. Following a quick examination, a smaller ship was noticed in the distance, fleeing away as it shot at the Aquila.
Quickly beginning to follow, Haytham and Connor's crew went through the rocky passage, while Haytham repetitively heckled his son over imperfections he observed, claiming his superiority as well.
After the smaller vessel passed through a narrow cliff-side area, the Aquila was forced to maneuver around the rocks and was greeted on the other side by a British Man-of-War and a few smaller ships firing at them with full force.
Making short work of the smaller boats, Connor and Haytham had the crew fire chain shots at the Man-of-War, breaking the masts before they boarded the enemy ship.

Just as they were about to meet at the side, Haytham stole the wheel and rammed the Aquila into the opposing ship, following with a mighty leap to the other side as he fought his way to Church below decks.
Quickly, Connor leaped over himself, bringing his crew with him to fight the mercenaries aboard. After killing the three officers on the upper deck, Connor made his way to the position of Haytham and Church.
Haytham, giving a slight speech to his former co-conspirator, continued to violently beat the man near to death. Connor proceeded from there to end the man's suffering after discovering the location of the Continental supplies, which lay on a nearby island awaiting pickup.
Final cooperation with Connor
- "You oppose tyranny. Injustice. These are just symptoms. Their true cause is human weakness. Why do you think I keep on trying to show you the error of your way?"
- ―Haytham's last attempt at converting his son.[src]

After cooperating with his son to kill Church, an uncertain alliance formed between Haytham and Connor, with the unity between the pair proving weak.
In an effort for the American colonies to secure independence from Great Britain, Haytham began working with his son to deliver the final blows, while also attempting to dissuade his son from perceiving the Templar cause as being biased in the conflict.
When the pair met up after the assassination near Bowling Green, they began a mission to discover the Loyalist plans, striking to interrogate the officers around the ruins from New York's Great Fire. Climbing through the destroyed buildings, they made their way to a viewpoint above the higher ranking soldiers.
Determining after useless eavesdropping that a different attempt to gather information was necessary, Haytham leaped down and proceeded to start a fight with the British Regulars. Connor, forced to help, went along to fight as well.
Making relatively short work of the soldiers, Haytham and Connor quickly caught the officers against the wall, except one that managed to run off. While Connor went to chase him, Haytham took the others to his quarters in Fort George, interrogating them and eventually killing them.
After the return of the final officer, a final interrogation occurred, following with another death by Haytham's hand, justified in his terms because the man would have told his command; despite this, the act still garnered Connor's scorn. Following their subsequent argument, Haytham made his way to the Continental fort in Valley Forge.

During the night, Connor also made his way towards the fort, meeting with Haytham at the foot of the hill to George Washington's command point. Following a short argument over what Connor favored, they proceeded up to meet with the Commander-in-Chief.
As Connor warned Washington of the British plans, Haytham snuck behind the two and discovered a letter ordering an attack on Connor's village, Kanatahséton.
Haytham then proceeded to educate Connor on the Commander's plan, along with dispensing the information that Washington was the one responsible for his mother's death during the Seven Years' War through a similar order, causing the Assassin to cut ties with both of them.
Connor claimed that his father had known all along and that Haytham had kept the information from him on purpose until it suited the Templar's aims, making him equally despicable as Washington.
Death
- "Too late he learned the truth of this – murdered by his own son. He gave his life as he lived it – in service to a dream we all share."
- ―Charles Lee at Haytham's funeral, 1782.[src]
After Connor had completed assisting the French Armada at the Battle of the Chesapeake, he had convinced the French Admiral de Grasse to allow the use of five ships for an attack on Fort George.
While they shelled New York Harbor from above, Connor sneaked below the area, through an underground tunnel network to reach Lee. Haytham, who still had a quartering in Fort George, had been working on his plans there with Lee prior to when the attack occurred.
Believing danger for his co-conspirator's life and his plans, he sent Lee away in the hope that he would survive to continue the Templars' ambitions, while Haytham stayed behind to deal with his son.

Connor, who had been injured in the bombardment, was struggling by the time he found his father instead of his original target; when Connor reached Fort George's strongest defended point, Haytham was waiting for him, starting a fight in which the Templar possessed the obvious upper hand.
Despite this, the odds were slightly evened when Connor managed to stab Haytham in the arm, and so a grueling battle began, forcing Connor to use the environment to his advantage. Eventually, a small shelling led to them both dropping to the ground.
Reacting quickly, Haytham attempted to strangle Connor while belittling the nature of the Assassins and their creed against the Templars, but Connor quickly and fatally stabbed his father in the neck with his Hidden Blade, ending Haytham's life and his rule as the Templar Grand Master.
Personality and characteristics
- "The only difference, Connor – the ONLY difference between myself and those you aid - is that I do not feign affection."
- ―Haytham Kenway to Connor.[src]

From the beginning, Haytham was very focused on his beliefs, every action concerning his Templar mindset.
After learning that he would be unable to enter the First Civilization storehouse, he grew quite concerned on setting up a foundation of power for the Templars in the Colonies.
As a young man, Haytham acted as a member of authority, slightly conceited in some ways, evident by him ignoring lower class civilians. When in the company of people closer to what he believed to be his level of intelligence or class, he was quite kind and more well-mannered.
His disregard for those underneath his standards contrasted with his respect towards the Native Americans, who many considered savages, as he engaged in a relationship with Kaniehtí:io.
On some occasions, Haytham would attempt to chime in with some humor, but in most situations he was relatively serious. This came with a courteous manner though, as he showed kindness towards the Native American people, saving them from slavery at the hands of Silas Thatcher, his admonishment of Charles Lee's negativity towards them and also apologizing towards patrons at the Theatre Royal in London when he disturbed their enjoyment of The Begger's Opera play.
Following this, he did not kill the child at the opera house who witnessed him assassinate Miko and he readily agreed to help Benjamin Franklin find his Almanac pages if he saw any.
He also saved the life of James Fairweather on board the Providence during the storm, even when he could have left him to fall. Additionally, Haytham was unflinching in a fight, defending Charles against Connor and acting calmly when captured by Church's men as he tailed the convoy.

As Haytham grew older, he experienced a significant change from how he was in his younger years. At this time, he was displayed to be a more irrational and impulsive individual, forcing people to do the dirty work and jumping into situations he knew he would make another person finish.
Haytham had also become much more cruel in some ways, callously killing his prisoners, although he was secretly shocked by his own cruelty, as he wrote in his journal.
In the company of his son, though, his hardened demeanor softened in some ways, or he made an attempt to be nice without displaying too much emotion. Shortly before his death, he became more fatherly towards his son in an attempt to kindle a relationship with him.
Despite his attempts though, his care for the Templar cause prevailed over the one for his son, and so he ultimately attempted to kill Connor in order to protect it.
However, he did seem somewhat distraught when Connor cut ties with him after the face off with Washington. In this way, he could be seen to sacrifice even those things close to him, all in the ultimate interests of mankind, even if his methods were less than stellar, recalling the Creed of the Assassins who killed because they must. In this way, he still held onto his Assassin upbringing.
As an ultimate gesture of love for his son, Haytham left behind his journal for Connor, in an attempt to have his son understand his life's journey, despite their clashing ideologies.
Equipment and skills
- "I am an expert swordsman. And I am skilled in the business of death. I take no pleasure in my skill. Simply, I am good at it."
- ―Haytham, describing his lethal prowess.[src]
Haytham was a capable freerunner, able to stealthily climb the inside of an opera house and the buildings of Colonial America with little effort. He was also an avid planner, able to quickly come up with infiltration techniques that would cripple the enemy. As well as that, he was a charismatic speaker and a master of both deception and stealth.
When it came to combat, Haytham claimed to be, and was indeed, a master swordsman, utilizing an elegant fencing style drastically different to his son's feral combat techniques. He also possessed two Hidden Blades as well as the rare ability of Eagle Vision.
Other weapons he was skilled in using included flintlock pistols and muskets. Following this, he was not afraid to use whatever was available to get the upper hand, such as strangling an executioner with his feet and throwing him into an enemy during the Siege of Bergen op Zoom.
Romantic life
- "I'm actually curious to know what your mother might have said about me. I always wondered what life might have been like had she and I stayed together."
- ―Haytham speaking to Ratonhnhaké:ton about Kaniehtí:io.[src]
As a child, Haytham attracted a few interests from women he grew up around in Queen Anne's Square, though his father's prior work as a pirate and Assassin caused his family to be alienated by the people.
Over the years traveling with Reginald and working as a Templar, Haytham experienced few romantic encounters, always feeling his dedication to the Order was more important than pursuing a family.

The most serious romantic relationship that Haytham shared with was Kaniehtí:io, a member of the Kanien'kehá:ka tribe. They met when Haytham saved her from British slavers working for Silas Thatcher, and after breaking into Southgate, he released her from captivity.
Following Silas' death, she escorted her people who were freed by Haytham out of the fortress, disappearing from Haytham's notice. By winter 1755, Haytham officially met Kaniehtí:io after chasing her around the forest outside of Lexington after he attempted to show her the emblems on the Precursor amulet.
The pair soon worked together on taking down General Edward Braddock who was occupying her people's lands. Originally, she distrusted Haytham, but she soon warmed up to him after a bar fight in Concord, as she applied alcohol on a cloth to a wound he received on his face.
Eight months later, Kaniehtí:io met with Haytham, his associates and allied Native American tribe leaders in their aim to bring down Braddock. During this encounter, she saved Haytham's life after he was nearly killed by George Washington.
After Braddock was defeated, she took Haytham to the Precursor site where she saw the symbols on the amulet. While Haytham failed to open the door because he lacked another piece, Kaniehtí:io comforted him and the couple kissed.
Later on, they shared another moment together which led to the conception of their son, though sometime following this, he revealed his Templar affiliation to her and respected her wishes for him to leave and never come back.
Haytham was surprised when he discovered Connor was his child, and when he finally met up with Connor, he told his son that he had always wondered what life would have been like for the three of them if he and Kaniehtí:io stayed together, adding that he wondered what she might have said about him.
Final words

- Connor: Surrender, and I will spare you.
- Haytham: Brave words for someone about to die.
- Connor: You fare no better!
- Haytham: Even when your kind appears to triumph... still, we rise again. And, do you know why? It is because the Order is born of a REALIZATION. We require no creed! No indoctrination by desperate, old men. All we need is that the world be as it is. And THIS is why the Templars will never be destroyed!
Connor managed to stab Haytham in the neck with the Hidden Blade.
- Haytham: Don't think I have any intention of caressing your cheek and saying I was wrong. I will not weep, and wonder what might have been. I'm sure you understand. Still, I'm proud of you in a way. You have shown great conviction, strength, courage, all noble qualities... I should have killed you long ago.
Connor spoke his farewell to his father in Kanien'keha.
- Connor: Goodbye, father.
Trivia
- Haytham's name was connected with an eagle, continuing the eagle motif set by Aquilus, Altaïr Ibn-La'Ahad, Ezio Auditore da Firenze, Aveline de Grandpré and Nikolai Orelov.
- "Haytham" is a transliteration of the Arabic name هيثم meaning "young eagle."
- "Kenway" comes from an Old English name, either Cynewig or Cenwig, composed of the words cyne ("royal") or cen ("keen, bold") and wig ("war").
- Like his son and father, Haytham did not possess the scar on his lip that some of Desmond's other ancestors displayed.
- Haytham had an eagle symbol on his jacket's left cuff, and what appeared to be a broken, rusted Assassin insignia on his right bracer. His cloak was also adorned by symbols both resembling a Templar cross near the top, and a Freemason insignia near the middle.
- Haytham was the first playable Templar in the Assassin's Creed series' single player mode and also the first playable ancestor who wore a hat instead of the symbolic white hood of the Assassins, the second being Aveline de Grandpré.
- In addition, the only mission playable without Haytham's hat was when he entered the Theatre Royal at the start of Assassin's Creed III.
- Haytham was the only known Templar capable of using Eagle Vision, and he was the second known ancestor of Desmond to be a Templar, the other being Maria Thorpe.
- Haytham's left Hidden Blade was unlike those of previous ancestors, being shorter and closer to his wrist.
- Haytham was the fourth known Templar to perform a Leap of Faith, others being Francesco de' Pazzi, Vali cel Tradat and Daniel Cross.
- The interactions between Haytham and Connor showed similarities to William and Desmond Miles, specifically concerning personality and conversations.
- Ironically, Haytham mentioned near to the start of Assassin's Creed III that he cut ties with Edward Braddock for his ruthlessness and slaughter of innocents, which Haytham himself showed signs of committing by the end of the game.
- During his final confrontation with Connor, Haytham justified the Templars by stating that "all mankind was built to serve." This cryptic statement was a reference to how humans were originally a slave race under the First Civilization.
- Haytham was briefly mentioned in The Tyranny of King Washington as having died a long time before in the alternate timeline. His Hidden Blades, their bracers different to his true timeline counterparts, were kept safe by Kaniehtí:io, who later gave them to Ratonhnhaké:ton.
Gallery
-
 Haytham talking with Samuel Smythe
 -
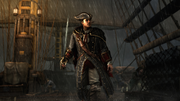 Haytham on board the Providence
 -
 Haytham with Kaniehtí:io
 -
 Haytham warning Edward Braddock
 -
 Haytham inducting Charles Lee into the Templar Order
 -
 Haytham with an accomplice shortly before the Boston Massacre
 -
 Haytham with his fellow Templars


References