Welcome to Assassin's Creed Wiki! Log in and join the community.
The Truth (memory): Difference between revisions
Jump to navigation
Jump to search
imported>The Supreme Diamond-Hooded Eagle |
m Text replacement - " " to " " |
||
| (35 intermediate revisions by 13 users not shown) | |||
| Line 1: | Line 1: | ||
{{Era|ACR}} | {{Era|Memories|ACR}} | ||
{{ | {{Youmay|a memory|the [[The Truth|video file]] of the same name}} | ||
{{Memory Infobox | {{Memory Infobox | ||
|image = | | name = The Truth | ||
|appearance = ''[[Assassin's Creed: Revelations]]'' - ''[[The Lost Archive]]'' | | image = ACR DLC-6.png | ||
|type = | | appearance = ''[[Assassin's Creed: Revelations]]'' - ''[[The Lost Archive]]'' | ||
|previous = [[Bleeding Effect (memory)|Bleeding Effect]] | | type = The Lost Archive | ||
|next = [[The End of the Line]] | | previous = [[Bleeding Effect (memory)|Bleeding Effect]] | ||
| | | next = [[The End of the Line]] | ||
| source = [[Clay Kaczmarek]]}} | |||
'''The Truth''' was a memory of [[Clay Kaczmarek]] during his journey through the [[Animus]] [[Black Room]]. | '''The Truth''' was a memory of [[Clay Kaczmarek]] during his journey through the [[Animus]] [[Black Room]]. | ||
== Description == | ==Description== | ||
Clay explored | Clay explored his memories on completing his given mission, that of learning what [[Abstergo Industries|Abstergo]] was looking for, and their plans for it. | ||
== Dialogue == | ==Dialogue== | ||
*'''Doctor:''' ''I've administered {{Wiki| | *'''[[Doctor]]:''' ''I've administered {{Wiki|paliperidone}}.'' | ||
*'''[[Warren Vidic|Warren]]:''' ''Thank you. Inform me when he recovers and we will return to work.'' | *'''[[Warren Vidic|Warren]]:''' ''Thank you. Inform me when he recovers and we will return to work.'' | ||
*'''Doctor:''' ''You have been experimenting on him for more than a year now, the man needs a long rest.'' | *'''Doctor:''' ''You have been [[Animus Project|experimenting]] on him for more than a year now, the man needs a long rest.'' | ||
*'''Warren:''' ''Stick to your field, Doctor, and I will practice mine.'' | *'''Warren:''' ''Stick to your field, Doctor, and I will practice mine.'' | ||
*'''Clay:''' ''How are you doing, [[Harold Kaczmarek|dad]]? Hanging in there? I know it's hard with Mom gone.'' | *'''Clay:''' ''How are you doing, [[Harold Kaczmarek|dad]]? Hanging in there? I know it's hard with Mom gone.'' | ||
| Line 24: | Line 24: | ||
*'''Clay:''' ''Now, to get into their mainframe.'' | *'''Clay:''' ''Now, to get into their mainframe.'' | ||
*'''Clay:''' ''There you are Vidic.'' | *'''Clay:''' ''There you are Vidic.'' | ||
*'''Warren:''' ''We've found a perfect candidate named [[Desmond Miles]]. His ancestral tree fits the data gathered from | *'''Warren:''' ''We've found a perfect candidate named [[Desmond Miles]]. His ancestral tree fits the data gathered from Subject 16's memory of [[Ezio Auditore da Firenze|Ezio Auditore]]. But it is quite likely that he won't cede essential details freely. Desmond is the key to the location of the [[Piece of Eden|Pieces]] of [[Eden]]. Our scientists have been running tests. If we were to place [[Apple of Eden 2|just one]] within a [[Eye-Abstergo|satellite]] and angle it toward the [[Earth]]... well, [[New World Order|utopia]] would be within our grasp.'' | ||
*'''Clay:''' ''Yes! That's it. I know what Vidic wants. We can leave.'' | *'''Clay:''' ''Yes! That's it. I know what Vidic wants. We can leave.'' | ||
A recording of Warren Vidic and [[Lucy Stillman]] | A recording of Warren Vidic and [[Lucy Stillman]] began to play. | ||
*'''Warren:''' ''Lucy, this is where your background comes into play. If our experiments with Desmond in the Animus aren't going well, you will remove him from | *'''Warren:''' ''Lucy, this is where your background comes into play. If our experiments with Desmond in the Animus aren't going well, you will remove him from Abstergo. Take him somewhere he will feel comfortable divulging his secrets. Your [[Assassins]] should do the trick. Since Desmond will be reading our [[emails]], we will ensure that secret communications between you and the Assassins go through unimpeded. Once you are embedded, I will come to pick up the Animus tapes. Make sure you look very upset. You need to be convincing. Desmond will lead you to the [[Apple of Eden 6|Apple]] and then you bring it right to us. We're counting on you, Lucy. You have served the [[Templars|Templar Order]] well, and we never forget [[Project Siren|loyalty]]. Oh, yes. Once inside their [[Rome hideout|hideout]], perhaps you might ask the Assassins why they left you alone for so many years.'' | ||
*'''Clay:''' ''Lucy. Trapped. I have to get out of here!'' | *'''Clay:''' ''Lucy. Trapped. I have to get out of here!'' | ||
== | ==Behind the scenes== | ||
After the | After the announcement of accessing the mainframe, besides the pit with the lasers, there was a line near to the bottom of the wall, encrypted with {{Wiki|Caesar cipher}}, which displayed as "''Oxfb, vkh Lv dOzdbv ehklqg Brx''." With an alphabetical shift of 3, the line could be decoded to read "''Lucy, she Is aLways behind You.''" | ||
The emblem above the doorway is the symbol of the asteroid {{Wiki|3 Juno}}. It is also the emblem of the [[Instruments of the First Will]]. | |||
==Gallery== | |||
<gallery captionalign="center" position="center" widths="180"> | |||
ACR DLC-6-room1.png | |||
ACR DLC-6-room2.png | |||
ACR DLC-6-room3.png | |||
ACR DLC-6-room4.png | |||
ACR DLC-6-room5.png | |||
ACR DLC-6-hallucination.png|Hallucination | |||
ACR DLC-6-room6.png | |||
ACR DLC-6-message.png|"Lucy, she Is aLways behind You" | |||
ACR DLC-6-hacking1.png|Into the mainframe | |||
ACR DLC-6-hacking2.png | |||
ACR DLC-6-room7.png | |||
ACR DLC-6-theater.png|[[Project Siren]] revealed | |||
ACR DLC-6-trapped.png | |||
ACR DLC-6-escape.png | |||
ACR TLA M06 Project Siren 01.png|"Lucy, this is where your background comes into play." | |||
ACR TLA M06 Project Siren 02.png|"If our experiments with Desmond in the Animus aren't going well..." | |||
ACR TLA M06 Project Siren 03.png|"Take him somewhere he will feel comfortable..." | |||
ACR TLA M06 Project Siren 04.png|"Your Assassins should do the trick." | |||
ACR TLA M06 Project Siren 05.png|"Since Desmond will be reading our emails..." | |||
ACR TLA M06 Project Siren 06.png|"...I will come to pick up the Animus tapes" | |||
ACR TLA M06 Project Siren 07.png|"Make sure you look very upset." | |||
ACR TLA M06 Project Siren 08.png|"Desmond will lead you to the Apple..." | |||
ACR TLA M06 Project Siren 09.png|"You have served the Templar Order well..." | |||
ACR TLA M06 Project Siren 10.png|"...perhaps you might ask the Assassins why they left you..." | |||
</gallery> | |||
==References== | |||
*''[[Assassin's Creed: Revelations]] – [[The Lost Archive]]'' | |||
{{ACRMemories}} | {{ACRMemories}} | ||
[[Category: | {{DEFAULTSORT:Truth (memory), The}} | ||
[[Category:Memories of Clay Kaczmarek]] | |||
[[Category:Memories relived using the Animus 2.03]] | |||
Latest revision as of 00:59, 10 July 2026
| This article is about a memory. You may be looking for the video file of the same name. |
The Truth was a memory of Clay Kaczmarek during his journey through the Animus Black Room.
Description[edit | edit source]
Clay explored his memories on completing his given mission, that of learning what Abstergo was looking for, and their plans for it.
Dialogue[edit | edit source]
- Doctor: I've administered paliperidone.
- Warren: Thank you. Inform me when he recovers and we will return to work.
- Doctor: You have been experimenting on him for more than a year now, the man needs a long rest.
- Warren: Stick to your field, Doctor, and I will practice mine.
- Clay: How are you doing, dad? Hanging in there? I know it's hard with Mom gone.
- Harold: Our contractor's not getting any jobs thanks to this crappy economy. I haven't been to work in a week.
- Clay: That's tough. I sent a check, it should arrive today or tomorrow.
- Clay: Now, to get into their mainframe.
- Clay: There you are Vidic.
- Warren: We've found a perfect candidate named Desmond Miles. His ancestral tree fits the data gathered from Subject 16's memory of Ezio Auditore. But it is quite likely that he won't cede essential details freely. Desmond is the key to the location of the Pieces of Eden. Our scientists have been running tests. If we were to place just one within a satellite and angle it toward the Earth... well, utopia would be within our grasp.
- Clay: Yes! That's it. I know what Vidic wants. We can leave.
A recording of Warren Vidic and Lucy Stillman began to play.
- Warren: Lucy, this is where your background comes into play. If our experiments with Desmond in the Animus aren't going well, you will remove him from Abstergo. Take him somewhere he will feel comfortable divulging his secrets. Your Assassins should do the trick. Since Desmond will be reading our emails, we will ensure that secret communications between you and the Assassins go through unimpeded. Once you are embedded, I will come to pick up the Animus tapes. Make sure you look very upset. You need to be convincing. Desmond will lead you to the Apple and then you bring it right to us. We're counting on you, Lucy. You have served the Templar Order well, and we never forget loyalty. Oh, yes. Once inside their hideout, perhaps you might ask the Assassins why they left you alone for so many years.
- Clay: Lucy. Trapped. I have to get out of here!
Behind the scenes[edit | edit source]
After the announcement of accessing the mainframe, besides the pit with the lasers, there was a line near to the bottom of the wall, encrypted with Caesar cipher, which displayed as "Oxfb, vkh Lv dOzdbv ehklqg Brx." With an alphabetical shift of 3, the line could be decoded to read "Lucy, she Is aLways behind You."
The emblem above the doorway is the symbol of the asteroid 3 Juno. It is also the emblem of the Instruments of the First Will.
Gallery[edit | edit source]
-

-

-

-

-

-
 Hallucination
 -

-
 "Lucy, she Is aLways behind You"
 -
 Into the mainframe
 -

-

-
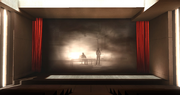 Project Siren revealed
 -

-

-
 "Lucy, this is where your background comes into play."
 -
 "If our experiments with Desmond in the Animus aren't going well..."
 -
 "Take him somewhere he will feel comfortable..."
 -
 "Your Assassins should do the trick."
 -
 "Since Desmond will be reading our emails..."
 -
 "...I will come to pick up the Animus tapes"
 -
 "Make sure you look very upset."
 -
 "Desmond will lead you to the Apple..."
 -
 "You have served the Templar Order well..."
 -
 "...perhaps you might ask the Assassins why they left you..."


