Welcome to Assassin's Creed Wiki! Log in and join the community.
Multiplayer/ACIII: Difference between revisions
Jump to navigation
Jump to search
imported>Amnestyyy No edit summary |
imported>Neadst |
||
| (31 intermediate revisions by 21 users not shown) | |||
| Line 1: | Line 1: | ||
{{Era|AC3|Realworld}} | {{Era|AC3|Realworld}} | ||
This page details the various locations | This page details the various characters and locations included within the multiplayer of ''[[Assassin's Creed III]]''. | ||
==Characters== | ==Characters== | ||
{|border="0" cellspacing="3" cellpadding="0" align="center" style="font-size:90%" | {| border="0" cellspacing="3" cellpadding="0" align="center" style="font-size:90%" | ||
|[[File:BearWall.png|150px|link=Bear (Animi Avatar)|Bear]] | |||
|[[File:CarpenterWall2.png|150px|link=Carpenter]] | |[[File:CarpenterWall2.png|150px|link=Carpenter]] | ||
|[[File:CommanderWall2.png|150px|link=Commander]] | |[[File:CommanderWall2.png|150px|link=Commander]] | ||
![[File:Coyote_Man_MP.png|150px|link=Coyote Man (Animi Avatar)]] | |||
|- | |- | ||
![[Bear (Animi Avatar)|Bear]] | |||
![[Carpenter]] | ![[Carpenter]] | ||
![[Commander]] | ![[Commander]] | ||
![[Coyote Man (Animi Avatar)|Coyote Man]] | |||
|} | |||
{| border="0" cellspacing="3" cellpadding="0" align="center" style="font-size:90%" | |||
![[File:Governor_MP.png|150px|link=Governor (Animi Avatar)]] | |||
|[[File:HessianWall.png|150px|link=Hessian]] | |||
![[File:Highlander_MP.png|150px|link=Highlander]] | |||
|[[File:HuntsmanWall.png|150px|link=Huntsman]] | |||
|- | |||
![[Governor (Animi Avatar)|Governor]] | |||
![[Hessian]] | |||
![[Highlander]] | |||
![[Huntsman]] | ![[Huntsman]] | ||
|} | |} | ||
{|border="0" cellspacing="3" cellpadding="0" align="center" style="font-size:90%" | {| border="0" cellspacing="3" cellpadding="0" align="center" style="font-size:90%" | ||
|[[File:IndependentWall.png|150px|link=Independent]] | |||
|[[File:LadyMaverickWall2.png|150px|link=Lady Maverick]] | |[[File:LadyMaverickWall2.png|150px|link=Lady Maverick]] | ||
|[[File:MontebankWall.png|150px|link=Mountebank]] | |[[File:MontebankWall.png|150px|link=Mountebank]] | ||
|[[File:NightstalkerWall2.png|150px|link=Night Stalker]] | |[[File:NightstalkerWall2.png|150px|link=Night Stalker]] | ||
|- | |- | ||
![[Independent]] | |||
![[Lady Maverick]] | ![[Lady Maverick]] | ||
![[Mountebank]] | ![[Mountebank]] | ||
![[Night Stalker]] | ![[Night Stalker]] | ||
|} | |} | ||
{|border="0" cellspacing="3" cellpadding="0" align="center" style="font-size:90%" | {| border="0" cellspacing="3" cellpadding="0" align="center" style="font-size:90%" | ||
|[[File: | |[[File:PioneerWall.png|150px|link=Pioneer]] | ||
|[[File: | |[[File:Preacher3Wall.png|150px|link=Preacher (Animi Avatar)|Preacher]] | ||
|[[File: | |[[File:RedcoatWall.png|150px|link=Red Coat]] | ||
|[[File: | |[[File:RobberWall.png|150px|link=Robber]] | ||
|- | |- | ||
![[Pioneer]] | |||
![[Preacher (Animi Avatar)|Preacher]] | ![[Preacher (Animi Avatar)|Preacher]] | ||
![[ | ![[Red Coat]] | ||
![[Robber]] | ![[Robber]] | ||
|} | |} | ||
{|border="0" cellspacing="3" cellpadding="0" align="center" style="font-size:90%" | {| border="0" cellspacing="3" cellpadding="0" align="center" style="font-size:90%" | ||
|[[File:SharpshooterWall.png|150px|link=Sharpshooter]] | |[[File:SharpshooterWall.png|150px|link=Sharpshooter]] | ||
|[[File:BlackbirdWall.png|150px|link=Silent Shadow]] | |||
|[[File:StrongmanWall.png|150px|link=Strong Man]] | |||
|- | |- | ||
![[Sharpshooter]] | ![[Sharpshooter]] | ||
![[Silent Shadow]] | |||
![[Strong Man]] | |||
|} | |} | ||
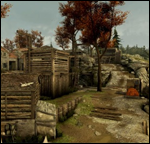
==Locations== | ==Locations== | ||
{|border="0" cellspacing="3" cellpadding="0" align="center" style="font-size:90%" | {| border="0" cellspacing="3" cellpadding="0" align="center" style="font-size:90%" | ||
|[[File: | |[[File:AnimusCoreWall.png|150px|link=Animus Core]] | ||
|[[File: | |[[File:BostonHarbourWall.png|150px|link=Boston Harbor]] | ||
|[[File: | |[[File:BostonNorthEndWall.png|150px|link=Boston North End]] | ||
|[[File: | |[[File:ACMPCharlestownWall.png|150px|link=Charlestown]] | ||
|- | |- | ||
![[Animus Core]] | ![[Animus Core]] | ||
![[Boston Harbor]] | ![[Boston Harbor]] | ||
![[Boston North End]] | ![[Boston North End]] | ||
![[ | ![[Charlestown]] | ||
|} | |} | ||
{|border="0" cellspacing="3" cellpadding="0" align="center" style="font-size:90%" | {| border="0" cellspacing="3" cellpadding="0" align="center" style="font-size:90%" | ||
|[[File: | |[[File:FortWolcottWall.png|150px|link=Fort Wolcott]] | ||
|[[File: | |[[File:ACMPFortStMathieuWall.png|150px|link=Fort St-Mathieu]] | ||
|[[File:NewYorkBreweryWall.png|150px|link=New York Brewery]] | |||
|[[File:NorthwestPassageWall.png|150px|link=Northwest Passage]] | |[[File:NorthwestPassageWall.png|150px|link=Northwest Passage]] | ||
|- | |- | ||
![[ | ![[Fort Wolcott]] | ||
![[Fort St-Mathieu]] | |||
![[New York Brewery]] | ![[New York Brewery]] | ||
![[Northwest Passage]] | ![[Northwest Passage]] | ||
|} | |||
{| border="0" cellspacing="3" cellpadding="0" align="center" style="font-size:90%" | |||
|[[File:ACMPSaintPierreWall.png|150px|link=Saint Pierre]] | |||
|[[File:ACMPVirginiaPlantationWall.png|150px|link=Virginian Plantation]] | |||
|- | |||
![[Saint Pierre]] | |||
![[Virginian Plantation]] | ![[Virginian Plantation]] | ||
|} | |} | ||
[[Category:Assassin's Creed III | [[Category:Assassin's Creed III multiplayer]] | ||
Latest revision as of 15:49, 22 December 2022
This page details the various characters and locations included within the multiplayer of Assassin's Creed III.
Characters[edit | edit source]

|

|

|

|
|---|---|---|---|
| Bear | Carpenter | Commander | Coyote Man |

|

|

|

|
|---|---|---|---|
| Governor | Hessian | Highlander | Huntsman |

|

|

|

|
| Independent | Lady Maverick | Mountebank | Night Stalker |
|---|

|

|

|

|
| Pioneer | Preacher | Red Coat | Robber |
|---|

|

|

|
| Sharpshooter | Silent Shadow | Strong Man |
|---|
Locations[edit | edit source]

|

|

|

|
| Animus Core | Boston Harbor | Boston North End | Charlestown |
|---|

|
|

|

|
| Fort Wolcott | Fort St-Mathieu | New York Brewery | Northwest Passage |
|---|

|

|
| Saint Pierre | Virginian Plantation |
|---|