|
|
| Line 2,525: |
Line 2,525: |
|
| |
|
| </tabber> | | </tabber> |
|
| |
| ===Original Table===
| |
| {|border="1" cellpadding="1" cellspacing="1" style="width:700px; text-align:center"
| |
| !Name
| |
| !Quote
| |
| !Timeline
| |
| !Location
| |
| !Story
| |
| !More
| |
| |-
| |
| |Sakakibara Yasumasa
| |
| |''Allocation of fiefs is the opposite of war: giving land, not taking it.''
| |
| |1548-1606
| |
| |Japan
| |
| |Sakakibara Yasumasa served as one of Tokugawa Ieyasu's greatest generals, often called the "Four Guardians.” Yasumasa and Honda Tadakatsu were the same age, and both were appointed into Ieyasu's personal service when they became old enough.
| |
| |Yasumasa earned the gratitude and trust of leyasu by staying to fight against Toyotomi Hideyoshi, despite having familal ties to Hideyoshi. Yasumasa was the most suspicious of the Assassins, though he was also the most impressed by their skills.
| |
| |-
| |
| |Sakai Tadatsugu
| |
| |''Every advance reveals a weakness. Wait, and strike.''
| |
| |1527-1596
| |
| |Japan
| |
| |Sakai Tadatsugu served as one of Tokugawa Ieyasu's greatest generals, often called the "Four Guardians." He was the eldest of the four, having first served Ieyasu's father, Matsudaira Hirotada.
| |
| |Tadatsugu was a brilliant tactician with a penchant for fooling his enemies with ruses. In the battle of Mikatagahara, which saw Iesyasu's army devastated by Takeda Shingen, some trickery from Tadagatsugu kept the enemy from pursuing Ieyasu's men as they retreated.
| |
| |-
| |
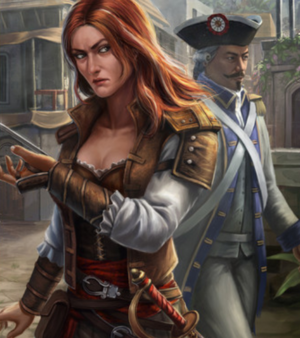
| |Charles Vane
| |
| |''I'll murder the man who stole my ship!''
| |
| |1680-1721
| |
| |Caribbean
| |
| |Like most pirates, Charles Vane began his career as a privateer. When privateering opportunities dried up, Vane took to piracy at the helm of his ship, the Ranger. He quickly became one of the most notorious pirates in the Caribbean.
| |
| |Vane and Edward Kenway sailed together on several occasions. It was during one of these collaborations that Jack Rackham convinced Vane's crew to mutiny, leaving Vane and Kenway stranded on a deserted island.
| |
| |-
| |
| |Honda Tadakatsu
| |
| |''I served in battle my master has fought, yet where are my wounds?''
| |
| |1548-1610
| |
| |Japan
| |
| |Honda Tadakatsu served as one of Tokugawa Ieyasu's greatest generals, often called the "Four Guardians.” His distinction in batile was known across all of Japan, and legends say that despite fighting in over 100 batiles, he never suffered a single wound.
| |
| |When the Assassins came to Ieyasu with a plan for retrieving the Sword of Eden, Tadakatsu was initially opposed; being an honorable warrior, he preferred meeting his enemy face to face in combat over striking at them from secrecy.
| |
| |-
| |
| |Mochizuki Chiyome
| |
| |''Your old life is over. Train with me, and you will have a new one.''
| |
| |?
| |
| |Japan
| |
| |Mochizuki Chiyome was a noblewoman who served Takeda Shingen. Upon hearing that she had been trained in the ninja arts by the Kōga clan, Shingen gave Chiyome the task of recruiting women and training them as spies and assassins.
| |
| |Chiyome's network of kunoichi numbered in the hundreds, and Shingen was kept well informed. While strong, this network still had holes; it was not enough to spot Honda Tadakatsu and Hattori Hanzō as they snuck into Shingen's camp.
| |
| |-
| |
| |Benjamin Hornigold
| |
| |''The Templars know order. Discipline. Structure. But you could never fathom these subleties.''
| |
| |?-1719
| |
| |Caribbean
| |
| |Benjamin Hornigold was a tremendously successful pirate with a fleet of five warships. Among Hornigold's trainees were Edward Thatch and Charles Vane. However, Hornigold would eventually betray them all after an offer to join the Templars.
| |
| |Hornigold accepted a pardon offered by the Templar Woodes Rogers. In exchange, Hornigold became a pirate hunter, chasing down and apprehending his former comrades. He excelled at this task until the day he went after his former associate Edward Kenway.
| |
| |-
| |
| |James Kidd
| |
| |''We follow a Creed, aye. But it does not command us to act or submit.''
| |
| |?-1720
| |
| |Caribbean
| |
| |In order to get a foothold in the predominately male pirate society, Mary Read disguised herself as a man and took the name James Kidd. She eventually sailed on Jack Rackham's ship, and was one of the few sober enough to fight back when they were boarded.
| |
| |Aside from her life of piracy, Mary Read was a member of the Assassins. She tried several times to convince Edward Kenway to abandon his pursuit of riches and join the Brotherhood. It was only after her death in prison that Edward took her advice.
| |
| |-
| |
| |Ah Tabai
| |
| |''Nothing in life is guaranteed, except surprise.''
| |
| |1660-?
| |
| |Caribbean
| |
| |Born on the Yucatán Peninsula and of Mayan descent, Ah Tabai became Mentor of the Caribbean Assassins in 1713. He trained both Mary Read and Duncan Walpole as Assassins, and took on Adéwalé as an apprentice after the latter left Edward Kenway's ship.
| |
| |Ah Tabai and Edward Kenway had a fractious relationship, as Edward had no interest in the Assassins and had simply posed as one to make some money. Edward would later come to understand what the Assassins stood for, and Ah Tabai then allowed him to join.
| |
| |-
| |
| |Calico Jack
| |
| |''You'd like to know my secrets, would you?''
| |
| |1682-1720
| |
| |Caribbean
| |
| |Jack Rackham, often called Calico Jack, was a capable shipman who sailed with Charles Vane. He convinced the crew to mutiny against Vane and steal Edward Kenway's ship, but his captaincy was a failure and Edward got his ship back a few months later.
| |
| |Calico Jack returned to piracy after enlisting the aid of Mary Read and Anne Bonny. They [sic] successes drew the attention of bounty hunters, who attacked Rackham's ship. They were captured fairly easily, as most of the crew was too drunk to fight back.
| |
| |-
| |
| |Bartholomew Roberts
| |
| |''A merry life and a short one, as promised. How well I know myself.''
| |
| |
| |
| |Caribbean
| |
| |As one of the most successful and destructive pirates of all time, Roberts drew the re of everyone in the Caribbean; Assassins, Templars, the British Navy, the Spanish Navy, the Portuguese Navy, and even other pirates.
| |
| |Roberts knew the location of an ancient First Civilization building called the Observatory, and both Templars and Assassins fought over him for this knowledge. In the end, it was Edward Kenway who claimed the pirate's life and the knowledge of the Observatory's location.
| |
| |-
| |
| |Julien du Casse
| |
| |''As bold as a musket ball, and still half as sharp.''
| |
| |
| |
| |Caribbean
| |
| |Julien du Casse was a French arms dealer operating In the West Indies. His work eventually saw him inducted into the Templar Order along with Woodes Rogers and Duncan Walpole, the latter being impersonated by Edward Kenway.
| |
| |Du Casse and the other Templars quickly discovered that who they thought was Walpole was actually an impostor, and had Kenway imprisoned, Shortly after escaping, Kenway crossed paths with du Casse and ended his life.
| |
| |-
| |
| |El Tiburón
| |
| |''...''
| |
| |
| |
| |Caribbean
| |
| |Spanish for "The Shark," El Tiburón was the mute bodyguard of the Templar Grand Master, Laureano de Torres y Ayala. El Tiburón was a brute of a man draped in thick armor, and was fearless in combat.
| |
| |Edward Kenway first encountered El Tiburón when he tried to break the Sage out of prison in Havana. El Tiburón got the better of Kenway then, but later he would prevail over The Shark as Kenway attempted to assassinate Torres.
| |
| |-
| |
| |Chaya Shirojiro Kiyonobu
| |
| |''Powerful men still need what we provide.''
| |
| |
| |
| |Japan
| |
| |Chaya Shirojiro Kiyonobu was part of a long line of merchants in Kyoto. The Chaya family held a monopoly on the raw silk trade thanks to a permit that allowed them to travel to Vietnam to trade goods.
| |
| |In addition to managing trade, Kyonobu was also tasked by leyasu to track the foreigners entering the port city. Specifically, he was to keep an eye on the Christian missionaries, and report any suspicion of Templar affiliation.
| |
| |-
| |
| |Peter Chamberlaine
| |
| |''Why scratch and claw to protect such squalor?''
| |
| |
| |
| |Caribbean
| |
| |The newly appointed governor of the Bahamas, Woodes Rodgers, appointed Commodore Peter Chamberlane to combat piracy. Chamberlaine harbored a fierce grudge against pirates, however, and was wiling to overstep his bounds to see them eliminated.
| |
| |While the governor had offered pardons to the pirates Hornigold, Vane, and Thatch, Chamberlaine plotted to sink their ships regardless of whether or not they accepted. Upon discovering this, Kenway snuck onto Chamberlaine's ship and assassinated him.
| |
| |-
| |
| |Laurens Prins
| |
| |''You live in the world but you cannot make it move.''
| |
| |1630-1717
| |
| |Caribbean
| |
| |Laurens Prins was a Dutch pirate who once sailed with the legendary Captain Henry Morgan. After Morgan's death, Prins became a slave trader, and as a consequence he worked closely with the Caribbean Templars.
| |
| |In 1717, Bartholomew Roberts was working on one of Prins' slave ships. Having identified Roberts as the Sage, Torres tried to buy Roberts from Prins for a sizable sum.
| |
| |-
| |
| |Hattori Hanzo
| |
| |''Those who cling to life, die; those who defy death, live.''
| |
| |1542-1596
| |
| |Japan
| |
| |Hattori Hanzō skill with the yari was legendary, and his prowess in battle made him respected and feared as one of the greatest samurai in Japan. He also excelled in the ninja arts, and had a fierce rivalry with Fūma Kotarō.
| |
| |Hanzō's ability made him a valued ally of Tokugawa Ieyasu, and Hanzō saved his master's life on several occasions. He was also instrumental in the struggle against the Japanese Templars, assassinating Uesugi Kenshin and retrieving the Sword of Eden.
| |
| |-
| |
| |Ii Naomasa
| |
| |''If you are not wounded, you have not truly fought.''
| |
| |1561-1602
| |
| |Japan
| |
| |Ii Naomasa served as one of Tokugawa Ieyasu's greatest generals, often called the "Four Guardians." He was a veteran of numerous battles, and was famous for continuing to fight even after sustaining severe injuries.
| |
| |While the rest of the Four Guardians were not easily convinced that the Assassins could aid them, Naomasa saw differentiy. He recognized that the Assassins could prove to be valuable allies, and often suggested calling on them to his colleagues.
| |
| |-
| |
| |Alesandro Valignano
| |
| |''These converts are our foothold in this country.''
| |
| |1539-1606
| |
| |Japan
| |
| |Alessandro Valignano was a Jesuit missionary that was sent to help introduce Catholicism to Japan. While he was sent to aid Francisco Cabral, who was already doing missionary work in Japan, the two men despised on [sic] another almost instantly.
| |
| |Valignano used his Jesuit connections to scour Japan for Templar recruits. When Francisco Cabral confronted Valignano about this, he used his influence to force Cabral to resign from his post as Superior of the Jesuit Mission.
| |
| |-
| |
| |Blackbeard
| |
| |''Legends ain't born from mildness.''
| |
| |1680-1718
| |
| |Caribbean
| |
| |Edward Thatch sailed in the British Navy, but eventually quit to become a privateer. Once the War of the Spanish Succession ended Thatch turned to piracy. His fearsome ability as well as his significant facial hair led to the nickname Blackbeard.
| |
| |Thatch and Kenway crossed paths when they freed Nassau from the British. The two soon became allies, and debated how to run the Pirate Republic. Thatch later decided to quit piracy, but was killed by the British Navy on the night of his retirement party.
| |
| |-
| |
| |Captain William Kidd
| |
| |''I find myself at a crossroads; to return to my wife and child, or join my kinsmen.''
| |
| |1645-1701
| |
| |Caribbean
| |
| |A Scottish sailor and privateer for the English Parliament, William Kidd was later accused of piracy and hung. While he certainly took his share of plunder while privateering, the evidence that actually tied him to piracy was slim at best.
| |
| |Kidd's legacy far outlived the man himself. The Assassin Mary Read took the name James Kidd, and pretended to be an illegitimate child. The Assassin Ratonhnhaké:ton followed several maps to discover one of Kidd's buried treasures, a Shard of Eden.
| |
| |-
| |
| |Adéwalé
| |
| |''I'll be your quartermaster. Nothing less.''
| |
| |1692-1758
| |
| |Caribbean
| |
| |Adéwalé was born into slavery on Trinidad. His opportunity for escape came when pirates began raiding the plantation Adéwalé was on. He decided to aid the pirates, and they took him on board. He was eventually caught by the Spanish and imprisoned.
| |
| |Adéwalé met Edward Kenway while imprisoned, and the two broke free and commandeered a ship. Adéwalé became Edward's quartermaster, and the two sailed together for many years. Eventually Adéwalé left Edward's employ to join the Assassins.
| |
| |-
| |
| |Mori Motonari
| |
| |''You have just shown me why we should not be under one rule.''
| |
| |
| |
| |Japan
| |
| |As daimyo of what was a relatively small clan, Mōri Motonari used a cunning blend of tactics and force to expand his empire. Within a few years, he had eliminated several rival clans and ruled over the entire Chugoku region of Japan.
| |
| |Motonari was a vocal opponent of Nobunaga's attempt to unify all of Japan, though he never had the strength to challenge Nobunaga directly. The Mōri clan was further weakened when Nobunaga arranged the assassination of Motonari's heir, Mōri Takamoto.
| |
| |-
| |
| |Uesugi Kenshin
| |
| |''Wars are to be won with swords and spears, not with rice and salt.''
| |
| |1530-1578
| |
| |Japan
| |
| |Uesugi Kenshin was one of the most powerful daimyos of his time, ruling over the large Echigo province of Japan. In addition to his skill in battle, Kenshin was also a gifted administrator who greatly expanded industry and trade in his province.
| |
| |When Takeda Shingen's army neared Echigo, Kenshin moved to halt their advance. They fought to a stalemate, which was the start of a fierce rivalry between the two daimyos. This rivalry ended when Shingen was assassinated over the Sword of Eden.
| |
| |-
| |
| |Hattori Masanari
| |
| |''I will serve the Tokugawa as my father did, but in my on own.''
| |
| |1565-1615
| |
| |Japan
| |
| |Like his father, Hattori Hanzo, [sic] Masanari was a gifted warrior. After Hanzo's death in 1596, Masanari succeeded his father as a retainer of the Tokugawa. His lethal skills in battle eventually saw him appointed the Captain of the Edo Castle guard.
| |
| |Masanari was not as capable a leader as he was a warrior, and this led to him losing his position as Captain. Determined to salvage the reputation of himself and the Hattori clan, Masanari fought valiantly at the Siege of Osaka in 1615, but did not survive.
| |
| |-
| |
| |Yamauchi Kazutoyo
| |
| |''I wonder if my station is too much for one of such humble origins.''
| |
| |1546-1605
| |
| |Japan
| |
| |At only fourteen years of age, Yamauchi Kazutoyo's father died, leaving the young man to wander as a ronin for several years. He eventually came into the service of Oda Nobunaga, and worked his way up to becoming a trusted general.
| |
| |After Nobunaga's death, Kazutoyo served Toyotomi Hideyoshi, who had taken up Nobunaga's goal of unifying all of Japan. When Hideyoshi died in 1598, Kazutoyo chose to serve Tokugawa Ieyasu, and played a small but critical role in the latter's rise to power in 1600.
| |
| |-
| |
| |Date Masamune
| |
| |''Benevolence indulged beyond measure sinks into weakness.''
| |
| |
| |
| |Japan
| |
| |A massive strongman with a missing eye, Date Masamune was feared throughout much of northern Japan for his cunning and ruthlessness. As daimyo, Masamune began attacking nearby clans to expand his own, eventually ruling over most of the Tōhoku region.
| |
| |The shogun at the time, Toyotomi Hideyoshi, saw the wisdom in having Masamune as an ally, as did Hideyoshi's successor Tokugawa Ieyasu. Eventualy Masamune became lord of the profitable Sendai Domain, making him one of the most powerful men in Japan.
| |
| |-
| |
| |Mogami Yoshiaki
| |
| |''The bald rat will soon learn he can not simply take any life he pleases.''
| |
| |1546-1614
| |
| |Japan
| |
| |Mogami Yoshiaki was a powerful daimyo of northern Japan. In order to solidify his political position, Yoshiaki sent his daughter, Komahime, to be wed to Toyotomi Hidetsugu, nephew and heir to the Regent of Japan, Toyotomi Hideyoshi.
| |
| |Soon after Hideyoshi had a son of his own, and in order to secure his succession, Hideyoshi ordered the death of Hidetsugu and his family, including Komahime. This enraged Yoshiaki, who immediately turned his allegiance to Tokugawa Ieyasu.
| |
| |-
| |
| |}
| |
My primary sandbox.
To do
In no particular order.
- Mummification
- Geirmund's Saga
- French augmented reality tours
- Create [Le trésor des Templiers], [Assassin's Creed : Le Secret de Napoléon 1er], [Assassin's Creed : Le Secret de Camerone], [Assassin's Creed Immersive City Tour - L'Armoire de Fer], [Senka]
- Last Descendants
- Valhalla
Note: work on Dynasty, The Highlands Children and The Silk Road is dependent on me getting my hands on them
Texts
Materials
-
Solid Thread
-
Sewing Thread
-
Wool
-
Lead Ore
-
Flint
-
Flax
-
Cloth
-
Metal
-
Sugar
-
Wood
Rebellion
Heroes
Valhalla
Gear
Armor
| Name
|
Type of Gear
|
Class
|
Description
|
| Steampunk Helmet (Gold)
|
Helmet
|
Bear
|
.
|
| Steampunk Hood (Gold)
|
Cloak
|
Bear
|
.
|
| Steampunk Armor (Gold)
|
Torso
|
Bear
|
.
|
| Steampunk Bracers (Gold)
|
Bracers
|
Bear
|
.
|
| Steampunk Pants (Gold)
|
Pants
|
Bear
|
.
|
| Steampunk Helmet (Silver)
|
Helmet
|
Bear
|
A most peculiar looking helm. The craftsmanship is such that the wearer of this helm does not have an altered voice when speaking.
|
| Steampunk Hood (Silver)
|
Cloak
|
Bear
|
.
|
| Steampunk Armor (Silver)
|
Torso
|
Bear
|
The contraption that serves as a chest piece seems to require an army of attendants to don but is in fact quite easy to wear.
|
| Steampunk Bracers (Silver)
|
Bracers
|
Bear
|
.
|
| Steampunk Pants (Silver)
|
Pants
|
Bear
|
.
|
| The Ealdorman's Helmet
|
Helmet
|
Raven
|
Inspired by the Staffordshire Hoard helmet.
|
| The Ealdorman's Cape
|
Cloak
|
Raven
|
Inspired by Mercian arts.
|
| The Ealdorman's Coat
|
Torso
|
Raven
|
Riveted mail coat with Taplow warrior jacket.
|
| The Ealdorman's Bracers
|
Bracers
|
Raven
|
Splint iron armor piece from Valsgärde.
|
| The Ealdorman's Trousers
|
Pants
|
Raven
|
Splint iron armor from Valsgärde.
|
Weapons
| Name
|
Type of Gear
|
Class
|
Description
|
| Cog Spear
|
Spear
|
Wolf
|
It looks like the tip could be foldable, or able to change shape, but that is not the case. Even after trying several different methods.
|
| Steel-wrought Bow
|
Hunter Bow
|
Wolf
|
A novel design for a bow. The metal disks at the tips make the cord harder to pull at first but give good power upon release.
|
| Myrkalfar Axe
|
Bearded Axe
|
Bear
|
Despite it's [sic] perfect size as a tool, woe befall the one to use this mythical weapon for menial tasks, such as cutting wood...
|
| Gram
|
Great Sword
|
Bear
|
Could this be the legendary dragon-slaying weapon that slew might Fafnir? Perhaps, although none could be found to verify the claim.
|
| Dokkalfar Axe
|
Dane Axe
|
Bear
|
A long-hafted axe, seemingly carved from a single piece of enchanted green ore. It will never chip or break, no matter the use.
|
| Skadi's String
|
Hunter Bow
|
Wolf
|
Perhaps your archery skills are unmatched, but what would they be when coupled with an enchanted bow?
|
| Bedale-Gilling Sword
|
Short Sword
|
Raven
|
Its blade is finely decorated to depict the flow of running water, held by a golden hilt.
|
Flyting
- Augusta the Cheerful
- Brother Quiescis
- Chadwick, Monger of Gossip
- Hogg the Burly
- Jungulf
- Ove the Scarred
- Ratatosk
- Stigr The Amorous
- Thor
Offering Altars
| Location
|
Offering
|
| Dobby's Altar
|
5x Fabric
|
LD Red links
- LD2 Chapter 7
- Jane Bolster[1]
- Michael Dooley[1]
- Richard Bolster[1]
- Whiteboys[1]
- LD3 Chapter 4
- LD3 Chapter 6/22
- People
References
Saga
Bluelinks
- People
- Styrbjorn Sigvaldisson[4]
- Locations
- Timeline
Redlinks
- People
References
France
- Le trésor des Templiers
- Assassin's Creed : Le Secret de Napoléon 1er
- Assassin's Creed : Le Secret de Camerone
- Assassin's Creed Immersive City Tour - L'Armoire de Fer
Le trésor des Templiers
Developer's summary
- Original
Il y a des siècles, l’Ordre des Templiers mettait la main sur un trésor légendaire et inestimable. Plusieurs sources affirment que le Cardinal Lemoine aurait été en possession de ce trésor avant que ce dernier ne tombe dans l’oubli…
La Confrérie des Assassins souhaite s’en emparer et vous missionne pour retrouver sa trace. Votre quête débutera chez un descendant du Cardinal Lemoine et nul ne sait où elle vous mènera.
Tout sera permis pour votre équipe d’Assassins… y compris explorer le passé !
- Translation
Le Secret de Camerone
Developer's summary
- Original
30 avril 1863, 7h du matin, un combat oppose une compagnie de la Légion étrangère aux troupes libérales du gouvernement mexicain lors de l'expédition française au Mexique. Ces 24 heures d’affrontements ont fait la renommée de cette bataille, où le capitaine Danjou, mort au combat, laissa derrière lui, une relique dotée d’un pouvoir secret, qui a valu la réputation historique de la bataille de Camerone. L’histoire raconte qu’elle serait présente ici, au musée de la Légion Etrangère, à Aubagne. Munis de la fonction vision d’aigle, vous devrez récolter des indices en temps réel dans le musée de la Légion Étrangère, indispensables pour mener à bien votre mission : reconstituer la mémoire de ces ancêtres grâce au cultissime “Animus” et retrouver l’emplacement de l’artefact, en vous assurant qu’il sera désormais, en sécurité. Plongez dans une aventure en réalité augmentée, sur les pas du Capitaine Jean Danjou et du Caporal Louis Philippe Maine.
- Translation
Le Secret de Napoléon
Developer's summary
- Original
Le Musée de l’Armée accueille, pour une dernière édition, le jeu immersif développé en partenariat avec l’agence Cultival et Ubisoft. Du 14 juin au 7 juillet, percez le secret de Napoléon Ier et découvrez l’Hôtel national des Invalides comme vous ne l’avez jamais vu ! En 1798, Napoléon revient vainqueur d’Egypte après la célèbre « bataille des Pyramides » avec en sa possession, un mystérieux objet. À son retour en France, l’Europe des têtes couronnées tombe à ses genoux. La fidélité et l’admiration sans limites que lui vouent ses soldats donnent naissance à une légende : Napoléon exercerait sur eux un charisme extraordinaire, presque surnaturel… Napoléon aurait découvert une relique inestimable capable d’accorder à son propriétaire le pouvoir de contrôler l’esprit des hommes. Nous sommes au début du XXe siècle, et l’affrontement pour la retrouver n’a pas cessé. Plusieurs sources affirment que la relique serait encore auprès du tombeau de l’Empereur, aux Invalides. Muni de votre smartphone et d’une carte de l’Hôtel national des Invalides, choisissez votre camp et découvrez le secret de Napoléon Ier. Vous userez de votre « vision d’aigle » pour percer le secret de Napoléon. Au fil des indices, vous pénètrerez dans les espaces emblématiques de ce lieu aux dimensions hors norme - cour d'honneur et Dôme abritant le tombeau de Napoléon Ier. Vous accéderez en privilégié à des lieux habituellement fermés au public. N’oubliez pas votre smartphone pour activer votre vision d’aigle en réalité augmentée ! Parcours ouvert aux joueurs de tous âges, seuls ou en équipe.
- Translation
Soon
Screens (get better section name)
- Original
[IMAGE]
L'énigme de Nostradamus fut cachée,
Et en deux fragments divisée : Helios et Selene.
Observez la carte de jeu pour trouver le début de chaque chemin.
Confrérie des Assassins, commencez par Helios, trouvez le canon protecteur !
Ordre des Templiers, commencez par Selene, trouvez le tombeau de l'Aiglon !
La protection est la mission des Gardiens du secret. Utilisez votre vision d'aigle puis observez les alentours pour trouver à quel nombre soustraire 431. Choisissez le bon résultat:
1840! Date à laquelle le fidèle général participa au rapatriement du corps de Napoléon en France.
Aidez-vous de votre carte pour retrouver le tombeau du général, il vous contera l'histoire de l'héritage de l'Empereur.
[AUDIO]
Avez-vous remarqué la marque que le temps a tracée sur le parchemin? S'agirait-il de la lettre dont parle le Général?
Ècoutez son message et descendez dans la crypte pour trouver le bas-relief où Napoléon arbore une couronne rayonnante.
Rappelez-vous le souhait de l'Aigle et observez la boussole pour résoudre l'énigme finale de Selene... N'hésitez pas à bouscule vos repères!
000X
Vous avez résolu le code de Helios. Il vous sera utile à l'avenir.
Mais avez-vous poursuivi le chemin de Selene? Il vous est indispensable pour découvrir le secret.
La statue de l'Empereur surplombe la tombe de son fils et se dresse au milieu de noms des villes conquises. L'Aigle de Suger fut enchanté par la Pomme d'Éden. Lors de quelle bataille triompha cette épée?
- Ulm
- Austerlitz
- Rivoli
- Les Pyramides
C'est à Ulm que triompha cette épée toute puissante. Retrouvez désormais l'Aigle couronné que vous foulerez à la sortie de la crypte, en haut des escaliers.
Depuis Sainte-Hélène où il était en exil, Napoléon a émis le souhait de voir ses cendres reposer:
- Dans la Cathédrale Notre-Dame de Paris
- Sur les bords de la Seine
- Sur l'île de Sainte-Hélène
- À Ajaccio, son lieu de naissance
Sur les bords de la Seine, au milieu du peuple français qu'il a tant aimé et où il avait laissé sa précieuse relique. Notez bien le nom de ce fleuve!
Remontez dans le Dôme et trouvez la grande maquette des Invalides pour comprendre les lieux.
Rappelez-vous le souhait de l'Aigle et observez la boussole pour résoudre l'énigme finale de Selene... N'hésitez pas à bouscule vos repères!
3NI3S
Vous avez résolu le code de Selene, l'une des clefs pour percer le secret de l'Empereur.
Mais avez-vous parcouru le chemin d'Helios? Il vous est indispensable pour continuer.
- Ophiuchus
Enfoui sous le Dôme,
Le repaire du roi Soleil conservair la précieuse relique de Napoléon 1er.
Lorsque ses cendres revirent de Sainte-Hélène
La crypte fut creusée et
Un autre abri lui fut trouvé
Le général Betrand, exécuteur testamentaire de Napoléon, a déplacé la Pomme d'Éden en la cachant sous un coussin d'or aujourd'hui conservé dans la chapelle Saint-Jérôme. Retrouvez ce coussin!
Le danger se rapproche.
Amis, ennemis, utilisez la devise de votre camp pour entrer dans la chapelle.
- Ophiuchus
Trouvez la coeur du Général Leclerc.
Par amour, il connair la vérité.
Pour l'entendre, il faut avoir tenu entre ses mains l'épée d'Austerlitz
La Pomme d'Éden a été caché ici auprès de l'Empereur de 1840 à 1861, sous le coussin qui contenait sa précieuse épée d'Austerlitz, puis transférée dans un lieu encore plus sûr.
Retenez le message gravé sur la lame pour entendre le coeur du Général Leclerc.
[AUDIO]
Le coeur perçoit tout. Celui du Général Leclerc a été placé dans cette urne par son épouse pauline, soeur chérie de Napoléon.
Depuis le royaume des morts, un murmure s'échappe de l'urne << Trouvez l'emblème impérial de résurrection.>>
Pour y accéder, il vous faudra reproduire la célèbre posture de Napoléon ler.
[AUDIO]
Pour connaître le signe, rapprochez vous du Gardien du secret.
Voici enfin le tombeau secret, recouvert par les dalles du tombeau de Sainte-Hélène. Pour ouvrir le coffre, trouvez la clef sur votre carte.
S1X
Félicitations, vous avez-trouvé la clef du coffre. Pour découvrir son contenu, trouvez le dernier marqueur!
- [Note on the Eagle of Suger]
- L'Aigle de Suger ne triomphe
Ni dans la colonne de l'arc
Ni dans celle des triangles
Mais en avant dernière ligne.
- [Note held by eagle]
- À quelques pas d'ici
Regardez vers le ciel
Vous verrez les volontés
de l'Aigle gravées.
- [Ophichus and message]
- Dans le tombeau de l'Aigle
Caché sous un autre clef
Sur lequel les anges veillent
Le fruit défendu attend.
- Vous avez résolu Helios et Selene, mais Ophiuchus l'énigme cachée n'est pas encore terminpee. Pour connaître le destin de la Pomme d'Éden, observez la maquette originelle du Dôme des Invalides.
- Translation
Soon
L'Armoire de Fer
Developer's summary
- Original
Sur les conseils avisés de Senka, embarquez dans une visite de Paris en réalité augmentée sur votre smartphone. De la Basilique Sainte-Clotilde, en passant par la Place du Palais Bourbon, l’Assemblée Nationale ou encore le Jardin des Tuileries, découvrez des anecdotes inédites de la Ville Lumière, au fil des époques.
Arpentez les rues parisiennes et aidez la Confrérie des Assassins à retrouver la combinaison de l’armoire de fer, dans le cabinet secret de Louis XVI.
Êtes-vous prêts pour une aventure au grand air, en plein de coeur de Paris ? Rejoignez la Confrérie dès maintenant.
- Translation
Text dump
Assassin's Creed Tour : L'Armoire de Fer
- Loading messages
- Démarrage du Tricordeur ...
- Préparation d'une tasse de thé Earl Grey...
- Réglage des phaseurs en mode rotatif ...
- Recherche de Spot en cours...
- Waypoints
- app_lang_reg_tuto1_body;string;Ton environnement se transforme en terrain de jeu : tu vas pouvoir interagir avec des personnages ou bâtiments qui vont apparaître autour de toi...
- app_lang_cta_next;string;Suivant
- app_lang_reg_tuto2_title;string;Pour découvrir une expérience, il va donc falloir se déplacer...
- app_lang_nav_go_next;string;Voulez-vous démarrer la navigation vers le point suivant ?
- actpadf_lang_intro_text;string;L'aventure commence bientôt, en face de l'Hôtel des Invalides.
- actpadf_lang_intro_click_text;string;Trouvez le symbole Crest sur la carte pour démarrer votre parcours.
- actpadf_lang_draw;string;Rechercher
- actpadf_lang_main_menu_tutorial_text;string;Le menu Chouette donne accès aux fonctionnalités de l'Animus portable. Cliquez sur le bouton Chouette pour revenir à la carte.
- actpadf_lang_notebook_tutorial;string;Voici votre carnet : il contient les anecdotes des points de passage.
- actpadf_lang_menu_inventory_tutorial;string;Voici votre inventaire qui vous permet de revisualiser en détail des objets collectés.
Aide: Maintenez le bouton de synchronisation appuyé. Lorsqu’il est bleu, la séquence mémorielle est activée. "Cliquez sur le bouton ""Mémoire terminée"" pour revenir à la carte ou sur le bouton “Rejouer” pour revoir la séquence !"
- Hint: Placez le patron sur le bleuet et appuyez sur le bouton de synchronisation.
- Senka: Enchantée touriste, je m’appelle Senka ! Vous venez d’installer le nouveau jeu d’Abstergo Entertainment n’est-ce pas ? Ils ont l’air de proposer de super expériences dans de plus en plus de villes, mais croyez-moi, c’est bien plus qu’un jeu pour eux ! Vous allez revivre une partie du passé grâce à leur technologie Animus, et eux, vont récupérer et stocker toutes les informations et les secrets que vous pourriez être amené à découvrir. Je fais partie d’une confrérie qui agit dans l'ombre pour protéger les libertés individuelles… et surtout lutter contre des corporations comme Abstergo à vrai dire. Je vous ai remarqué depuis un moment. Vous faites preuve d'une grande curiosité et d'un certain esprit d’analyse. Nous avons besoin de nouveaux initiés sur le terrain et je suis sûre que vous avez les épaules pour ! Tout va bien ? Pas trop de pression ? Je viens de pirater votre version de l’application, vous pourrez utiliser la vision d’aigle ! Elle vous permettra de voir des projections du passé et d’agir dans ces dernières au sein de la ville Lumière. Votre mission est la suivante : nous avons la conviction que le registre de Louis XVI n'a pas livré tous ses secrets. Il aurait été caché dans une armoire secrète de son bureau. Trouvez un moyen de mettre la main sur son contenu avant que d’autres joueurs ne le fassent pour le compte d’Abstergo et ne leur livre l’identité d'ancêtres de ma confrérie inscrits dans le registre ! Avant de partir, voici une clé qui pourrait vous servir, elle a été récupérée non loin des Invalides par ceux qui vous ont précédé pour défendre la vérité. Notre survie face à Abstergo en dépend ! Et… la vôtre aussi. N'hésitez pas à noter vos observations et les mémoires de l'Animus dans votre index, ça pourrait servir ! Allez, on se retrouve plus tard. Bon courage !
Aide: Placez les contours sur le blason de l’ambassade de suisse et cliquez sur le bouton de synchronisation.
- Hint: Alignez le fragment de mémoire avec le blason suisse.
End: Nouvelle fonctionnalité de l'Animus débloquée : Guidage par ondes sonores. Les ondes à vos pieds accélèrent et deviennent vertes si vous vous déplacez dans la bonne direction.
Aide: Superposez cette image à la réalité et cliquez sur le bouton de synchronisation. L'Animus est imprécis. Essayez de recréer une image claire en déplaçant les fragments de mémoire !
- Hint: Alignez le fragment de mémoire avec la porte de la basilique.
End: C’est la façade de l’église que nous cherchons ! Observez-la bien, elle n’est pas pas loin de nous...
Aide: 16 mars 1956. Activez la vision d'aigle et visez les différentes personnes pour repérer le descendant de Jospeh Chodron. Suivez les traces de Joseph Chodron !
- Hint: Alignez le fragment de mémoire avec les portes centrales de l'église.
End: Bien vu ! Bernadette Chirac est la fille de Jean-Louis Chodron de Courcel, lui même descendant éloigné de Joseph Chodron, au service du prince de Condé pendant le règne de Louis XVI ! Il ne nous reste plus qu’à suivre sa piste jusqu’au prince de Condé, maintenant !
Intro Clock: Placez l’horloge sur le socle.
- Hint Clock: Avancez les aiguilles. Un mécanisme caché nous indiquera le chemin.
- Sync Hint: Alignez le fragment de mémoire avec la statue de la place.
- Hint Scepter: Suivez la direction indiquée par la main du sceptre, elle vous mènera à Athéna.
Cons: L’Animus bugge… Reconstituez la statue pour rejoindre la séquence mémorielle suivante.
Aide: Cliquez sur un morceau de statue et glissez votre doigt pour le faire tourner.
- Hint: Visez le sol pour synchroniser l'Animus.
End: Trouvez Le Nôtre au Jardin des Tuileries !
- Hint: Alignez le fragment de mémoire avec le buste de Le Nôtre.
End: On a récupéré le plan des Tuileries de 1664 ! Il y a eu quelques changements depuis...
- Hint: Scannez le sol pour synchroniser l'Animus.
- actpadf_lang_waypoint_07_hint_eagle;string;Cliquez sur le bouton de la vision d’aigle.
- actpadf_lang_waypoint_07_hint_hermes;string;Suivez la direction du plan et montez rejoindre Hermès.
- actpadf_lang_waypoint_07_hint_map;string;Trouvez un plan des Tuileries autour de vous.
- actpadf_lang_waypoint_07_hint_water;string;Le chiffre du grand bassin peut-être ?
- actpadf_lang_waypoint_07_task_ballon;string;Coupez la corde du ballon pour qu’il s’envole.
- actpadf_lang_waypoint_07_task_ground;string;Visez le sol pour synchroniser l'Animus.
- actpadf_lang_waypoint_07a_pu_ending;string;Trouvez un moyen gonflé de prendre de la hauteur. Il n’y a rien près du portail ?
- actpadf_lang_waypoint_07a_pu_help;string;Repérez le chiffre associé au grand bassin.
- actpadf_lang_waypoint_07a_pu_help_2;string;Repérez le nombre associé au grand bassin
- actpadf_lang_waypoint_07a_pu_sync_hint;string;Alignez le fragment de mémoire avec le plan des jardins.
- actpadf_lang_waypoint_07b_pu_consigne_1;string;Prenez place dans la nacelle de la Charlière puis inspectez chaque recoin à la recherche d'une archive.
- actpadf_lang_waypoint_07b_pu_consigne_2;string;Vous avez découvert le secret du Jardin des Tuileries dessinés par Le Nôtre. Une anomalie temporelle est apparue. Tournez-vous et observez les Tuileries en 1789. L’Armoire de Fer n’est pas loin !
Cons: Cliquez pour récupérer le caducée. Alignez la pointe du caducée avec celle de l’obélisque. Canalisez l’énergie du caducée dans le bon hiéroglyphe en face de vous.
- Hint: Alignez le fragment de mémoire avec la statue d’Hermès.
End: Suivez l’énergie du caducée sur la carte jusqu’à la prochaine étape.
Aide: Pour tourner une bague, glissez horizontalement votre doigt sur l’une d’elles. Glissez votre doigt sur l’écran pour placer la clé face à vous.
Cons: Tournez les bagues pour déverrouiller la cachette de Catherine de Médicis. Analysez cette clé pour percer son secret.
- Hint:Alignez le fragment de mémoire avec la colonne de gauche.
End: Oh un 3 ! Cette clé va nous aider à ouvrir l’Armoire de Fer, d’une manière ou d’une autre... Dirigeons-nous vers le grand bassin rond.
- Fail: Comparons avec la colonne voisine pour trouver la solution…
L’ordre des motifs doit être le même que sur l’autre colonne.
Aide: Frottez la frise au sol à l’aide de votre doigt.
Frottez en entier la surface pour découvrir ce qu’elle cache.
- Hint: Visez le sol pour synchroniser l'Animus.
End: Dirigez-vous vers l’élément représenté par la frise.
Cons: Entrez dans le bureau.
- Aide: Cliquez sur la zone bleue sur le bureau.
"Touchez un objet pour le prendre. Touchez l'icone ""main"" en bas à droite pour le lâcher."
Activez la vision d’aigle pour repérer les zones interactives de la pièce.
Cliquez sur une zone jaune pour interagir avec elle.
Tournez la clé et placez-la face au trou de la serrure. Rapprochez vous de la serrure si nécessaire.
Touchez les 4 crans l’un après l’autre et faites tourner leur cadran.
Tournez-vous pour voir l’ouverture de l’Armoire de Fer.
Mauvaise serrure.
Ce coffre me dit quelque chose... Nous ne l'ouvrirons pas aujourd'hui.
Regardez à droite, Senka vous parle.
- Hint: Visez la borne pour synchroniser l'Animus.
Senka: Vous avez percé à jour les derniers secrets du bureau et de l'Armoire de Fer de Louis XVI ! Cette partie du palais ayant brûlé en 1871, nous aurions sûrement pu en tirer d’autres indices... Il y aurait dans le registre des noms d’assassins et de templiers de l'époque. Il ne nous reste plus qu’à les identifier parmi les personnes citées. C’est une ressource très importante pour nos recherches, et je vous remercie pour votre aide ! C’est vraiment une avancée majeure que vous avez permise en remontant les traces de ce registre. En tout cas, vous nous avez prouvé votre valeur : nous vous recontacterons très bientôt ! Et gardez l’oeil ouvert, Abstergo n’est jamais loin, peut-être sont-ils en train de nous chercher en ce moment-même… Avant de se quitter... Je suis persuadée que l’Animus cache encore des secrets ! Avez-vous tout examiné ? N’hésitez pas à revenir dans votre inventaire ou chercher sur la carte les endroits qui vous intriguent, peut-être y découvrirez-vous de nouvelles pistes ! Bonne chance et à bientôt !
- End panel: Mission terminée !
Félicitations ! Vous avez résolu le mystère de l’Armoire de Fer. Les Assassins vous contacteront à nouveau pour vous confier de nouvelles missions… Vous allez quitter l’expérience et revenir à l’application Hootside. Vous pourrez revenir à cette expérience depuis le store Hootside. Merci d’avoir joué !
- Fail: Ce n’est pas la bonne clé. Essayez la deuxième.
Aide: Risque de désynchronisation... Regardez autour de vous, mais ne vous approchez pas des murs ! Vous êtes sortis de la zone de mémoire ! Veuillez vous resynchronisez.
- Hint: Alignez le fragment de mémoire avec vos pieds.
- actpadf_lang_quest_main_short_description;string;Sur les traces de l'Armoire de Fer de Louis XVI...
- actpadf_lang_quest_main_name;string;L'Armoire de Fer
- actpadf_lang_quest_precursors_short_description;string;Un fragment de mémoire caché se trouve quelque part sur le parcours...
- actpadf_lang_quest_precursors_name;string;Fragment de mémoire 1
- actpadf_lang_nav_available;string;Animus mis à jour ! Touchez cette icône en bas de votre écran pour être guidé vers la prochaine étape.
- actpadf_lang_animus_connect_ko;string;Connexion à l'Animus impossible. Approchez de la zone pour vous synchroniser.
- actpadf_lang_synchro_title;string;Synchronisation perturbée
- actpadf_lang_synchro_text;string;Le fragment de mémoire n'est pas tout à fait aligné à la réalité et vous empêche de progresser ? Resynchronisons-le ici.
- actpadf_lang_ending_texte;string;Félicitations ! Vous avez résolu le parcours de l’Armoire de Fer ! Les Assassins vous contacteront à nouveau pour vous confier de nouvelles missions... Vous allez quitter l’expérience et revenir à l’application Hootside. Vous pourrez revenir à cette expérience depuis le store Hootside. Merci d’avoir joué !
- actpadf_lang_garden_plan_paper_name;string;Code secret N°2
- actpadf_lang_eight_paper_name;string;Code secret N°1
- actpadf_lang_letter_bezenvaltoconde_name;string;Lettre de Besenval à Condé
- actpadf_lang_letter_bezenvaltoqueen_name;string;Lettre de Besenval à la Reine
- actpadf_lang_key_cabinet_name;string;Clé mystérieuse
- actpadf_lang_key_vestiges_name;string;Clé des Vestiges
- Database entries
Le choix du bleuet comme symbole de mémoire et de solidarité remonte à la Première Guerre Mondiale en 1916 : c’est l’une des rares fleurs qui poussaient sur les champs de bataille criblés d’obus (à l’instar du coquelicot, qui a la même fonction symbolique en Angleterre).
Né en Suisse, le marquis de Besenval est emprisonné en 1789, accusé à tort d’avoir fomenté l’incendie de Paris et le massacre de ses habitants. Au contraire il retira ses troupes de Paris le 12 juillet face à l’inaction du gouvernement, ce qui permit la prise de la Bastille.
En 1789, une église de la Communauté des Filles Pénitentes se tenait à proximité : “Saint-Valère”. Elle accueillait des filles de “mauvaise vie”. La basilique Sainte-Clotilde la remplaça. Sa forme actuelle date de 1857. Elle a une jumelle en Chine datant du 19ème siècle.
La Chapelle de Jésus Enfant vit le mariage de Jacques Chirac et Bernadette Chodron de Courcel. L’ancêtre de celle-ci, Joseph Chodron, rejoignit l’Armée des Princes (constituée d'émigrés français) au côté du Prince de Condé en 1789 pour lutter contre la Révolution.
Louis XVI était grand amateur de serrures et d’horloges. Il préférait passer plus de temps dans son atelier qu’avec sa reine.
Le palais des princes de Condé n’abrita le conseil des Cinq-Cents, ancêtre du parlement qu'à partir du 21 janvier 1798. Il servit un temps de prison révolutionnaire puis à l'École polytechnique . Le drapeau tricolore n’entra à l'Assemblée nationale qu'en janvier 2007.
Le Nôtre a redessiné les jardins des Tuileries en 1664. Il a aussi conçu ceux de Versailles pour le Roi Soleil. Ses jardins cachent sans doute des secrets ! Peut-être faudrait-il aller à Versailles : le jardinier avait aussi une collection d'art digne d'un cabinet de curiosités !
Le premier vol en ballon à dihydrogène habité a eu lieu aux Tuileries, le 27 août 1783. Il fut mené par Charles, un physicien et chimiste, accompagné par les frères Robert, aéronautes et ingénieurs.
Le 25 octobre 1836, l’obélisque est dressé sur la Concorde. L'ingénieur de la machine qui le souleva, Jean-Baptiste Apollinaire Lebas, resta en-dessous. Si l'opération échouait, il mourrait sans en subir la honte. Qu’est-ce qu'on ne ferait pas pour sauver son honneur ?
Catherine de Médicis, veuve du roi Henri II, fit construire le Palais des Tuileries en 1564. Elle tint à exprimer son histoire dans le palais, notamment à travers des symboles sur les colonnes. Le palais fut incendié lors de la Commune de Paris du 23 au 26 mai 1871.
Cette figure est un quadrige. Serait-ce celui de la place Saint-Marc, ou sa copie sur l'arc de Triomphe du Carrousel ? L’original date du 2ème siècle et fut rapporté par les vénitiens de Constantinople en 1204 puis volé par Napoléon et ses troupes en 1797.
L'Armoire de Fer renfermait de nombreux secrets de Louis XVI dont ses correspondances avec des hommes politiques. Elle fut découverte par les révolutionnaires à la suite de la trahison du serrurier du roi, Germain, qui vendit la mèche.
Il existe un coffre fort similaire aux Archives Nationales de l’Hôtel de Soubise, renfermant de nombreux documents précieux comme le Serment du Jeu de Paume, et la Déclaration des Droits de l’Homme et du Citoyen.
Louis XVI passait du temps dans son atelier, mais étudiait également beaucoup. Féru de sciences, il parlait couramment anglais et s’était passionné pour géographie et la marine.
Offertes par le peintre Claude Monet à la France le lendemain même de l'armistice du 11 novembre 1918 comme symbole de la paix. Les Nymphéas sont installés selon ses plans au musée de l'Orangerie en 1927, quelques mois après sa mort.
DTVA
She is married to Thorsteinn, a merchant from Stavanger. Together they have plans to move upward in society by putting Thorsteinn in the service of a great jarl and growing their riches.
After Thorsteinn gains the attention of Harald Fairhair and begins raiding for him, Gunnhilda uses the wealth Thorsteinn brings home to secure additional trade partnerships. Through prudent investment, she builds their fortunes until she and Thorsteinn have enough to purchase their own ship. She also puts together the felag (guild/group) that will travel with them to settle in England.
He gains attention of Harald Fairhair and serves him as a raider for many years before deciding to depart for England to build a future for himself and his wife, Gunnhilda.
Unfortunately, despite Thorsteinn's efforts to repair the relationship, an old rivalry with Bjorn will resurface in the lands across the sea. In Jorvik, Thorsteinn discovers what Fate has in store for him and, as always, its threads prove impossible to resist.
There were many reasons that could spur two clans to join themselves in matrimony. The union could be social, political, commercial, and even spiritual. In this last case, a marriage between Christians and heathens would have required the conversion and baptism of the groom or bride.
Marriages between Scandinavians and Anglo-Saxons were a driving force for change in the northern part of the island. They slowly but surely fostered the emergence of a people that scholars today call the “Anglo-Scandinavians.”
This armring made of solid gold could have been a marvelous wedding gift.
Fish (fiskar) was mostly consumed after it was dried. To dry a fish, one simply placed the catch of the day on a wooden frame and let the sun and fresh air do the rest. By the end of the day, the fish would be dried and ready to eat.
According to the Welsh chronicler Asser, Chippenham was a royal centre, or villa, during Alfred's reign. Chippenham was seized by Viking Chieftain Guthrum's forces on January 6th, 878; the date was chosen because it was the Christian holiday of Epiphany. The Vikings often attacked during Christian holidays, aiming to take their enemies by surprise.
Alfred would eventually win back Chippenham from its Viking conquerors. His troops besieged the town for twelve days until Guthrum agreed to surrender.
This image from Assassin's Creed Valhalla shows a bird's-eye view of Chippenham, seemingly peaceful despite the siege.
The main factor that divided the classes of freemen was how much land they owned. With land came wealth; the more land a ceorl had, the higher their social status, privileges, and standard of living
At the bottom of the social ladder were ceorls with very little land. Unable to provide food for their families, these freemen would have relied on their local lord to survive. In exchange for the noble's support and protection, the ceorls would have been expected to work the lord's tands at least a few days a week.
One rung up the ladder were the ceorts who had enough land to support their families. These wealthier freemen would have worked for the lord on occasion to pay their rent.
Finally, at the top of the ladder were ceorls who had large tracts of Land. They may not have been expected to work on the lord's lands; they would just use their superior wealth to pay the aristocrat for his protection instead. They could also provide him with different services; offering horses or food, cutting his hedges, putting out snares to catch hares or other animals, making offerings to the Church on his behalf, running errands, or mending fences with tools such as this carpenter's axe head.
In a society with neither maps nor compasses, a sailor needed a keen knowledge of the seascape. There were several ways to acquire this “sea lore.” One was through ancestral tradition. Late Iron Age Scandinavians used sailing routes discovered dozens of decades earlier. They passed this knowledge down from generation to generation through an oral tradition. Their maritime expertise was transmitted by word of mouth to their descendants, who secured it by repetition and imitation.
The other way to learn sea-lore was through direct experience. Becoming a sailor required being “in the field” or, in this case, on the boat. Sailors were constantly performing the same shipboard movements and travelling the same routes. Through repetition, seafarers became familiar with the motions of the sailor and of the ship as it navigated different weathers and currents.
This practical style of learning helped sailors gain a much deeper understanding of seafaring than they would have from a theoretical approach.
Here's a beautiful photo of Norway, showing the stunning grandeur of the landscape that flanked Vikings on their way to new and adventurous expeditions.
The Scandinavians could have been accompanied by descendants from Viking settlements in Francia, Friesland, the Scottish islands, and Ireland, lured by the promise of wealth and new social opportunities.
The settlers came from both common folk and aristocracy, but all of them shared the hope of building a new life. Women were certainly present; some travelled independently, while others followed and supported their families or househotds on their journey. Like everyone else, women put their shoulders to the wheel to build a new life in the Anglo-Saxon kingdoms.
This map illustrates the alleged origin of the vast majority of the Nordic settlers.
The TURQUOISE arrows correspond to Danish and, to some extent, Frisian movements of population.
The BLUE arrows correspond to Norwegian journeys.
Each letter corresponds with a region:
A. Norway
B. Denmark
C. Frisia
D. England
E. Pictland
F. Ireland
G. Kingdom of Dublin
The town of Jorvik is identified by the number 1.
AC Memories Cards
Working off of the screenshots Lacrosse managed to procure for us. This table is not meant to be used as is, it's just a way to archive this. Missing cells for 'location' and 'timeline' are not in the screenshots I have. The question marks exist in the cards.
Page prep
Caribbean
| Adéwalé
|
| File:XXXXXXXXXXXXXXXXXXXXXXXX.png
|
| Quote
|
Timeline
|
Location
|
| I'll be your quartermaster. Nothing less.
|
1692-1758
|
Caribbean
|
| Story
|
| Adéwalé was born into slavery on Trinidad. His opportunity for escape came when pirates began raiding the plantation Adéwalé was on. He decided to aid the pirates, and they took him on board. He was eventually caught by the Spanish and imprisoned.
|
| More
|
| Adéwalé met Edward Kenway while imprisoned, and the two broke free and commandeered a ship. Adéwalé became Edward's quartermaster, and the two sailed together for many years. Eventually Adéwalé left Edward's employ to join the Assassins.
|
| Ah Tabai
|
| File:XXXXXXXXXXXXXXXXXXXXXXXX.png
|
| Quote
|
Timeline
|
Location
|
| Nothing in life is guaranteed, except surprise.
|
1660-?
|
Caribbean
|
| Story
|
| Born on the Yucatán Peninsula and of Mayan descent, Ah Tabai became Mentor of the Caribbean Assassins in 1713. He trained both Mary Read and Duncan Walpole as Assassins, and took on Adéwalé as an apprentice after the latter left Edward Kenway's ship.
|
| More
|
| Ah Tabai and Edward Kenway had a fractious relationship, as Edward had no interest in the Assassins and had simply posed as one to make some money. Edward would later come to understand what the Assassins stood for, and Ah Tabai then allowed him to join.
|
| Anne Bonny
|
|
| Quote
|
Timeline
|
Location
|
| England's the wrong way 'round the globe for an Irishwoman.
|
1702-1743
|
Caribbean
|
| Story
|
| Anne Bonny was working as a bartender in Nassau when she caught the eye of Jack Rackham. The two eloped, and Anne became a member of Rackham's crew. Proving to be capable with both a sword and a gun, Anne took to a life of piracy quite readily.
|
| More
|
| While sailing around the Caribbean, Anne crossed paths with Edward Kenway several times. The two came to trust one another, and after Rackham was executed and Adéwalé left to join the Assassins, Anne became quartermaster on Edward's ship.
|
| Bartholomew Roberts
|
| File:XXXXXXXXXXXXXXXXXXXXXXXX.png
|
| Quote
|
Timeline
|
Location
|
| A merry life and a short one, as promised. How well I know myself.
|
|
Caribbean
|
| Story
|
| As one of the most successful and destructive pirates of all time, Roberts drew the re of everyone in the Caribbean; Assassins, Templars, the British Navy, the Spanish Navy, the Portuguese Navy, and even other pirates.
|
| More
|
| Roberts knew the location of an ancient First Civilization building called the Observatory, and both Templars and Assassins fought over him for this knowledge. In the end, it was Edward Kenway who claimed the pirate's life and the knowledge of the Observatory's location.
|
| Benjamin Hornigold
|
| File:XXXXXXXXXXXXXXXXXXXXXXXX.png
|
| Quote
|
Timeline
|
Location
|
| The Templars know order. Discipline. Structure. But you could never fathom these subleties.
|
?-1719
|
Caribbean
|
| Story
|
| Benjamin Hornigold was a tremendously successful pirate with a fleet of five warships. Among Hornigold's trainees were Edward Thatch and Charles Vane. However, Hornigold would eventually betray them all after an offer to join the Templars.
|
| More
|
| Hornigold accepted a pardon offered by the Templar Woodes Rogers. In exchange, Hornigold became a pirate hunter, chasing down and apprehending his former comrades. He excelled at this task until the day he went after his former associate Edward Kenway.
|
| Blackbeard
|
| File:XXXXXXXXXXXXXXXXXXXXXXXX.png
|
| Quote
|
Timeline
|
Location
|
| Legends ain't born from mildness.
|
1680-1718
|
Caribbean
|
| Story
|
| Edward Thatch sailed in the British Navy, but eventually quit to become a privateer. Once the War of the Spanish Succession ended Thatch turned to piracy. His fearsome ability as well as his significant facial hair led to the nickname Blackbeard.
|
| More
|
| Thatch and Kenway crossed paths when they freed Nassau from the British. The two soon became allies, and debated how to run the Pirate Republic. Thatch later decided to quit piracy, but was killed by the British Navy on the night of his retirement party.
|
| Calico Jack
|
| File:XXXXXXXXXXXXXXXXXXXXXXXX.png
|
| Quote
|
Timeline
|
Location
|
| You'd like to know my secrets, would you?
|
1682-1720
|
Caribbean
|
| Story
|
| Jack Rackham, often called Calico Jack, was a capable shipman who sailed with Charles Vane. He convinced the crew to mutiny against Vane and steal Edward Kenway's ship, but his captaincy was a failure and Edward got his ship back a few months later.
|
| More
|
| Calico Jack returned to piracy after enlisting the aid of Mary Read and Anne Bonny. They [sic] successes drew the attention of bounty hunters, who attacked Rackham's ship. They were captured fairly easily, as most of the crew was too drunk to fight back.
|
| Charles Vane
|
| File:XXXXXXXXXXXXXXXXXXXXXXXX.png
|
| Quote
|
Timeline
|
Location
|
| I'll murder the man who stole my ship!
|
1680-1721
|
Caribbean
|
| Story
|
| Like most pirates, Charles Vane began his career as a privateer. When privateering opportunities dried up, Vane took to piracy at the helm of his ship, the Ranger. He quickly became one of the most notorious pirates in the Caribbean.
|
| More
|
| Vane and Edward Kenway sailed together on several occasions. It was during one of these collaborations that Jack Rackham convinced Vane's crew to mutiny, leaving Vane and Kenway stranded on a deserted island.
|
| El Tiburón
|
| File:XXXXXXXXXXXXXXXXXXXXXXXX.png
|
| Quote
|
Timeline
|
Location
|
| ...
|
|
Caribbean
|
| Story
|
| Spanish for "The Shark," El Tiburón was the mute bodyguard of the Templar Grand Master, Laureano de Torres y Ayala. El Tiburón was a brute of a man draped in thick armor, and was fearless in combat.
|
| More
|
| Edward Kenway first encountered El Tiburón when he tried to break the Sage out of prison in Havana. El Tiburón got the better of Kenway then, but later he would prevail over The Shark as Kenway attempted to assassinate Torres.
|
| James Kidd
|
| File:XXXXXXXXXXXXXXXXXXXXXXXX.png
|
| Quote
|
Timeline
|
Location
|
| We follow a Creed, aye. But it does not command us to act or submit.
|
?-1720
|
Caribbean
|
| Story
|
| In order to get a foothold in the predominately male pirate society, Mary Read disguised herself as a man and took the name James Kidd. She eventually sailed on Jack Rackham's ship, and was one of the few sober enough to fight back when they were boarded.
|
| More
|
| Aside from her life of piracy, Mary Read was a member of the Assassins. She tried several times to convince Edward Kenway to abandon his pursuit of riches and join the Brotherhood. It was only after her death in prison that Edward took her advice.
|
| Julien du Casse
|
| File:XXXXXXXXXXXXXXXXXXXXXXXX.png
|
| Quote
|
Timeline
|
Location
|
| As bold as a musket ball, and still half as sharp.
|
|
Caribbean
|
| Story
|
| Julien du Casse was a French arms dealer operating In the West Indies. His work eventually saw him inducted into the Templar Order along with Woodes Rogers and Duncan Walpole, the latter being impersonated by Edward Kenway.
|
| More
|
| Du Casse and the other Templars quickly discovered that who they thought was Walpole was actually an impostor, and had Kenway imprisoned, Shortly after escaping, Kenway crossed paths with du Casse and ended his life.
|
| Laurens Prins
|
| File:XXXXXXXXXXXXXXXXXXXXXXXX.png
|
| Quote
|
Timeline
|
Location
|
| You live in the world but you cannot make it move.
|
1630-1717
|
Caribbean
|
| Story
|
| Laurens Prins was a Dutch pirate who once sailed with the legendary Captain Henry Morgan. After Morgan's death, Prins became a slave trader, and as a consequence he worked closely with the Caribbean Templars.
|
| More
|
| In 1717, Bartholomew Roberts was working on one of Prins' slave ships. Having identified Roberts as the Sage, Torres tried to buy Roberts from Prins for a sizable sum.
|
| Peter Chamberlaine
|
| File:XXXXXXXXXXXXXXXXXXXXXXXX.png
|
| Quote
|
Timeline
|
Location
|
| Why scratch and claw to protect such squalor?
|
|
Caribbean
|
| Story
|
| The newly appointed governor of the Bahamas, Woodes Rodgers, appointed Commodore Peter Chamberlane to combat piracy. Chamberlaine harbored a fierce grudge against pirates, however, and was wiling to overstep his bounds to see them eliminated.
|
| More
|
| While the governor had offered pardons to the pirates Hornigold, Vane, and Thatch, Chamberlaine plotted to sink their ships regardless of whether or not they accepted. Upon discovering this, Kenway snuck onto Chamberlaine's ship and assassinated him.
|
| Captain William Kidd
|
| File:XXXXXXXXXXXXXXXXXXXXXXXX.png
|
| Quote
|
Timeline
|
Location
|
| I find myself at a crossroads; to return to my wife and child, or join my kinsmen.
|
1645-1701
|
Caribbean
|
| Story
|
| A Scottish sailor and privateer for the English Parliament, William Kidd was later accused of piracy and hung. While he certainly took his share of plunder while privateering, the evidence that actually tied him to piracy was slim at best.
|
| More
|
| Kidd's legacy far outlived the man himself. The Assassin Mary Read took the name James Kidd, and pretended to be an illegitimate child. The Assassin Ratonhnhaké:ton followed several maps to discover one of Kidd's buried treasures, a Shard of Eden.
|
Colonial
| Benjamin Church
|
| File:XXXXXXXXXXXXXXXXXXX.png
|
| Quote
|
Timeline
|
Location
|
| There's no single path through life that's right and fair and does no harm.
|
1734-1778
|
Colonial
|
| Story
|
| A wealthy doctor, Benjamin Church was kidnapped and held for ransom until he was rescued by Haytham Kenway. He was then recruited into the Templar Order, and furthered their goals through his position as Surgeon General of the Revolutionary Army.
|
| More
|
| Church ended up betraying both the Templars and the Patriots, and had planned to defect to the British with military secrets and a cache of weapons in tow. Ratonhnhaké:ton and Haytham formed a temporary partnership to put an end to the traitor.
|
| David "Big Dave" Walston
|
| File:XXXXXXXXXXXXXXXXXXX.png
|
| Quote
|
Timeline
|
Location
|
| Don't much agree with the fight and I love this country, so there you have it.
|
|
Colonial
|
| Story
|
| "Big Dave" Walston was a blacksmith who was drafted into the British army. Walston had little desire to fight, so he deserted and ran off to the Frontier. He was later found by British Regulars, was about to be executed when Ratonhnhaké:ton came to his aid.
|
| More
|
| After saving him, Ratonhnhaké:ton offered Big Dave a job and a place to live on the Davenport Homestead. His smithing skills quickly made a valuable ally of the Colonial Assassins.
|
| Israel Putnam
|
| File:XXXXXXXXXXXXXXXXXXX.png
|
| Quote
|
Timeline
|
Location
|
| What would you know about victory?
|
1718-1790
|
Colonial
|
| Story
|
| Israel Putnam was a brash general of the Continental Army that fought with recklessness. His most notable battle was that of Bunker Hill; while technically a loss, Putnam's army inflicted so many casualtes on the British that their victory was hollow.
|
| More
|
| Putnam might have faced further humiliation at Bunker Hill if it weren't for Ratonhnhaké:ton's aid. The Assassin disabled a British frigate in the harbor, and then snuck into the British camp to assassinate their general, John Pitcairn.
|
| John Pitcairn
|

|
| Quote
|
Timeline
|
Location
|
| I assume you've good reason for causing all this madness?
|
1722-1775
|
Colonial
|
| Story
|
| Pitcairn was a British soldier stationed in Boston before the Revolutionary War broke out. It was then that he was contacted by Haytham Kenway and the rest of the Colonial Templars, and offered a position in their Order.
|
| More
|
| Despite being closely tied with Templars on the side of the Revolutionaries, Pitcairn continued to lead British troops in the war. He claimed to seek peaceful resolutions to the conflict, and was part of the conspiracy to assassinate George Washington.
|
| Redcoat Captain
|
| File:XXXXXXXXXXXXXXXXXXX.png
|
| Quote
|
Timeline
|
Location
|
| These lowlifes are no match for us.
|
N/A
|
Colonial
|
| Story
|
| The British Regular was the foot soldier of the Loyalist Army, and they were easily identified by their red jackets. Their training and equipment were superior to the Continental Army, forcing the Colonists to devise new tactics to counter them.
|
| More
|
| N/A
|
| Thomas Hickey
|
| File:XXXXXXXXXXXXXXXXXXX.png
|
| Quote
|
Timeline
|
Location
|
| They paid me so I said yes. Didn't bother to ask who or how or why.
|
?-1776
|
Colonial
|
| Story
|
| Thomas Hickey was an Irish soldier in the French and Indian War, and he eventualky joined the Templars along with his commander, William Johnson. He was vulgar and unscrupulous, but loyal to the Templar cause (so long as they continued to pay him).
|
| More
|
| Thomas Hickey ran a counterfeiting ring in New York, and was to be the trigger-man in the plot to assassinate George Washington. Hickey was to make this attempt during Ratonhnhaké:ton's hanging, but the Assassin managed to escape the noose and stop Hickey.
|
| William Johnson
|
| File:XXXXXXXXXXXXXXXXXXX.png
|
| Quote
|
Timeline
|
Location
|
| I offered you an olive branch, and you knocked it from my hand.
|
|
Colonial
|
| Story
|
| A commander in the British Army, William Johnson was one of the few to see the indigenous tribes of the Frontier as allies. He developed a rapport with the Kanien'kehá:ka people, leaming their language and recruiting them to fight on behalf of the British.
|
| More
|
| Johnson attempted to buy land from the Iroqiuos [sic] for the Templars, but the tribal leaders refused, Johnson then made threats on their lives if they did not comply. Before this threat could turn to violence, Ratonhnhaké:ton silenced Johnson permanently.
|
Italy
| Bartolomeo d'Alviano
|
| File:XXXXXXXXXXXXXXXXXXX.png
|
| Quote
|
Timeline
|
Location
|
| I'll take you all on! With one arm -- no-- BOTH arms tied behind my back!
|
1455-1515
|
Italy
|
| Story
|
| Bartolomeo d'Alviano was a loyal member of the Italian Brotherhood of Assassins. He was renowned for his prowess in battle, though much of that was due to brute strength and sheer determination. He wielded a huge two-handed sword that he named "Bianca."
|
| More
|
| Bartolomeo and Ezio met in Venice, and soon became friends. The two of them would aid one another several times over the years, with Bartolomeo's leadership over the Venetian mercenaries proving invaluable to the Assassins.
|
| Charles de la Motte
|
| File:XXXXXXXXXXXXXXXXXXX.png
|
| Quote
|
Timeline
|
Location
|
| My skill with the blade? Don't ask me: ask the eviscerated dead.
|
?
|
Italy
|
| Story
|
| Charles de la Motte, often called "The Marquis," was a Templar and a close ally of Cesare Borgia. He was a masterful swordsman as well as a skilled leader, and Cesare called upon the Marquis' mercenaries on several occasions.
|
| More
|
| Despite being Cesare's ally, the two were rivals in many things. They competed fiercely, oftern to assert whether the French or the Italians were superior.
|
| Emilio Barbarigo
|
| File:XXXXXXXXXXXXXXXXXXX.png
|
| Quote
|
Timeline
|
Location
|
| Progress demands sacrifice.
|
1421-1485
|
Italy
|
| Story
|
| Emilio Barbarigo used his connections in the government and the police force to ensure that the merchant district remained under his control. He demanded outrageous taxes from merchants, and sent his guards to destroy the stalls of those who couldn't pay.
|
| More
|
| Emilio was secrety a Templar, and a close ally of Rodrigo Borgia. His actions attracted the attention of the Venetian Thieves Guild, who enlisted the aid of Ezio in freeing the merchants of the city from Emilio's cruel governance.
|
| Francesco Vecellio
|
| File:XXXXXXXXXXXXXXXXXXX.png
|
| Quote
|
Timeline
|
Location
|
| Someday I will take the time to paint. For now, I am a soldier on the front lines.
|
|
Italy
|
| Story
|
| Francesco was an Italian painter and member of the Assassin Brotherhood. He was born in Venice and trained under the Assassin Perotto Calderon, though the latter would eventually betray the Order after falling in love with Lucrezia Borgia.
|
| More
|
| After the death of Perotto, Francesco traveled to Rome to become the apprentice of Ezio Auditore. He became close friends with two other apprentices, Cipriano Enu and Tessa Varzi, only to see both of them fall in an attack by Cesare and Charles de la Motte.
|
| La Volpe
|
| File:XXXXXXXXXXXXXXXXXXX.png
|
| Quote
|
Timeline
|
Location
|
| It is my business to know everything in this city.
|
?
|
Italy
|
| Story
|
| Gilberto was a thief known as La Volpe (the Fox). He closely guarded the details of his life, and little other than his name is known. His network of thieves in Florence aided Ezio a number of times, and he was eventually invited to join the Assassins.
|
| More
|
| After moving to Rome, La Volpe began to suspect the Mentor Niccolò Machiavelli of betraying the Assassin cause, and was prepared to assassinate him. Ezio discovered the identity of the true traitor, and was able to convince La Volpe to stay his blade.
|
| Lorenzo d'Medici [sic]
|
| File:XXXXXXXXXXXXXXXXXXX.png
|
| Quote
|
Timeline
|
Location
|
| Whoever wants to be happy, let him be so.
|
1449-1492
|
Italy
|
| Story
|
| Lorenzo de' Medici was an Italian statesman and the ruler of the Florentine Republic. He was also a close friend of the Auditore family, and one of the few people to know about Giovanni's role as an Assassin.
|
| More
|
| Lorenzo de' Medici became reunited with the Assassins when there was an attempt on Medici's life; Ezio came to his aid and prevented the deed from being completed. From that point on, Medici sought Ezio's aid in dealing with the Templar threat in Florence.
|
| Lucrezia Borgia
|
| File:XXXXXXXXXXXXXXXXXXX.png
|
| Quote
|
Timeline
|
Location
|
| Tell Cesare, we shall see how it feels when the shoe is on the other foot.
|
1480-1519
|
Italy
|
| Story
|
| The daughter of Rodrigo and the sister of Cesare, Lucrezia collaborated with her family in their machinations. Rodrigo married her off several times to men with power, whom Cesare would then have assassinated.
|
| More
|
| Befitting the Borgia name, Lucrezia was every bit as cruel and manipulative as her father and brother. However, she later became aware that their manipulation extended to her as well, as they were merely using her to further their own ambitions.
|
| Niccolò Machiavelli
|
| File:XXXXXXXXXXXXXXXXXXX.png
|
| Quote
|
Timeline
|
Location
|
| We don't need the apple to tell us what our old friend Cesare is planning.
|
1469-1527
|
Italy
|
| Story
|
| As a poltican and philosopher, Machiavelli was highly critical of idealism and self-serving politicians. Eventualy, the term “Machiavellian" became adopted as an adjective for those who served themselves before their people.
|
| More
|
| Niccolò was also an Assassin, and he worked with Ezio to track the Templars through Venice, Florence, and later Rome. When the previous leader of the Assassins, Mario Auditore, was murdered by Cesare, Niccolò became the leader of the Brotherhood.
|
| Rocco Tiepolo
|
| File:XXXXXXXXXXXXXXXXXXX.png
|
| Quote
|
Timeline
|
Location
|
| Am I for sale? Cesare will need to send more coin for that.
|
?-1503
|
Italy
|
| Story
|
| Rocco Tiepolo was a Templar who led a sizable group of mercenaries. While he often provided mercenaries to Cesare, he was not directly under the Borgia's control.
|
| More
|
| Rocco was one of the names that Fiora gave to the Assassins when she defected from the Templar Order. Fiora pointed out the strategic weaknesses in Rocco s headquarters, and the Assassins launched an attack.
|
Japan
| Alessandro Valignano
|
| File:XXXXXXXXXXXXXXXXXXX.png
|
| Quote
|
Timeline
|
Location
|
| These converts are our foothold in this country.
|
1539-1606
|
Japan
|
| Story
|
| Alessandro Valignano was a Jesuit missionary that was sent to help introduce Catholicism to Japan. While he was sent to aid Francisco Cabral, who was already doing missionary work in Japan, the two men despised on [sic] another almost instantly.
|
| More
|
| Valignano used his Jesuit connections to scour Japan for Templar recruits. When Francisco Cabral confronted Valignano about this, he used his influence to force Cabral to resign from his post as Superior of the Jesuit Mission.
|
| Chaya Shirojiro Kiyonobu
|
| File:XXXXXXXXXXXXXXXXXXX.png
|
| Quote
|
Timeline
|
Location
|
| Powerful men still need what we provide.
|
1545-1596
|
Japan
|
| Story
|
| Chaya Shirojiro Kiyonobu was part of a long line of merchants in Kyoto. The Chaya family held a monopoly on the raw silk trade thanks to a permit that allowed them to travel to Vietnam to trade goods.
|
| More
|
| In addition to managing trade, Kyonobu was also tasked by leyasu to track the foreigners entering the port city. Specifically, he was to keep an eye on the Christian missionaries, and report any suspicion of Templar affiliation.
|
| Date Masamune
|
| File:XXXXXXXXXXXXXXXXXXX.png
|
| Quote
|
Timeline
|
Location
|
| Benevolence indulged beyond measure sinks into weakness.
|
1567-1636
|
Japan
|
| Story
|
| A massive strongman with a missing eye, Date Masamune was feared throughout much of northern Japan for his cunning and ruthlessness. As daimyo, Masamune began attacking nearby clans to expand his own, eventually ruling over most of the Tōhoku region.
|
| More
|
| The shogun at the time, Toyotomi Hideyoshi, saw the wisdom in having Masamune as an ally, as did Hideyoshi's successor Tokugawa Ieyasu. Eventualy Masamune became lord of the profitable Sendai Domain, making him one of the most powerful men in Japan.
|
| Hattori Hanzo
|
| File:XXXXXXXXXXXXXXXXXXX.png
|
| Quote
|
Timeline
|
Location
|
| Those who cling to life, die; those who defy death, live.
|
1542-1596
|
Japan
|
| Story
|
| Hattori Hanzō skill with the yari was legendary, and his prowess in battle made him respected and feared as one of the greatest samurai in Japan. He also excelled in the ninja arts, and had a fierce rivalry with Fūma Kotarō.
|
| More
|
| Hanzō's ability made him a valued ally of Tokugawa Ieyasu, and Hanzō saved his master's life on several occasions. He was also instrumental in the struggle against the Japanese Templars, assassinating Uesugi Kenshin and retrieving the Sword of Eden.
|
| Hattori Masanari
|
| File:XXXXXXXXXXXXXXXXXXX.png
|
| Quote
|
Timeline
|
Location
|
| I will serve the Tokugawa as my father did, but in my on own.
|
1565-1615
|
Japan
|
| Story
|
| Like his father, Hattori Hanzo, [sic] Masanari was a gifted warrior. After Hanzo's death in 1596, Masanari succeeded his father as a retainer of the Tokugawa. His lethal skills in battle eventually saw him appointed the Captain of the Edo Castle guard.
|
| More
|
| Masanari was not as capable a leader as he was a warrior, and this led to him losing his position as Captain. Determined to salvage the reputation of himself and the Hattori clan, Masanari fought valiantly at the Siege of Osaka in 1615, but did not survive.
|
| Honda Tadakatsu
|
| File:XXXXXXXXXXXXXXXXXXX.png
|
| Quote
|
Timeline
|
Location
|
| I served in battle my master has fought, yet where are my wounds?
|
1548-1610
|
Japan
|
| Story
|
| Honda Tadakatsu served as one of Tokugawa Ieyasu's greatest generals, often called the "Four Guardians.” His distinction in batile was known across all of Japan, and legends say that despite fighting in over 100 batiles, he never suffered a single wound.
|
| More
|
| When the Assassins came to Ieyasu with a plan for retrieving the Sword of Eden, Tadakatsu was initially opposed; being an honorable warrior, he preferred meeting his enemy face to face in combat over striking at them from secrecy.
|
| Ii Naomasa
|
| File:XXXXXXXXXXXXXXXXXXX.png
|
| Quote
|
Timeline
|
Location
|
| If you are not wounded, you have not truly fought.
|
1561-1602
|
Japan
|
| Story
|
| Ii Naomasa served as one of Tokugawa Ieyasu's greatest generals, often called the "Four Guardians." He was a veteran of numerous battles, and was famous for continuing to fight even after sustaining severe injuries.
|
| More
|
| While the rest of the Four Guardians were not easily convinced that the Assassins could aid them, Naomasa saw differentiy. He recognized that the Assassins could prove to be valuable allies, and often suggested calling on them to his colleagues.
|
| Mochizuki Chiyome
|
| File:XXXXXXXXXXXXXXXXXXX.png
|
| Quote
|
Timeline
|
Location
|
| Your old life is over. Train with me, and you will have a new one.
|
?
|
Japan
|
| Story
|
| Mochizuki Chiyome was a noblewoman who served Takeda Shingen. Upon hearing that she had been trained in the ninja arts by the Kōga clan, Shingen gave Chiyome the task of recruiting women and training them as spies and assassins.
|
| More
|
| Chiyome's network of kunoichi numbered in the hundreds, and Shingen was kept well informed. While strong, this network still had holes; it was not enough to spot Honda Tadakatsu and Hattori Hanzō as they snuck into Shingen's camp.
|
| Mogami Yoshiaki
|
| File:XXXXXXXXXXXXXXXXXXX.png
|
| Quote
|
Timeline
|
Location
|
| The bald rat will soon learn he can not simply take any life he pleases.
|
1546-1614
|
Japan
|
| Story
|
| Mogami Yoshiaki was a powerful daimyo of northern Japan. In order to solidify his political position, Yoshiaki sent his daughter, Komahime, to be wed to Toyotomi Hidetsugu, nephew and heir to the Regent of Japan, Toyotomi Hideyoshi.
|
| More
|
| Soon after Hideyoshi had a son of his own, and in order to secure his succession, Hideyoshi ordered the death of Hidetsugu and his family, including Komahime. This enraged Yoshiaki, who immediately turned his allegiance to Tokugawa Ieyasu.
|
| Mori Motonari
|
| File:XXXXXXXXXXXXXXXXXXX.png
|
| Quote
|
Timeline
|
Location
|
| You have just shown me why we should not be under one rule.
|
1497-1571
|
Japan
|
| Story
|
| As daimyo of what was a relatively small clan, Mōri Motonari used a cunning blend of tactics and force to expand his empire. Within a few years, he had eliminated several rival clans and ruled over the entire Chugoku region of Japan.
|
| More
|
| Motonari was a vocal opponent of Nobunaga's attempt to unify all of Japan, though he never had the strength to challenge Nobunaga directly. The Mōri clan was further weakened when Nobunaga arranged the assassination of Motonari's heir, Mōri Takamoto.
|
| Oda Nobunaga
|
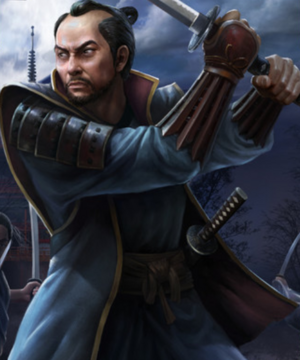
|
| Quote
|
Timeline
|
Location
|
| Yes, you have your ideals. But I will have a nation.
|
1534-1586
|
Japan
|
| Story
|
| Oda Nobunaga first achieved notoriety at the bate of Okehazama, where his army overwhelmed an army ten times its size. His tactics and leadership saw his empire continue to grow and he proclaimed that he would eventually control all of Japan.
|
| More
|
| When the Assassins first made contact with Nobunaga, he was sympathetic to their cause, and promised an alliance once he had unified Japan. However, this promise was made before Nobunaga held the Sword of Eden.
|
| Sakai Tadatsugu
|
| File:XXXXXXXXXXXXXXXXXXX.png
|
| Quote
|
Timeline
|
Location
|
| Every advance reveals a weakness. Wait, and strike.
|
1527-1596
|
Japan
|
| Story
|
| Sakai Tadatsugu served as one of Tokugawa Ieyasu's greatest generals, often called the "Four Guardians." He was the eldest of the four, having first served Ieyasu's father, Matsudaira Hirotada.
|
| More
|
| Tadatsugu was a brilliant tactician with a penchant for fooling his enemies with ruses. In the battle of Mikatagahara, which saw Iesyasu's army devastated by Takeda Shingen, some trickery from Tadagatsugu kept the enemy from pursuing Ieyasu's men as they retreated.
|
| Sakakibara Yasumasa
|
| File:XXXXXXXXXXXXXXXXXXX.png
|
| Quote
|
Timeline
|
Location
|
| Allocation of fiefs is the opposite of war: giving land, not taking it.
|
1548-1606
|
Japan
|
| Story
|
| Sakakibara Yasumasa served as one of Tokugawa Ieyasu's greatest generals, often called the "Four Guardians.” Yasumasa and Honda Tadakatsu were the same age, and both were appointed into Ieyasu's personal service when they became old enough.
|
| More
|
| Yasumasa earned the gratitude and trust of leyasu by staying to fight against Toyotomi Hideyoshi, despite having familal ties to Hideyoshi. Yasumasa was the most suspicious of the Assassins, though he was also the most impressed by their skills.
|
| Uesugi Kenshin
|
| File:XXXXXXXXXXXXXXXXXXX.png
|
| Quote
|
Timeline
|
Location
|
| Wars are to be won with swords and spears, not with rice and salt.
|
1530-1578
|
Japan
|
| Story
|
| Uesugi Kenshin was one of the most powerful daimyos of his time, ruling over the large Echigo province of Japan. In addition to his skill in battle, Kenshin was also a gifted administrator who greatly expanded industry and trade in his province.
|
| More
|
| When Takeda Shingen's army neared Echigo, Kenshin moved to halt their advance. They fought to a stalemate, which was the start of a fierce rivalry between the two daimyos. This rivalry ended when Shingen was assassinated over the Sword of Eden.
|
| Yamauchi Kazutoyo
|
| File:XXXXXXXXXXXXXXXXXXX.png
|
| Quote
|
Timeline
|
Location
|
| I wonder if my station is too much for one of such humble origins.
|
1546-1605
|
Japan
|
| Story
|
| At only fourteen years of age, Yamauchi Kazutoyo's father died, leaving the young man to wander as a ronin for several years. He eventually came into the service of Oda Nobunaga, and worked his way up to becoming a trusted general.
|
| More
|
| After Nobunaga's death, Kazutoyo served Toyotomi Hideyoshi, who had taken up Nobunaga's goal of unifying all of Japan. When Hideyoshi died in 1598, Kazutoyo chose to serve Tokugawa Ieyasu, and played a small but critical role in the latter's rise to power in 1600.
|
Kingdom
| Abu'l Nuqoud
|
| File:XXXXXXXXXXXXXXXXXXX.png
|
| Quote
|
Timeline
|
Location
|
| These noble robes did little more than muffle their shouts of hate.
|
?-1191
|
Kingdom
|
| Story
|
| This wealthy Damascus merchant had little regard for what he sold or who he sold it to. He was fond of throwing both parties and insults, and was convinced that he was the subject of cruel words and misgivings from the people of the city.
|
| More
|
| Abu'l Nugoud [sic] was one of the nine Templars on Altaïr's list. Altaïr attended one of Abul's lavish partes (paid for with funds embezzled from the city treasury), only to discover that Abu'l had poisoned the wine the partygoers had been drinking.
|
| Adha the Chalice
|
| File:XXXXXXXXXXXXXXXXXXX.png
|
| Quote
|
Timeline
|
Location
|
| A chalice is merely a vessel for libation, for good or ill.
|
?-1190
|
Kingdom
|
| Story
|
| The Chalice was supposedly an object of great power, which was rumored to be able to unite even the most bitter of rivals. Both the Assassins and Templars sought it, but at first only the Templars were aware that the Chalice was actually a woman, Adha.
|
| More
|
| Altaïr sought Adha to keep the Chalice's ability to sway the minds of people out of the hands of the Templars. He fought for her safety, but could only watch as a Templar ship took her away. He would never see her alive again.
|
| Jabal
|
| File:XXXXXXXXXXXXXXXXXXX.png
|
| Quote
|
Timeline
|
Location
|
| End the life of Montferrat, that we may call this city free.
|
?
|
Kingdom
|
| Story
|
| The Levantine Assassins maintained presence in three major cities; Jerusalem, Damascus, and Acre. These agents were called Rafiqs, and it was through them that final approval for an assassination was given.
|
| More
|
| Jabal was the Rafiq of Acre, and he urged Altaïr to gather as much information on his targets as possible before attempting to assassinate them.
|
| Jacques de Molay
|
| File:XXXXXXXXXXXXXXXXXXX.png
|
| Quote
|
Timeline
|
Location
|
| If my death means my brothers can continue on, then so be it.
|
1244-1314
|
Kingdom
|
| Story
|
| As the last Grand Master of the Templar order before the organization was dissolved, at least publicly, Jacques de Molay became renowned as a martyr after being accused of heresy and subsequently burned at the stake.
|
| More
|
| By accepting the dubious charges brought before him, de Molay allowed the world to believe that the Templars were gone for good. In actuality, his widely publicized death drew attention away from the Templars, allowing them to rebuild the organization in secret.
|
| Majd Addin
|
| File:XXXXXXXXXXXXXXXXXXX.png
|
| Quote
|
Timeline
|
Location
|
| Do you know what it feels like, to determine another man's fate.
|
?-1191
|
Kingdom
|
| Story
|
| While the Sultan Saladin had left Jerusalem to fight the armies of King Richard, Majd Addin took the opportunity to seize control of the city. He did this mainly through fear, conducting public executions of anyone who spoke against him.
|
| More
|
| Majd Addin was one of the nine Templars on Altaïr's list. Altaïr learned that Addin was about to execute several people of Jerusalem, one of whom was a fellow Assassin. Altaïr intervened, and while the Assassin was saved, the rest were not.
|
| Malik Al-Sayf
|
| File:XXXXXXXXXXXXXXXXXXX.png
|
| Quote
|
Timeline
|
Location
|
| As we share the glory of our victories, so too should we share the pain of our defeat.
|
1165-1228
|
Kingdom
|
| Story
|
| When Altaïr let his arrogance get the better of him it was Malik who suffered, losing his brother and his left arm in the battle that followed. However, after Altaïr regained his honor the two men reconciled, and Malik would become second in command of the Brotherhood.
|
| More
|
| After his injury, Malik served as the Rafiq of Jerusalem, offering a point of contact and advice to the Assassins who had business to perform in the city.
|
| Niccolò Polo
|
| File:XXXXXXXXXXXXXXXXXXX.png
|
| Quote
|
Timeline
|
Location
|
| To us, Altaïr is entrusting the spirit of the Brotherhood. He is passing the torch to us.
|
1230-1294
|
Kingdom
|
| Story
|
| Niccolò and Maffeo Polo ran a successful trading post in Constantinople, and it was through this that they met and befriended Darim Ibn-La'Ahad. Darim then invited the two of them to Masyaf, and there the brothers began their training as Assassins.
|
| More
|
| Altaïr knew Masyaf would fall under the approaching Mongols and the Sword of Eden. Therefore he imparted as much knowledge as he could to Niccolò Polo, and told him and his brother Maffeo to start a new Brotherhood in Constantinople.
|
| Robert Fitzwalter
|
| File:XXXXXXXXXXXXXXXXXXX.png
|
| Quote
|
Timeline
|
Location
|
| Our so-called King meets with his Templar advisers in London. Shall we pay them a visit?
|
?-1235
|
Kingdom
|
| Story
|
| An aristocrat and a soldier of King John during the wars in Normandy, Robert Fitzwalter cast away that allance after seeing King John abusing his authonty. Fitzwalter then became the leader of the baronial uprising against the king.
|
| More
|
| After meeting with his fellow Assassins to figure out how to depose King John, Htzwalter began a campaign to unite all of the English barons and force John off the throne. This attempt soon led to civil war, and the barons had to ask France for aid.
|
| Sibrand
|
| File:XXXXXXXXXXXXXXXXXXX.png
|
| Quote
|
Timeline
|
Location
|
| I followed my orders, believeing in my cause. Same as you.
|
1157-1191
|
Kingdom
|
| Story
|
| Grand Master of the Teutonic Knights, Sibrand was a fierce and skiled warrior capable of besting his enemies just as skillfully with words as he was with weapons.
|
| More
|
| As Sibrand witnessed more and more of his Templar brethren meeting their end at Altaïr's hands, he grew increasingly paranoid. He doubled his personal guard and took refuge on his ship. Ultimately, he faced same fate that befell the rest of the Templars on Altaïr's list.
|
| Tamir
|
| File:XXXXXXXXXXXXXXXXXXX.png
|
| Quote
|
Timeline
|
Location
|
| I serve a far nobler cause than mere profit.
|
1147-1191
|
Kingdom
|
| Story
|
| Tamir ran a black market in Damascus, specializing in weapons and armor. He supplied both sides of the conflict, Saracens and Crusaders, and would often gloat about the amount of death caused by his wares.
|
| More
|
| Tamir was one of the nine Templars on Altaïr's list. He was also the first clue that the nine men were connected somehow, as in his dying words he warned Altaïr that his brethren would not take kindly to his demise.
|
| Willikin of the Weald
|
| File:XXXXXXXXXXXXXXXXXXX.png
|
| Quote
|
Timeline
|
Location
|
| Your barons better than the King if they take aid from the French.
|
?-1257
|
Kingdom
|
| Story
|
| Willikin of the Weald, also known as William of Cassingham, was a squire during the First Barons' War. Willikin rallied a guerilla force to oppose Prince Louis VIII of France, who had tried to depose King John during the First Barons' War.
|
| More
|
| Willikin was an expert archer and Master Assassin of the English Brotherhood. While not an admirer of the despotic King John, Willkin still favored the monarchy over baronial rule and was a supporter of John's son, Henry.
|
Mongolia
| Aleksander Nevsky
|
| File:XXXXXXXXXXXXXXXXXXX.png
|
| Quote
|
Timeline
|
Location
|
| It's better to die for your country than to leave it.
|
1120-1263
|
Mongolia
|
| Story
|
| Alexander Nevsky was a deft military tactician and an emphatic leader who successfully defended Russia's borders on several occasions. He became Grand Prince of Vladimir in 1252, and his alliance with the Golden Horde kept Russia from being a Mongolian target.
|
| More
|
| While Nevsky was never identified as a Templar, his somewhat improbable alliance with the Khans implies such an association. It was on his way back from visiting the Golden Horde that Nevsky fell mysteriously ill and passed away.
|
| Attar of Nishapur
|
| File:XXXXXXXXXXXXXXXXXXX.png
|
| Quote
|
Timeline
|
Location
|
| Be the Eternal Mirror that you saw.
|
1145-1221
|
Mongolia
|
| Story
|
| A poet, traveler, and Sufi mystic, Attar of Nishapur studied under many great Sufi Shaykhs and returned to his native Persia to spread this knowledge.
|
| More
|
| Attar fell victim to the seemingly unstoppable spread of the Mongol Empire. In April of 1221, the Mongols entered the Persian city of Nishapur and slaughtered everyone they came across.
|
| Ilkhanate Captain
|
| File:XXXXXXXXXXXXXXXXXXX.png
|
| Quote
|
Timeline
|
Location
|
| Loyalty to the Khan is what guides our arrows.
|
N/A
|
Mongolia
|
| Story
|
| The Ilkhanate was a khanate created as the Mongol Empire expanded across Central Asia and into the Levant. It was ruled over by Hülegü Khan, and at its height it spread all the way into Turkey.
|
| More
|
| N/A
|
| Jochi Khan
|
| File:XXXXXXXXXXXXXXXXXXX.png
|
| Quote
|
Timeline
|
Location
|
| Am I not the eldest Khan? I will have more than a quartered empire.
|
|
Mongolia
|
| Story
|
| Despite being the eldest of Genghis Khan's sons, and despite numerous successes on the battlefield, Jochi was not named as the Great Khan's successor, While controversial at the time, this issue became moot when Jochi passed away before his father did.
|
| More
|
| Jochi Khan did not know that he was being tracked by Darim Ibn-LaAhad as he moved through Central Asia. Under cover of night, Darim snuck into Jochi's tent and placed a few drops of poison into his waterskin.
|
| Kheshig
|
| File:XXXXXXXXXXXXXXXXXXX.png
|
| Quote
|
Timeline
|
Location
|
| The Kheshig battle is at the tents of the Khan.
|
N/A
|
Mongolia
|
| Story
|
| The Kheshig were the personal guard of the Khan and his family. They did not go to war with the rest of the Mongolian army, as they were tasked with seeing to the Khan's personal safety at all times.
|
| More
|
| N/A
|
| Maria Thorpe
|
| File:XXXXXXXXXXXXXXXXXXX.png
|
| Quote
|
Timeline
|
Location
|
| You see? Years of being boisterous finally paid off.
|
1161-1228
|
Mongolia
|
| Story
|
| Maria Thorpe, a former Templar, switched aliances to the Assassins when after several meetings with Altaïr. The two eventually started a family, and it was that family that traveled to Mongolia to see to the end of Genghis Khan.
|
| More
|
| Maria did not take an active role in the assassination of Genghis Khan. However, she was on hand to tend to Altaïr's wounds when his first attempt on the Khan's life was unsuccessful.
|
| Mongolian Assassin
|
| File:XXXXXXXXXXXXXXXXXXX.png
|
| Quote
|
Timeline
|
Location
|
| We cannot hope to fight them, but we can still sabotage their efforts.
|
N/A
|
Mongolia
|
| Story
|
| The Mongolian chapter of the Assassin Brotherhood was one of the few groups who resisted the expansion of the Mongol Horde. Though few in number, the Mongolian Assassins managed to curtail the Horde's campaigns on several occasions.
|
| More
|
| N/A
|
| Nergüi
|
| File:XXXXXXXXXXXXXXXXXXX.png
|
| Quote
|
Timeline
|
Location
|
| I made a promise to an old friend.
|
1212-1279
|
Mongolia
|
| Story
|
| While still an Apprentice, the Mongolian Assassin Nergüi was captured. He was tortured while imprisoned, leaving his face permanently scarred. He was eventually rescued by Qulan Gal and Darim Ibn-La'Ahad when the two of them assassinated Genghis Khan.
|
| More
|
| Nergüi would go on to be an effective and influential member of the Mongolian Assassins. His greatest achievement was the assassination of Hülegü Khan, in retribution for Hülegü's sacking of Masyaf and the destruction of the Levantine Assassins.
|
| Qulan Gal
|
| File:XXXXXXXXXXXXXXXXXXX.png
|
| Quote
|
Timeline
|
Location
|
| But there is another way to bring down the Khan.
|
?
|
Mongolia
|
| Story
|
| Qulan Gal was an Assassin of the Mongolian Brotherhood as well as an unmatched archer. His skill with the bow led to his role in the assassination of Genghis Khan, elevating Qulan Gal to a legendary status among the Mongolian Assassins.
|
| More
|
| Little is known about Qulan Gal beyond his involvement in the assassination of Genghis Khan. Such was his legacy, though, that the Italian Brotherhood had him entombed below the Rocca di Ravaldino in Forlì, Italy.
|


