Welcome to Assassin's Creed Wiki! Log in and join the community.
A Night to Remember/Gallery: Difference between revisions
Jump to navigation
Jump to search
imported>Cristophorus35 New gallery page created: A Night to Remember |
imported>Lady Kyashira mNo edit summary |
||
| (One intermediate revision by one other user not shown) | |||
| Line 1: | Line 1: | ||
{{GalleryHeader}}<gallery> | {{GalleryHeader}} | ||
<gallery position="center" widths="180" captionalign="center"> | |||
Evie using the Shroud neckless M4.JPG|Evie, dressed in her ballgown, awaits for the Gladstones' carriage to arrive | Evie using the Shroud neckless M4.JPG|Evie, dressed in her ballgown, awaits for the Gladstones' carriage to arrive | ||
Ready for the grand finale M4.JPG|The carriage of Mr & Mrs. Gladstone arrives | Ready for the grand finale M4.JPG|The carriage of Mr & Mrs. Gladstone arrives | ||
Abbeline ready to help M4.JPG|Abberline, dressed like a Royal Guard, | Abbeline ready to help M4.JPG|Abberline, dressed like a Royal Guard, unboards the carriage to greet Evie | ||
Elegant Jacob M4.JPG|Jacob tells Evie they must enter unarmed | Elegant Jacob M4.JPG|Jacob tells Evie they must enter unarmed | ||
To the Palace M4.JPG|Evie enters the carriage | To the Palace M4.JPG|Evie enters the carriage | ||
Jacob and Evie enter the palace M4.JPG|The carriage reaches the gates of the palace while Mr. & Mrs. Gladstone ask themselves what | Jacob and Evie enter the palace M4.JPG|The carriage reaches the gates of the palace while Mr. & Mrs. Gladstone ask themselves what it's doing there | ||
Buckingham Palace M4.JPG|Insides of Buckingham Palace | Buckingham Palace M4.JPG|Insides of Buckingham Palace | ||
Palace' Main Hall M4.JPG|Evie follows Jacob into the outdoor ballroom | Palace' Main Hall M4.JPG|Evie follows Jacob into the outdoor ballroom | ||
Frye Twins to action M4.JPG|The Frye twins separate to | Frye Twins to action M4.JPG|The Frye twins separate to scout the terrain | ||
Evie use some help to get into the Palace's upper levels M4.JPG|Evie kidnapping a Royal Guard to gain access to the Palace's upper levels | Evie use some help to get into the Palace's upper levels M4.JPG|Evie kidnapping a Royal Guard to gain access to the Palace's upper levels | ||
More stairs M4.JPG|Evie passes by the guards to reach the White Drawing Room | More stairs M4.JPG|Evie passes by the guards to reach the White Drawing Room | ||
| Line 51: | Line 52: | ||
Evie faces Starrick once more M4.JPG|Evie stands up and fights once more | Evie faces Starrick once more M4.JPG|Evie stands up and fights once more | ||
Starrick stangles Evie again M4.JPG|Evie is overpowered by Starrick again | Starrick stangles Evie again M4.JPG|Evie is overpowered by Starrick again | ||
Jacob joins the fight M4.JPG|Jacob tries to free his sister from | Jacob joins the fight M4.JPG|Jacob tries to free his sister from Starrick's grip, to no avail | ||
Henry joins the fight M4.JPG|Henry Green comes to help the Frye twins | Henry joins the fight M4.JPG|Henry Green comes to help the Frye twins | ||
Knife joins the fight M4.JPG|Henry Green intervenes by throwing a knife into Starrick's shoulder | Knife joins the fight M4.JPG|Henry Green intervenes by throwing a knife into Starrick's shoulder | ||
Henry uses his Hidden blade M4.JPG|Henry managed to inflict a mortal wound, but it was quickly healed by the Shroud | Henry uses his Hidden blade M4.JPG|Henry managed to inflict a mortal wound, but it was quickly healed by the Shroud | ||
Henry realices regeneration M4.JPG|The Indian Assassin | Henry realices regeneration M4.JPG|The Indian Assassin realizes the abilities of the Shroud | ||
Starrick is pissed of M4.JPG|Starrick looks at Henry, displeased | Starrick is pissed of M4.JPG|Starrick looks at Henry, displeased | ||
Henry vs Starrick M4.JPG|Starrick grabs Henry and throws him back | Henry vs Starrick M4.JPG|Starrick grabs Henry and throws him back | ||
| Line 67: | Line 68: | ||
He could have created a paradise M4.JPG|Starrick saying his last words | He could have created a paradise M4.JPG|Starrick saying his last words | ||
You are but one man M4.JPG|Evie saying that London belongs to the people | You are but one man M4.JPG|Evie saying that London belongs to the people | ||
Jacob collects blood M4.JPG|Jacob dips his | Jacob collects blood M4.JPG|Jacob dips his handkerchief in Starrick's blood | ||
Evie collects blood M4.JPG|Evie dips her | Evie collects blood M4.JPG|Evie dips her handkerchief in Starrick's blood | ||
London is free for know M4.JPG|The Grand Master, Crawford Starrick, has fallen | London is free for know M4.JPG|The Grand Master, Crawford Starrick, has fallen | ||
Jacob apologies to her sister M4.JPG|Jacob apologies to | Jacob apologies to her sister M4.JPG|Jacob apologies to his sister | ||
Evie apologies to his brother M4.JPG|Evie apologies to her brother | Evie apologies to his brother M4.JPG|Evie apologies to her brother | ||
Henry is fine M4.JPG|Henry wakes up and Evie runs to his side | Henry is fine M4.JPG|Henry wakes up and Evie runs to his side | ||
A brotherhood of love M4.JPG|Evie expresses her love and affection for Henry Green | A brotherhood of love M4.JPG|Evie expresses her love and affection for Henry Green | ||
Dont mind me Im dead M4.JPG|Henry and Evie | Dont mind me Im dead M4.JPG|Henry and Evie staring into each other's eyes | ||
The queen regards her heroes M4.JPG|Jacob, Evie, and Henry awaiting a royal carriage, driven by Abberline | The queen regards her heroes M4.JPG|Jacob, Evie, and Henry awaiting a royal carriage, driven by Abberline | ||
Happy Abbeline M4.JPG|Abberline is happy to see the Frye twins unharmed | Happy Abbeline M4.JPG|Abberline is happy to see the Frye twins unharmed | ||
| Line 83: | Line 84: | ||
Henry is left alone M4.JPG|Henry is left alone | Henry is left alone M4.JPG|Henry is left alone | ||
A good future ahead M4.JPG|Henry looks at the Frye twins with a smile | A good future ahead M4.JPG|Henry looks at the Frye twins with a smile | ||
To Eternity M4.JPG|Evie and Jacob | To Eternity M4.JPG|Evie and Jacob run to the Train Hideout | ||
</gallery> | </gallery> | ||
Latest revision as of 12:39, 7 June 2020

|
Words are nothing without art A Night to Remember/Gallery is a gallery page, information about this gallery's article must not be placed here unless under the caption of an image. |
-
 Evie, dressed in her ballgown, awaits for the Gladstones' carriage to arrive
 -
 The carriage of Mr & Mrs. Gladstone arrives
 -
 Abberline, dressed like a Royal Guard, unboards the carriage to greet Evie
 -
 Jacob tells Evie they must enter unarmed
 -
 Evie enters the carriage
 -
 The carriage reaches the gates of the palace while Mr. & Mrs. Gladstone ask themselves what it's doing there
 -
 Insides of Buckingham Palace
 -
 Evie follows Jacob into the outdoor ballroom
 -
 The Frye twins separate to scout the terrain
 -
 Evie kidnapping a Royal Guard to gain access to the Palace's upper levels
 -
 Evie passes by the guards to reach the White Drawing Room
 -
 Access to the upper levels
 -
 White Drawing Room
 -
 Palace's Upper Balcony
 -
 Royal Guards scouting the area
 -
 Evie finds Mary Anne Disraeli at the ball
 -
 Queen Victoria
 -
 Evie apologizes for Mr. Gladstone's mishap
 -
 Starrick holds Evie close and silently removes the key around her neck
 -
 Evie dancing with Starrick
 -
 The ball
 -
 Jacob dressing in a suit
 -
 Jacob retrieves his weapons from the hiding spot and redresses in his Assassin gear
 -
 Jacob frees a group of Royal Guards
 -
 Jacob reaches the rooftop to signal Evie
 -
 Evie hitting Starrick in the groin
 -
 Evie notices Starrick's absence
 -
 The broken necklace lying on the ground
 -
 Jacob notices explosions near the entrance to the Vault
 -
 The Vault has been breached
 -
 Jacob slides down the steps of the vault
 -
 The main hall of the Vault
 -
 Starrick notices Jacob's arrival
 -
 Starrick starts to strangle Jacob
 -
 Evie puts on her Assassin gear and discards her dress
 -
 The sounds of the explosions scare the people at the Palace
 -
 Everyone investigates the source of said explosions
 -
 Evie arrives at the Vault
 -
 Jacob being overpowered by Starrick
 -
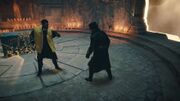
 Evie fights Starrick
 -
 Evie about to stab Starrick with her Hidden Blade
 -
 Starrick's injury is regenerated by the Shroud
 -
 Starrick is healed completely
 -
 Starrick strangles Evie
 -
 Jacob returns to the fight
 -
 Starrick about to be stabbed by Jacob's Hidden Blade
 -
 The Grand Master is wounded once more
 -
 Starrick laughs as he takes Jacob's arm and pulls the Hidden Blade out of his body
 -
 Jacob is strangled again
 -
 Evie stands up and fights once more
 -
 Evie is overpowered by Starrick again
 -
 Jacob tries to free his sister from Starrick's grip, to no avail
 -
 Henry Green comes to help the Frye twins
 -
 Henry Green intervenes by throwing a knife into Starrick's shoulder
 -
 Henry managed to inflict a mortal wound, but it was quickly healed by the Shroud
 -
 The Indian Assassin realizes the abilities of the Shroud
 -
 Starrick looks at Henry, displeased
 -
 Starrick grabs Henry and throws him back
 -
 Henry is bested by Starrick and rendered unconscious
 -
 Evie manages to overwhelm Starrick in combat
 -
 Jacob runs forward and holds Starrick down
 -
 Evie removes the Shroud as she and Jacob throw the Grand Master to the ground
 -
 Starrick, injured, is unable to stand up and continue fighting
 -
 The Assassins about to deliver the killing blow
 -
 Jacob, Evie and Starrick in the Memory Corridor
 -
 Starrick saying his last words
 -
 Evie saying that London belongs to the people
 -
 Jacob dips his handkerchief in Starrick's blood
 -
 Evie dips her handkerchief in Starrick's blood
 -
 The Grand Master, Crawford Starrick, has fallen
 -
 Jacob apologies to his sister
 -
 Evie apologies to her brother
 -
 Henry wakes up and Evie runs to his side
 -
 Evie expresses her love and affection for Henry Green
 -
 Henry and Evie staring into each other's eyes
 -
 Jacob, Evie, and Henry awaiting a royal carriage, driven by Abberline
 -
 Abberline is happy to see the Frye twins unharmed
 -
 Queen Victoria steps out the carriage to approach and talk with the Assassins
 -
 The Assassins are inducted into the Order of the Secret Garter
 -
 Queen Victoria informs the Frye twins she may call on them
 -
 Abberline waves to the Frye twins as he drives off
 -
 Henry is left alone
 -
 Henry looks at the Frye twins with a smile
 -
 Evie and Jacob run to the Train Hideout


